Character Frames
This page will tell you all about how the frames for every character are determined for gcsim.
Assumptions
The following descriptions assume:
- Windows as the operating system.
- Computer specs are good enough to record without significant frame drops.
- Computer supports virtualization for WSL.
- Access to the character ingame.
- Top level folder for all character videos is called
genshin-frames. - OBS install folder is
C:\Program Files\obs-studio.
The file and folder names are just examples.
Setup
Prepare Genshin
- Open Genshin.
- Open the Paimon Menu.
- Open the Settings.
- Go to the Graphics tab.
- Only if you do not have a second monitor: Set the Display Mode to use a windowed resolution so that you can later add OBS stats.
- Set everything to lowest if it is not possible to record without significant frame drops.
- Make sure that FPS is set to 60.
Install Video Player (mpv)
For the purposes of character frames, a video player should be able to:
- step frame-by-frame in both the forward and backward direction to count frames.
- show chapter markers to make it easier to extract timestamps to put in the YouTube description of the video.
A suitable video player that is able to do both of these things is mpv. mpv is a free, open source and cross-platform video player.
- Download the mpv archive for Windows from here.
- Create a folder that will contain the mpv video player. In this example, it is called
mpvas well. - Extract the content of the mpv archive into the
mpvfolder.
The current folder structure for mpv should look like this:
└── mpv
    ├── updater.bat
    └── updater.ps1
- Open
updater.bat. - Let the installer run through or answer the shown questions for customization.
After the default installation, the folder structure for mpv should look like this:
└── mpv
    ├── 7z
    │   └── ...
    ├── doc
    │   └── ...
    ├── installer
    │   └── ...
    ├── mpv
    │   └── ...
    ├── d3dcompiler_43.dll
    ├── mpv.com
    ├── mpv.exe
    ├── settings.xml
    └── updater.bat
Set mpv As Default Video Player for .mp4 Files
- Find a .mp4 file.
- Right-click on the .mp4 file.
- Click on
Open With>Choose another app. - Click on
mpvin the shown list. - Check the
Always use this app to open .mp4 filesoption towards the bottom. - Click on
OKat the bottom.
Now every .mp4 file will always be opened in mpv.
Install Recording Software (OBS)
Open Broadcaster Software (OBS) is a free, open-source recording software available for Windows, macOS and Linux. Download and install the latest version of OBS from here.
Import Profile
- Download a basic profile for OBS from here. This profile sets the recording quality to a fairly high level (1920x1080 resolution, 60 fps, 2500 Kbps bitrate).
Feel free to lower the resolution or bitrate to save disk space and lower the computer's load as long as the needed frames can still be counted.
- Extract the
frames-profilefolder inside of theframes-profile.gzarchive to a place where it can be found again. - Open OBS if not already opened.
- Click on
Profilein OBS's top menu. - Click on
Importin theProfilemenu. - Select the
frames-profilefolder and open it.
Select Profile
- Open OBS if not already opened.
- Click on
Profilein OBS's top menu. - Click on
frames-profiletowards the bottom of theProfilemenu.
Now the frames-profile profile is enabled.
Configure Recording Hotkeys
- Open OBS if not already opened.
- Click on
Filein OBS's top menu. - Click on
Settingsin theFilemenu. - Click on
Hotkeyson the left side in theSettingsmenu. - Click in the text box for the
Start Recordinghotkey. - Press the desired button for starting the recording on the keyboard.
- Click in the text box for the
Stop Recordinghotkey. - Press the desired button for stopping the recording on the keyboard.
- Click on
Applyin the bottom left of theSettingsmenu.
The same button can be used for both Start Recording and End Recording.
Install Input Overlay
Having an input overlay in OBS is useful to see at which points in time buttons were pressed. For this purpose, someone implemented a plugin called Input Overlay that works on Windows and Linux.
- Download and install the latest version of the plugin from here. For ease of installation, choose the Windows installer that ends with
windows-x64-Installer.exe.
During installation make sure that the installation folder is the same as the one during the installation of OBS. Unless a custom install folder was chosen, this does not need to be changed.
- Download the presets archive from the same page that ends with
presets.zip. - Open the presets archive.
- Navigate to
C:\Program Files\obs-studio\data\obs-plugins\input-overlay. - Extract the
mouse,qwertyandwasdfolders from the presets archive into the folder from the previous step.
Arrange OBS Scene
Add Genshin
- Open OBS if not already opened.
- Open Genshin.
- Click on the ➕ button at the bottom of OBS's
Sourcestab. - Click on
Window Capturein the ➕ menu. This opens aCreate/Select Sourcewindow. - Choose
Genshinas the new source name in theCreate/Select Sourcewindow. - Click on
OK. This opens aPropertieswindow for the new source. - Click on the drop-down next to
Windowin thePropertieswindow. - Look for
[GenshinImpact.exe]: Genshin Impactin the drop-down list and click on it. - Click on
OKin thePropertieswindow.
It is normal that OBS's recording window shows a black screen for Genshin, because it can only record it when the Genshin window is not minimized.
Add Mouse Input Overlay
- Open OBS if not already opened.
- Click on the ➕ button at the bottom of OBS's
Sourcestab. - Click on
Input Overlayin the ➕ menu. This opens aCreate/Select Sourcewindow. - Choose
Mouseas the new source name in theCreate/Select Sourcewindow. - Click on
OK. This opens aPropertieswindow for the new source. - Click on
Browsenext toOverlay image file. - Navigate to
C:\Program Files\obs-studio\data\obs-plugins\input-overlay\mouse. - Select
mouse.pngand open it. - Click on
Browsenext toOverlay config file. - Navigate to
C:\Program Files\obs-studio\data\obs-plugins\input-overlay\mouse. - Select
mouse-no-movement.jsonand open it. - Click on
OKin thePropertieswindow. - Move the newly added source in OBS's recording window via drag-and-drop to where it doesn't obstruct the recording.
Add Keyboard Input Overlay
- Open OBS if not already opened.
- Click on the ➕ button at the bottom of OBS's
Sourcestab. - Click on
Input Overlayin the ➕ menu. This opens aCreate/Select Sourcewindow. - Choose
Keyboardas the new source name in theCreate/Select Sourcewindow. - Click on
OK. This opens aPropertieswindow for the new source. - Click on
Browsenext toOverlay image file. - Navigate to
C:\Program Files\obs-studio\data\obs-plugins\input-overlay\wasd. - Select
wasd.pngand open it. - Click on
Browsenext toOverlay config file. - Navigate to
C:\Program Files\obs-studio\data\obs-plugins\input-overlay\wasd. - Select
wasd-minimal.jsonand open it. - Click on
OKin thePropertieswindow. - Move the newly added source in OBS's recording window via drag-and-drop to where it doesn't obstruct the recording.
Add Swap Input Overlay
- Open OBS if not already opened.
- Click on the ➕ button at the bottom of OBS's
Sourcestab. - Click on
Input Overlayin the ➕ menu. This opens aCreate/Select Sourcewindow. - Choose
Swapas the new source name in theCreate/Select Sourcewindow. - Click on
OK. This opens aPropertieswindow for the new source. - Click on
Browsenext toOverlay image file. - Navigate to
C:\Program Files\obs-studio\data\obs-plugins\input-overlay\qwerty. - Select
qwerty.pngand open it. - Click on
Browsenext toOverlay config file. - Navigate to
C:\Program Files\obs-studio\data\obs-plugins\input-overlay\qwerty. - Select
qwerty.jsonand open it. - Click on
OKin thePropertieswindow. - Click on the newly added source in OBS's recording window. This will highlight the source's boundary as a red rectangle.
- Crop the newly added source to only show the buttons involved in Swap (for example: number keys 1, 2, 3, 4 or a selection of those) by holding the
ALTkey while dragging the small red rectangles on the edges of the red rectangle. - Move the newly added source in OBS's recording window via drag-and-drop to where it doesn't obstruct the recording.
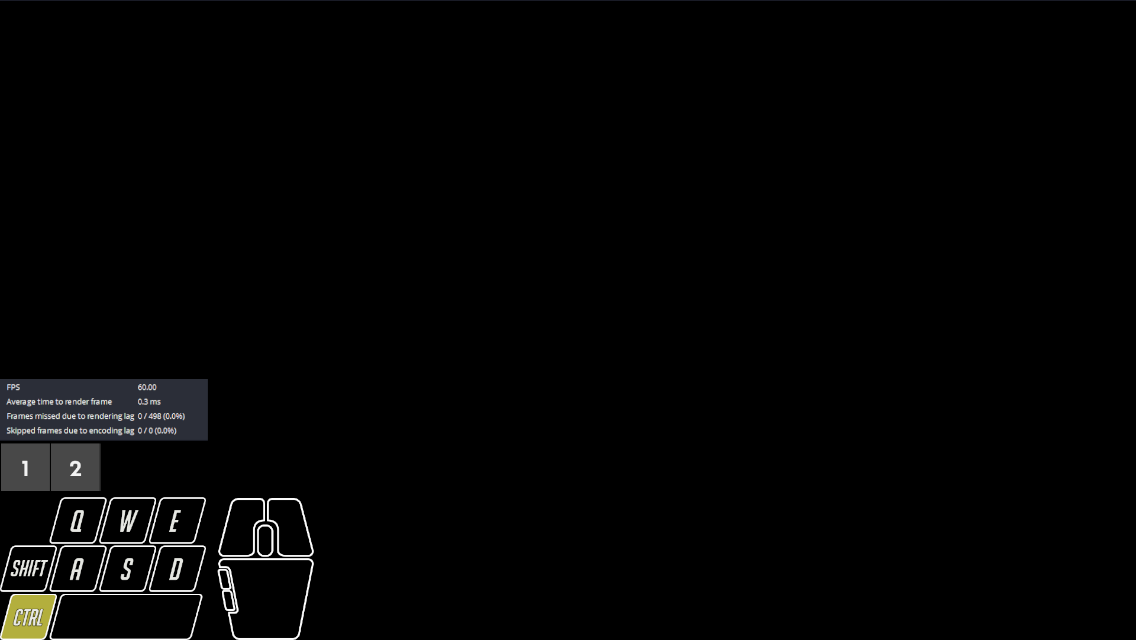
Add OBS Stats
OBS stats are used to quickly check whether significant frame drops occurred in the recording.
- Open OBS if not already opened.
- Click on
Viewin OBS's top menu. - Click on
Statsin theViewmenu. This will open a new window for OBS stats. - Click on the ➕ button at the bottom of OBS's
Sourcestab. - Click on
Display Capturein the ➕ menu. This opens aCreate/Select Sourcewindow. - Choose
Statsas the new source name in theCreate/Select Sourcewindow. - Click on
OK. This opens aPropertieswindow for the new source. - Only if you have a second monitor: Click on the drop-down next to
Displayin thePropertieswindow. - Only if you have a second monitor: Select the monitor that will not be displaying Genshin.
- Click on
OKin thePropertieswindow. - Click on the newly added source in OBS's recording window. This will highlight the source's boundary as a red rectangle.
- Crop the newly added source to only show the OBS stats window by holding the
ALTkey while dragging the small red rectangles on the edges of the red rectangle. - Move the newly added source in OBS's recording window via drag-and-drop to where it doesn't obstruct the recording.
Final Scene
OBS's recording window should now look something like this:
Optional: Install Audio Mixer (Voicemeeter Banana)
An Audio Mixer is needed if you want to listen to something else during recording without the audio being in that recording. Voicemeeter Banana is a free audio mixer available for Windows.
Click here for a very good tutorial on how to set up Voicemeeter Banana with music audio split from the other audio.
Split Spotify Audio in OBS
Spotify is just an example. You can substitute Spotify for any other program playing audio.
Assumptions:
- all audio except Spotify audio is playing on the
Voicemeeter Input (VB-Audio VoiceMeeter VAIO)audio device which should be yourDefaultdevice if you followed the tutorial - Spotify audio is playing on a different audio device (example from the video:
CABLE Input (VB-Audio Virtual Cable))
In this case, you do not have to configure anything in OBS.
You can confirm that the Spotify audio is not being recorded by OBS, by checking that the green-yellow-red line below Desktop Audio in OBS's Audio Mixer tab does not move when Spotify is playing.
Prepare Helper Scripts
There are two helper scripts which need to be downloaded to make it easier to deal with the huge amount of videos that are recorded for each character.
What they do is explained in a later section.
Install WSL
In order to be able to use the helper scripts, you need to install the Windows Subsystem for Linux (WSL) by following the instructions from here.
Make sure to put the WSL credentials into a password manager or write them on a piece of paper.
If you run into the Please enable the Virtual Machine Platform Windows feature and ensure virtualization is enabled in the BIOS. error message when trying to open WSL, then do the following:
- Type
Turn Windows features on or offinto the Windows search bar. - Open the first result.
- Make sure that
Hyper-V,Virtual Machine PlatformandWindows Subsystem for Linuxare enabled. - Restart the computer.
- During restart, check if virtualization is enabled in the BIOS.
Install Necessary Packages
- Open WSL.
- Install
ffmpegviasudo apt install ffmpeg. - Install
gpacviasudo apt install gpac. - Install
mp4v2-utilsby typing these six commands:
wget http://archive.ubuntu.com/ubuntu/pool/universe/m/mp4v2/libmp4v2-2_2.0.0~dfsg0-6_amd64.deb
wget http://archive.ubuntu.com/ubuntu/pool/universe/m/mp4v2/mp4v2-utils_2.0.0~dfsg0-6_amd64.deb
sudo dpkg -i libmp4v2-2_2.0.0~dfsg0-6_amd64.deb
sudo dpkg -i mp4v2-utils_2.0.0~dfsg0-6_amd64.deb
rm libmp4v2-2_2.0.0~dfsg0-6_amd64.deb
rm mp4v2-utils_2.0.0~dfsg0-6_amd64.deb
- Install
coreutilsviasudo apt install coreutils. - Install
bcviasudo apt install bc.
If you run into an error like could not locate package ..., then you need to run sudo apt update && sudo apt upgrade.
Download Helper Scripts
- Download the helper scripts archive
frames-helper-scripts.gzfrom here. - Extract the helper scripts inside of the archive to the
genshin-framesfolder.
The current folder folder structure should look like this:
└── genshin-frames
    ├── chapter.sh
    └── merge-videos.sh
Install Macro Software (Wootomation)
In order to perform action cancels quickly and consistently, Macro software is required. Wootomation is a free, open-source Macro program available on Windows and Linux.
Certain mouse or keyboard manufacturers offer their own macro software solutions like Logitech G HUB or Razer Synapse. These solutions require owning the hardware of manufacturer, so they were not considered here.
- Download and install Wootomation from here.
- Open Wootomation.
- Click on
Settingsat the bottom left. - Make sure you are in the
Applicationtab on the left side. - Under
Delay Settings: EnableAuto-add Delay. - Under
Delay Settings: SetDefault Delay Valueto 25.
Macro Guidelines
For simplicity and gcsim purposes, these are the assumptions regarding macros regardless of the macro software used:
- 50 ms button press duration at base
- button press duration can be longer in case of holding button press
- minimum 25 ms delay between button presses
- 25 ms steps for changes in button press durations and delays
Optional: Enable Dark Mode
- Open Wootomation if not already opened.
- Click on
Settingsat the bottom left. - Click on
Appearancetab on the left side. - Switch the theme from
LighttoDark.
Add NA String Macro to General Collection
The Normal Attack strings of characters are always recorded by repeating a macro with a single left click.
- Rename the
Collection 1macro collection toGeneralby clicking, typing in the text field at the top and then clicking out of it. - Optional: Choose your favorite emoji at the top to represent the
Generalcollection. Example: ⚔️. - Click on
Add Macro. This opens aTrigger Keyswindow. - Click on
Recordin theTrigger Keyswindow. - Press any key to choose it as the trigger key.
- Click on
Savein theTrigger Keyswindow. - Choose a name and emoji in the top left. Example: ⚔️ and
NA String. - Click on
RecordbelowSequencein the middle. - Left-click once in some other place.
- Click on
StopbelowSequencein the middle. - Change
Type of keystrokeon the right side toMouse Down. - Click on
Add DelaybelowSequencein the middle. - Click on the three dots menu on the
Left Clickitem in the sequence. - Click on
Duplicate. - Change
Type of keystrokeon the right side toMouse Up. - Click on
Save Macroin the top right.
Lower Keyboard Repeat Delay
As of Wootomation 1.0.2, there is no proper way to toggle a macro so that it repeats until it is toggled off again. If the trigger key for a macro is held down, then it will perform it once, wait for a bit and then start spamming the macro. This delay is undesirable for the previously added NA String Macro.
As a workaround, the keyboard repeat delay has to be lowered.
- Press Windows Key + R.
- Type
control keyboard. - Press Enter.
- Set the
Repeat delayslider to be atShort. - Click
Apply.
Now, if a key is pressed down then it will start repeating it after a shorter amount of time than before.
Running Example: Nahida
For educational purposes, Nahida was chosen as the running example.
Before Recording
Create New Folder
Create new folder that will contain the videos for Nahida called nahida.
The current folder structure should look like this:
└── genshin-frames
    ├── nahida
    │   └── ...
    ├── chapter.sh
    └── merge-videos.sh
Write TODO List
Action abbreviations:
- NA = Normal Attack
- CA = Charge Attack (also used for Aimed Shot)
- E = Skill
- Q = Burst
- D = Dash or Alternate Sprint
- J = Jump
In general, if an action has a different version, then record the same hitmarks and cancels as the normal cancel. Examples:
- Raiden NA vs. Q CA
- Wanderer CA vs. E CA, Ganyu CA Lv.1 vs. CA Lv. 2, ...
- Bennett Tap E vs. Hold Lv. 1 E vs. Hold Lv. 2
- Childe Ranged Q vs. Melee Q
For NA/CA: If you are sure that it is just a simple infusion (Hu Tao, Xiao, ...) and the NA/CA therefore have the same frames, then do not record those versions.
Characters that have a Tap E and Hold E might also have a viable Short Hold E (shortest possible Hold E) version that needs to be recorded. Examples include Sayu and Kirara.
Due to lack of interest, Claymore CAs will not be covered here.
The fact that Catalyst N1s have different lengths depending on the previous action is not considered here.
Create a new file called nahida_todo.txt in the nahida folder.
The current folder structure should look like this:
└── genshin-frames
    ├── nahida
    │   └── nahida_todo.txt
    ├── chapter.sh
    └── merge-videos.sh
Hitmarks
Generally, every action or ability that has a hitmark should have it recorded including Alternate Sprints.
In the case of Bow NA/CA, it is more about release and travel instead of hitmark, because gcsim already assumes a default travel time. For other projectiles like Tighnari E or additional hitmarks of the Bow NA/CA like Tighnari's CA Lv. 2 Clusterbloom Arrow, it is recommended to pay attention to hitmarks in order to determine a reasonable default travel time.
This means the following is added to the Nahida TODO list:
NA String - hitmark
CA - hitmark

Tap E - hitmark
Tri-Karma Purification - hitmark
Hold E - hitmark
Optional: Duration
If you want to be sure of the duration of things like constructs (Zhongli E Pillar) or other deployable abilities (Kuki E Ring, Nahida Q Field), then record the duration.
This means the following is added to the Nahida TODO list:
Q - duration
Action Cancels
This section can vary depending on the character and weapon type used.
➔ is used instead of ->, because YouTube does not allow -> in its video descriptions.
Shared:
- NA String (including final NA into N1) (can be used to count Release for Bow characters)
- E ➔ N1/E/Q/D/J/Walk/Swap
- E ➔ E requires a Sacrificial weapon which means this is not easily possible for Polearm users unless they have multiple E charges
- Q ➔ N1/E/D/J/Walk/Swap
- D ➔ N1/E/Q/D/J/Walk/Swap
- only if D is an Alternate Sprint
Shared if consistently possible in the character's kit (Alhaitham, Xiao, Wanderer) (excluding Dragon Strike):
- Low Plunge ➔ N1/E/Q/D/J/Walk/Swap
- High Plunge ➔ N1/E/Q/D/J/Walk/Swap
Sword/Polearm:
- NA ➔ CA/Walk
- no need for NA ➔ E/Q/Swap, because they are the same as hitmark (if in doubt, double check)
- CA ➔ N1/E/Q/Walk/Swap
- CA ➔ CA is not possible without performing N1 ➔ CA first, so it is not needed
- CA ➔ D/J is the same as hitmark (if in doubt, double check)
Claymore:
- NA ➔ W
Bow:
- NA ➔ CA
- can be skipped if sure that it is same as release
- CA ➔ W
- can be used for CA ➔ N1/CA/E/Q/D/J/Swap as well
Catalyst:
- NA ➔ CA/E/Q/D/J/Walk/Swap
- CA ➔ N1/CA/E/Q/D/J/Walk/Swap
- E ➔ CA
- Q ➔ CA
- D ➔ CA
- only if D is an Alternate Sprint
This means the following is added to the Nahida TODO list:
NA String (including N4 ➔ N1)

N1 ➔ CA
N1 ➔ E
N1 ➔ Q
N1 ➔ D
N1 ➔ J
N1 ➔ Walk
N1 ➔ Swap

N2 ➔ CA
N2 ➔ E
N2 ➔ Q
N2 ➔ D
N2 ➔ J
N2 ➔ Walk
N2 ➔ Swap

N3 ➔ CA
N3 ➔ E
N3 ➔ Q
N3 ➔ D
N3 ➔ J
N3 ➔ Walk
N3 ➔ Swap

N4 ➔ CA
N4 ➔ E
N4 ➔ Q
N4 ➔ D
N4 ➔ J
N4 ➔ Walk
N4 ➔ Swap

CA ➔ N1
CA ➔ CA
CA ➔ E
CA ➔ Q
CA ➔ D
CA ➔ J
CA ➔ Walk
CA ➔ Swap

Tap E ➔ N1
Tap E ➔ CA
Tap E ➔ E
Tap E ➔ Q
Tap E ➔ D
Tap E ➔ J
Tap E ➔ Walk
Tap E ➔ Swap

Hold E ➔ N1
Hold E ➔ CA
Hold E ➔ E
Hold E ➔ Q
Hold E ➔ D
Hold E ➔ J
Hold E ➔ Walk
Hold E ➔ Swap

Q ➔ N1
Q ➔ CA
Q ➔ E
Q ➔ D
Q ➔ J
Q ➔ Walk
Q ➔ Swap
Xingqiu/Yelan N0
Every character should have their N0 timing for Xingqiu/Yelan recorded if possible (might not have access to Yelan + recorded character).
This means the following is added to the Nahida TODO list:
Xingqiu N0
Yelan N0
Final TODO list
The final TODO list for Nahida looks like this:
NA String - hitmark
CA - hitmark

Tap E - hitmark
Tri-Karma Purification - hitmark
Hold E - hitmark

Q - duration

NA String (including N4 ➔ N1)

N1 ➔ CA
N1 ➔ E
N1 ➔ Q
N1 ➔ D
N1 ➔ J
N1 ➔ Walk
N1 ➔ Swap

N2 ➔ CA
N2 ➔ E
N2 ➔ Q
N2 ➔ D
N2 ➔ J
N2 ➔ Walk
N2 ➔ Swap

N3 ➔ CA
N3 ➔ E
N3 ➔ Q
N3 ➔ D
N3 ➔ J
N3 ➔ Walk
N3 ➔ Swap

N4 ➔ CA
N4 ➔ E
N4 ➔ Q
N4 ➔ D
N4 ➔ J
N4 ➔ Walk
N4 ➔ Swap

CA ➔ N1
CA ➔ CA
CA ➔ E
CA ➔ Q
CA ➔ D
CA ➔ J
CA ➔ Walk
CA ➔ Swap

Tap E ➔ N1
Tap E ➔ CA
Tap E ➔ E
Tap E ➔ Q
Tap E ➔ D
Tap E ➔ J
Tap E ➔ Walk
Tap E ➔ Swap

Hold E ➔ N1
Hold E ➔ CA
Hold E ➔ E
Hold E ➔ Q
Hold E ➔ D
Hold E ➔ J
Hold E ➔ Walk
Hold E ➔ Swap

Q ➔ N1
Q ➔ CA
Q ➔ E
Q ➔ D
Q ➔ J
Q ➔ Walk
Q ➔ Swap

Xingqiu N0
Yelan N0
Open Wootomation
Wootomation has to be opened as administrator for the macros to work with Genshin.
Create New Macro Collection
- Open Wootomation if not already opened.
- Click on
New Collection. - Name it
Nahidaand choose an emoji. Example: 🌱.
Create Macros Based On TODO List
- Open Wootomation if not already opened.
For every item in Nahida's TODO List except NA String and Xingqiu/Yelan N0:
- Click on
Add Macro. This opens aTrigger Keyswindow. - Click on
Recordin theTrigger Keyswindow. - Press a button to choose it as the trigger key for the item.
- Click on
Savein theTrigger Keyswindow. - Choose a name and emoji for the item in the top left.
- Click on
RecordbelowSequencein the middle. - Click the buttons to perform the actions ingame.
For walk cancels (X ➔ W), start holding down W immediately (25 ms) after the previous button and then simply adjust the W duration later.
For cancels starting with CA (CA ➔ X), hold down left-click instead of splitting it up into two clicks when the character needs to perform N1 before a CA comes out. This way the single left-click will perform both N1 and CA.
The actual timings will be determined in a later section.
Add Xingqiu/Yelan N0 Macros
The actual timing for the delay between Left Click and Space so that Xingqiu/Yelan Q procs on the character's N0 will be determined in a later section.
Xingqiu
- Click on
Add Macro. This opens aTrigger Keyswindow. - Click on
Recordin theTrigger Keyswindow. - Press any key to choose it as the trigger key.
- Click on
Savein theTrigger Keyswindow. - Choose a name and emoji in the top left. Example: 🌧️ and
Xingqiu. - Click on
RecordbelowSequencein the middle. - Press Q, one out of 1/2/3/4 for swapping to the character that the timing is being recorded for, left click and spacebar. In this example:
2. - Click on
StopbelowSequencein the middle. - Click on the
Qitem in the sequence. - Change the
Duration (ms)to 50. - Click on the Delay between
Qand2. - Change the
Duration (ms)to 350. - Click on the
2item in the sequence. - Change the
Duration (ms)to 50. - Click on the Delay between
2andLeft Click. - Change the
Duration (ms)to 1350. The goal is to only start actions on the character after the swap cd is gone. This might not be long enough at high ping. - Click on the
Left Clickitem in the sequence. - Change the
Duration (ms)to 50. - Click on the
Spaceitem in the sequence. - Change the
Duration (ms)to 50. - Click on
Save Macroin the top right.
Yelan
- Click on
Add Macro. This opens aTrigger Keyswindow. - Click on
Recordin theTrigger Keyswindow. - Press any key to choose it as the trigger key.
- Click on
Savein theTrigger Keyswindow. - Choose a name and emoji in the top left. Example: 🎲 and
Yelan. - Click on
RecordbelowSequencein the middle. - Press Q, one out of 1/2/3/4 for swapping to the character that the timing is being recorded for, left click and spacebar. In this example:
2. - Click on
StopbelowSequencein the middle. - Click on the
Qitem in the sequence. - Change the
Duration (ms)to 50. - Click on the Delay between
Qand2. - Change the
Duration (ms)to 1250. - Click on the
2item in the sequence. - Change the
Duration (ms)to 50. - Click on the Delay between
2andLeft Click. - Change the
Duration (ms)to 1300. The goal is to only start actions on the character after the swap cd is gone. This might not be long enough at high ping. - Click on the
Left Clickitem in the sequence. - Change the
Duration (ms)to 50. - Click on the
Spaceitem in the sequence. - Change the
Duration (ms)to 50. - Click on
Save Macroin the top right.
Open OBS
OBS has to be opened as administrator for the input overlay to work with Genshin.
Configure Recording Folder
In order for the videos to be placed inside of the nahida folder, you have to configure it in OBS's settings.
- Open OBS if not already opened.
- Click on
Filein OBS's top menu. - Click on
Settingsin theFilemenu. - Click on
Outputon the left side in theSettingsmenu. - Click on the
Recordingtab on the right side. - Click on
Browseon the line withRecording Path. - Navigate to
genshin-frames/nahida. - Click on
Applyin the bottom left of theSettingsmenu.
During Recording
Recording Locations
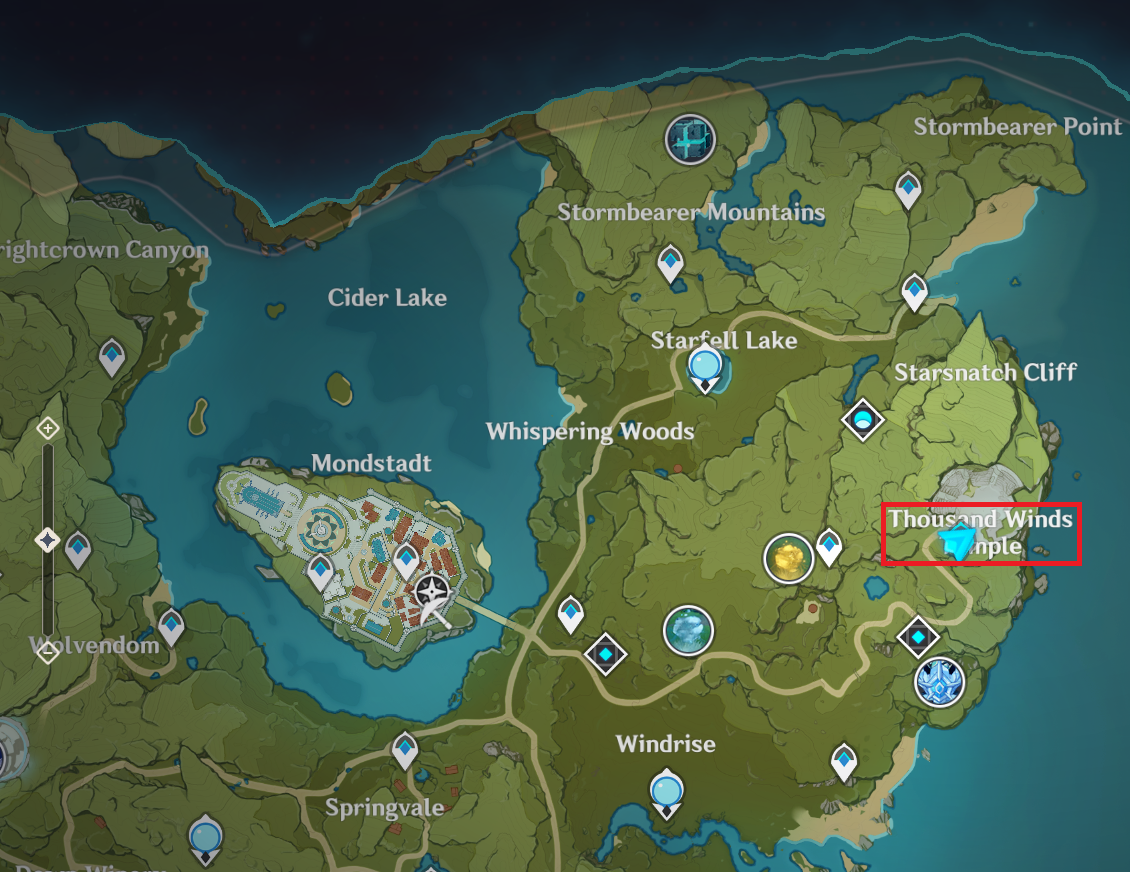
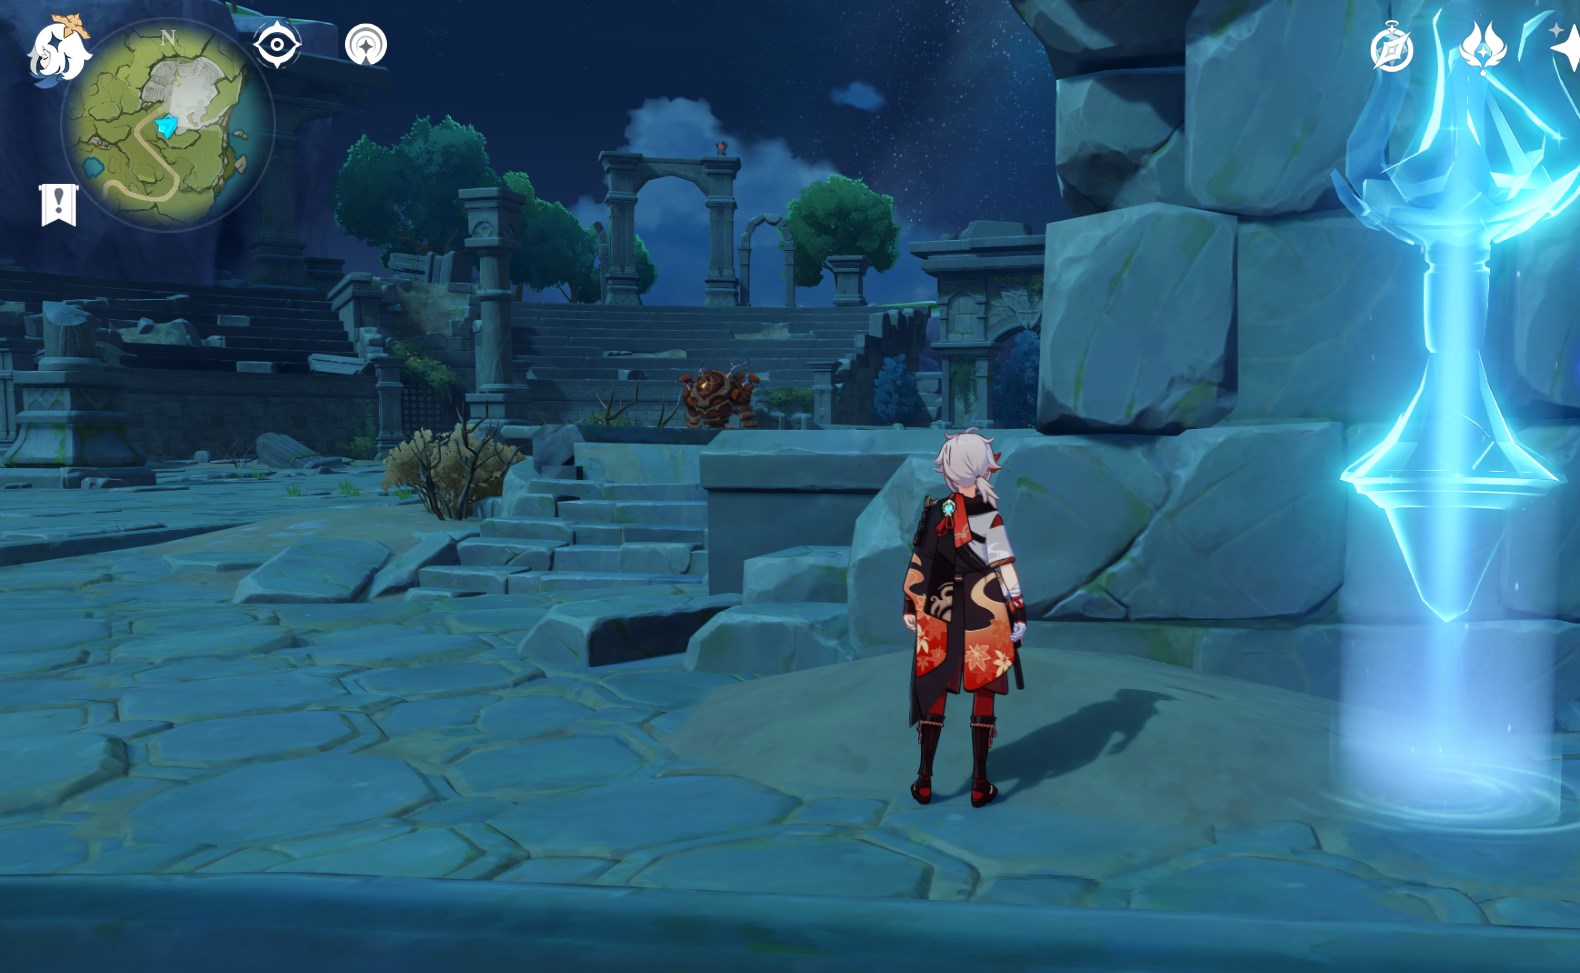
Hitmarks
For hitmarks, it is recommended to place a Portable Waypoint towards the entrace of Thousand Winds Temple in the east of the Mondstadt region. There you can find a Ruin Guard that can be stunned via Bow CA headshots.
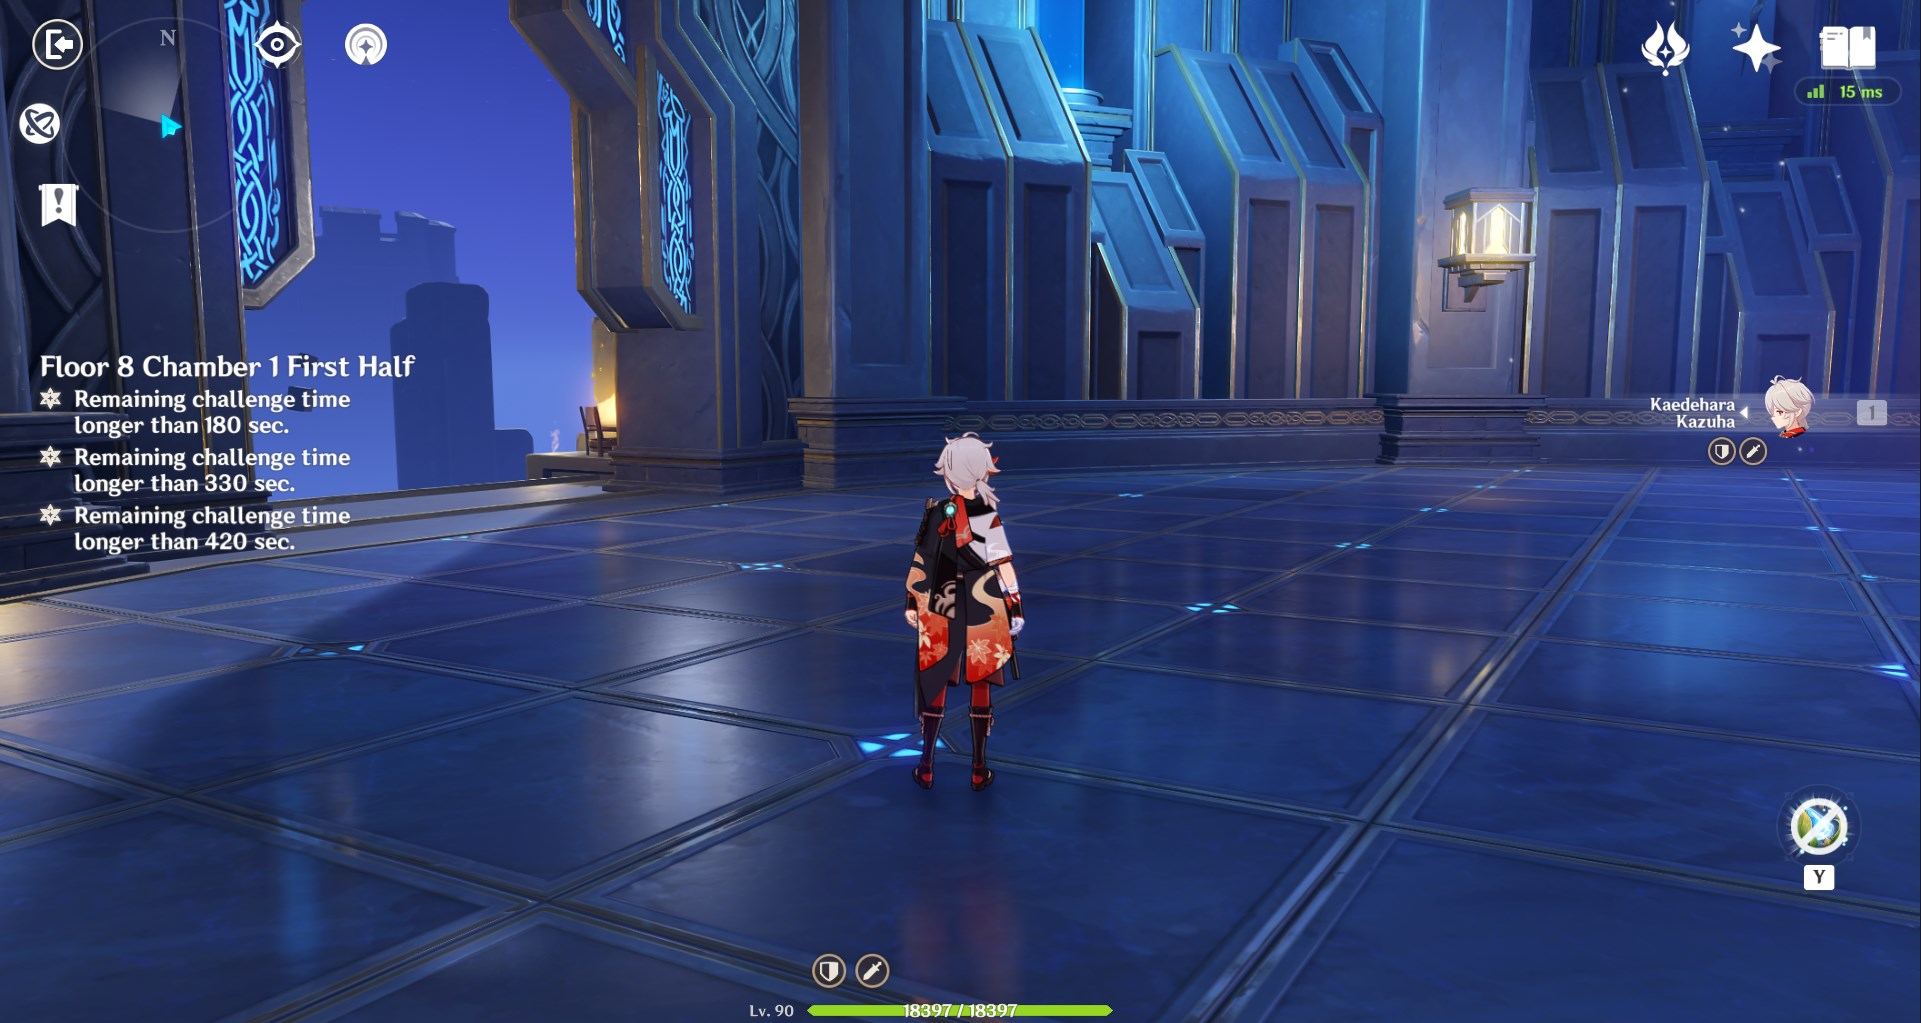
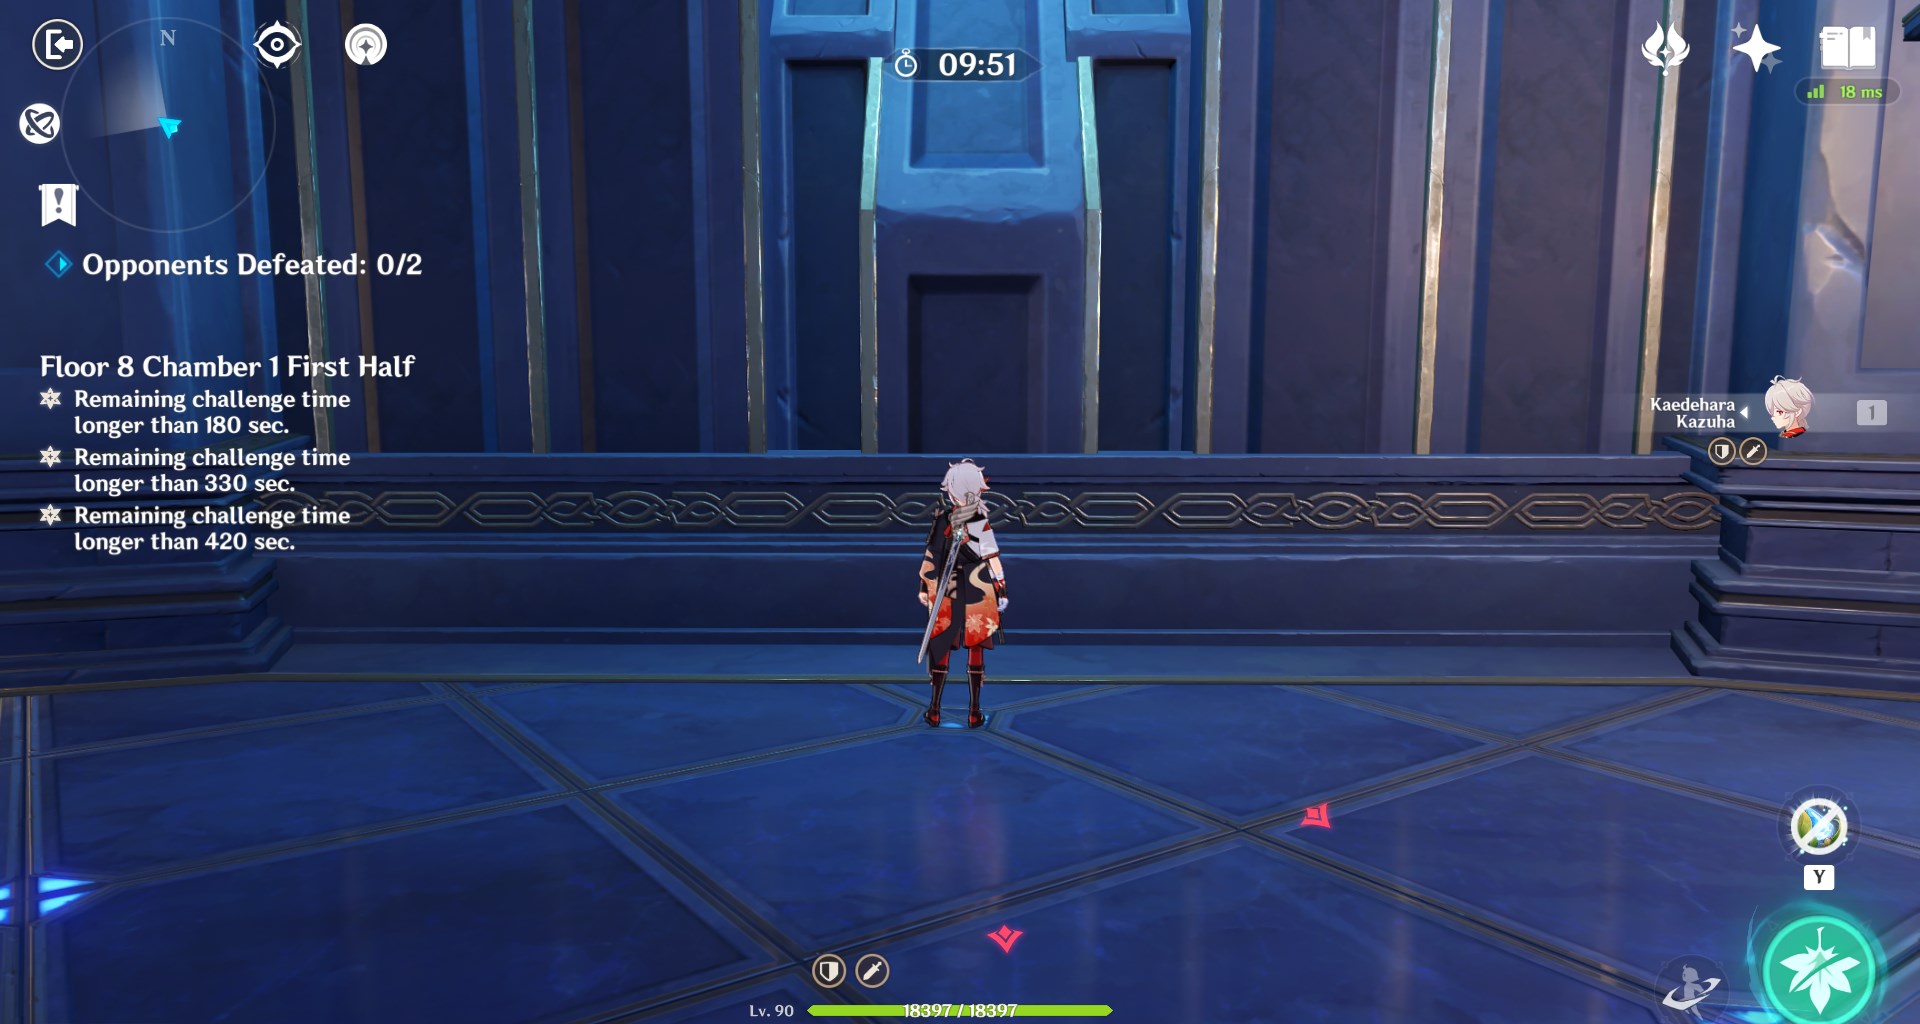
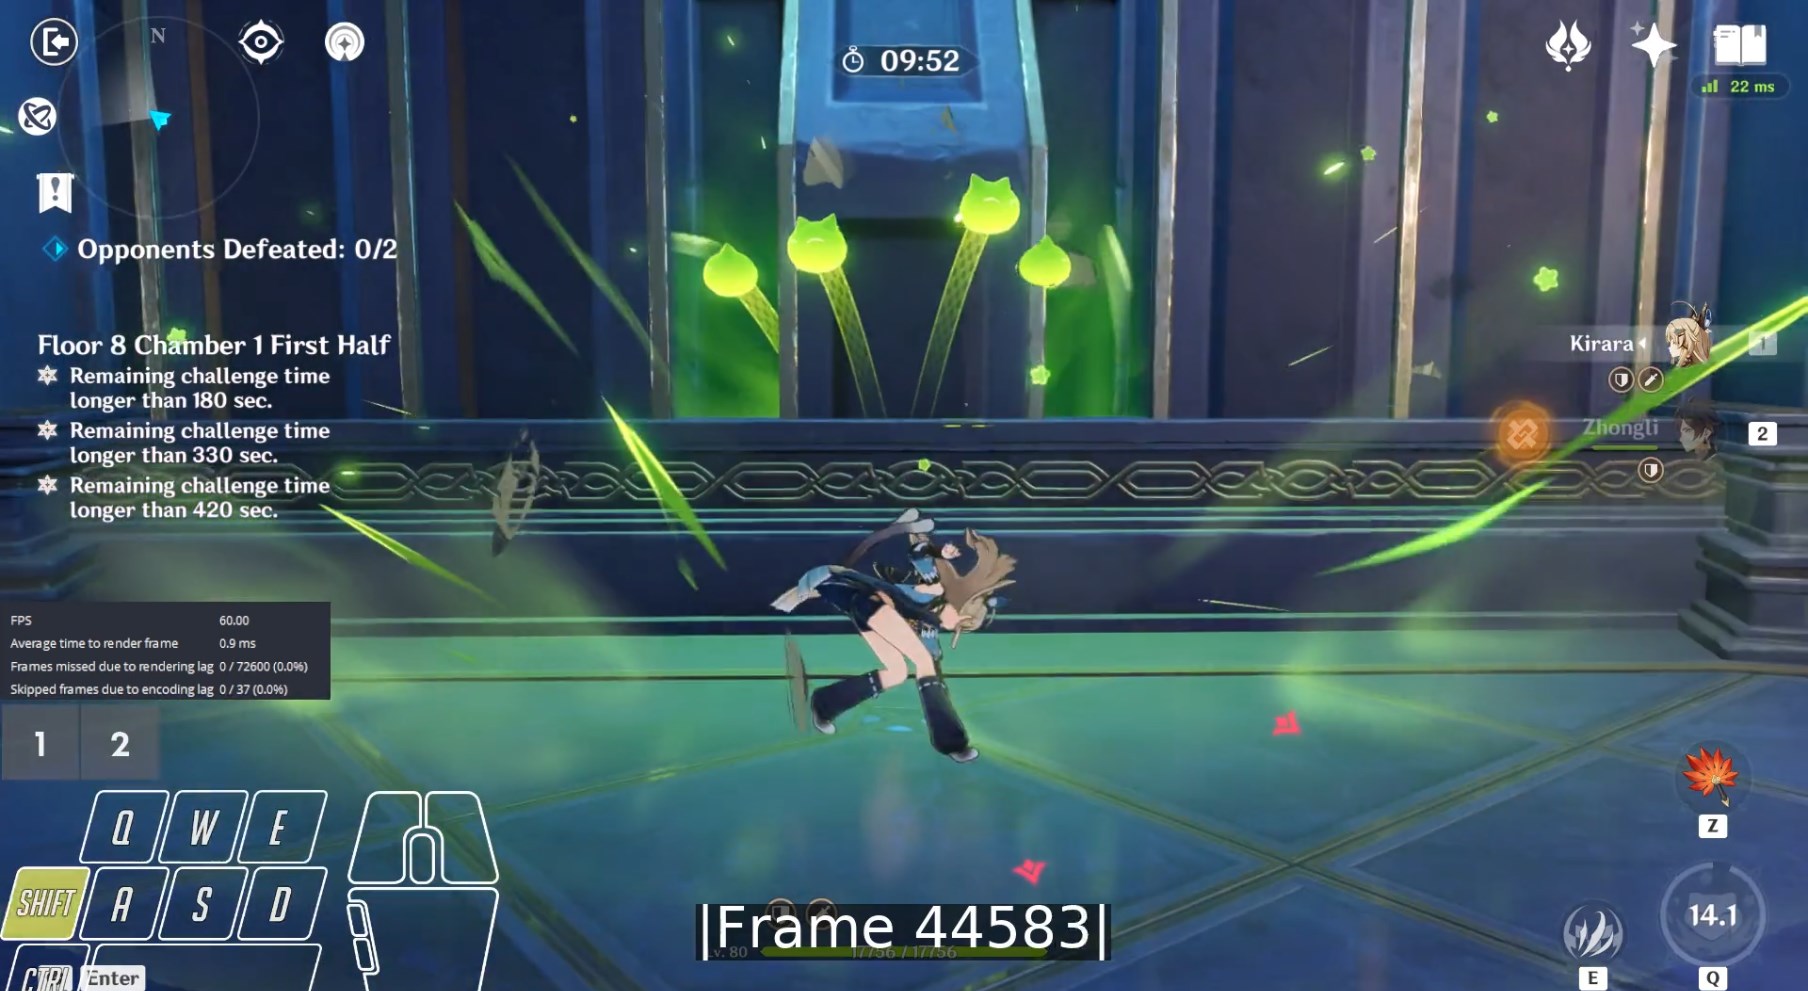
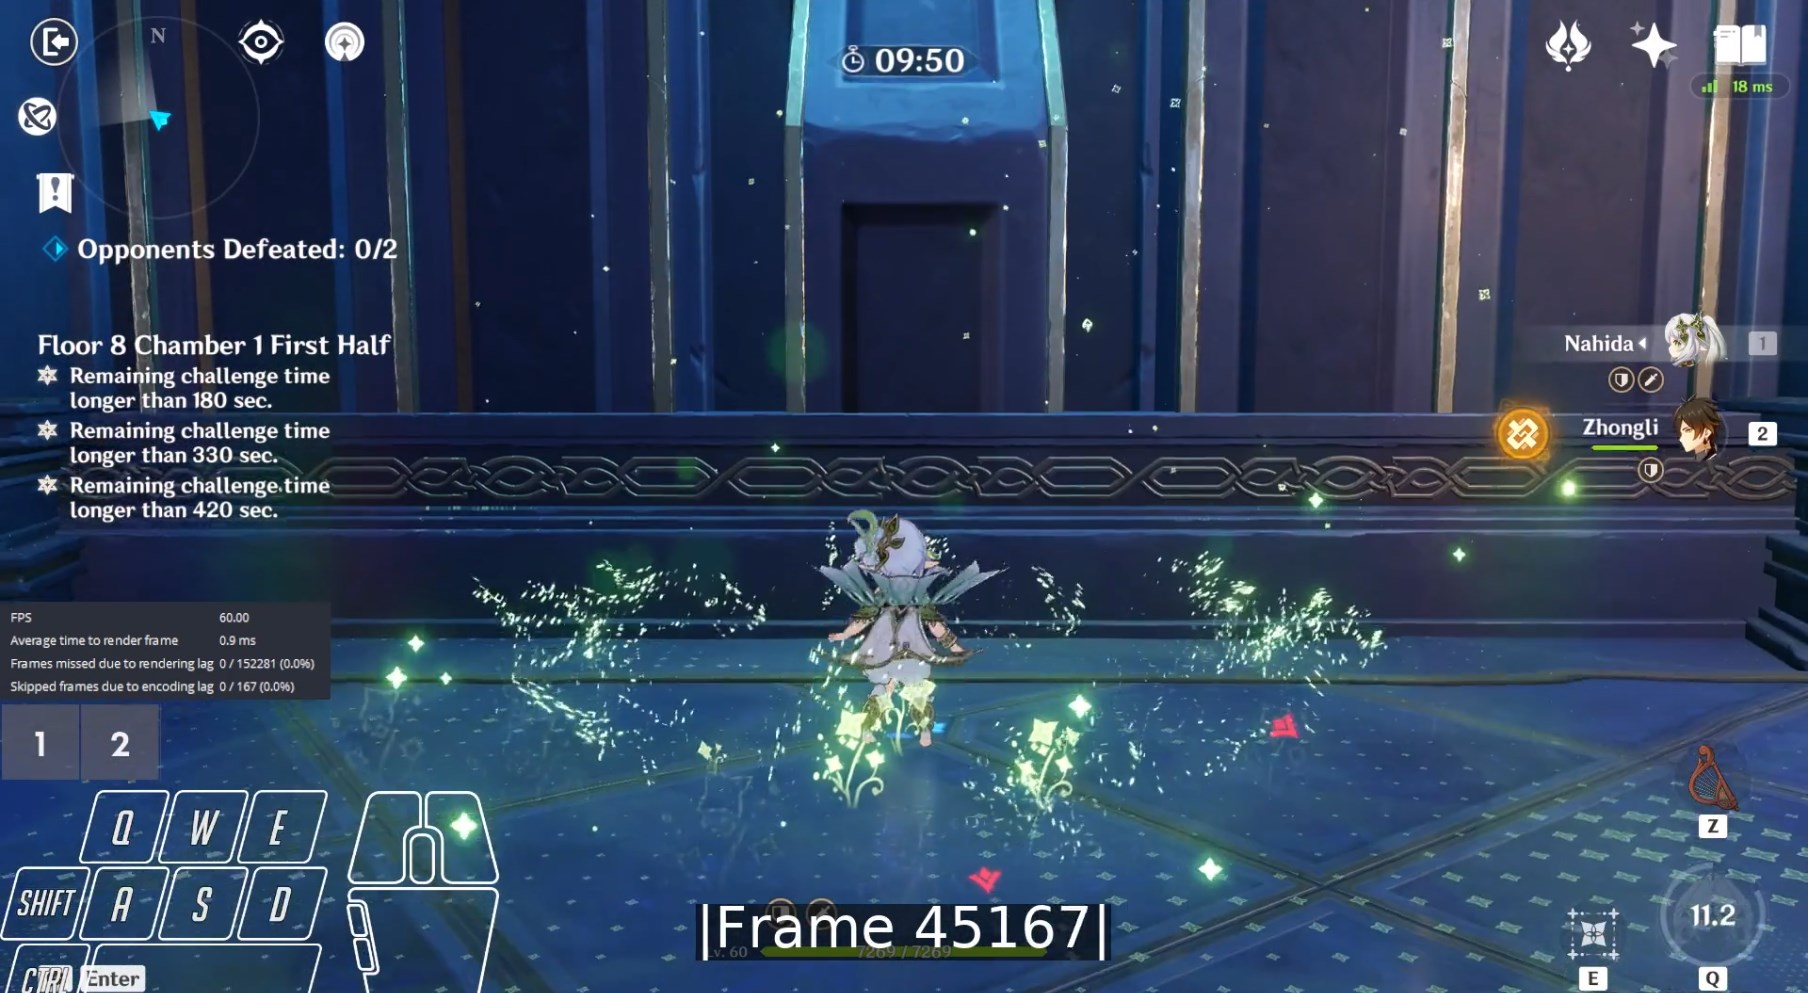
Q
For cancels involving Q, you can go to Spiral Abyss Floor 8, Chamber 1, First Side and stand in front of the bottom left wall while facing it. This way, the Abyss Mages will not teleport or attack the character.
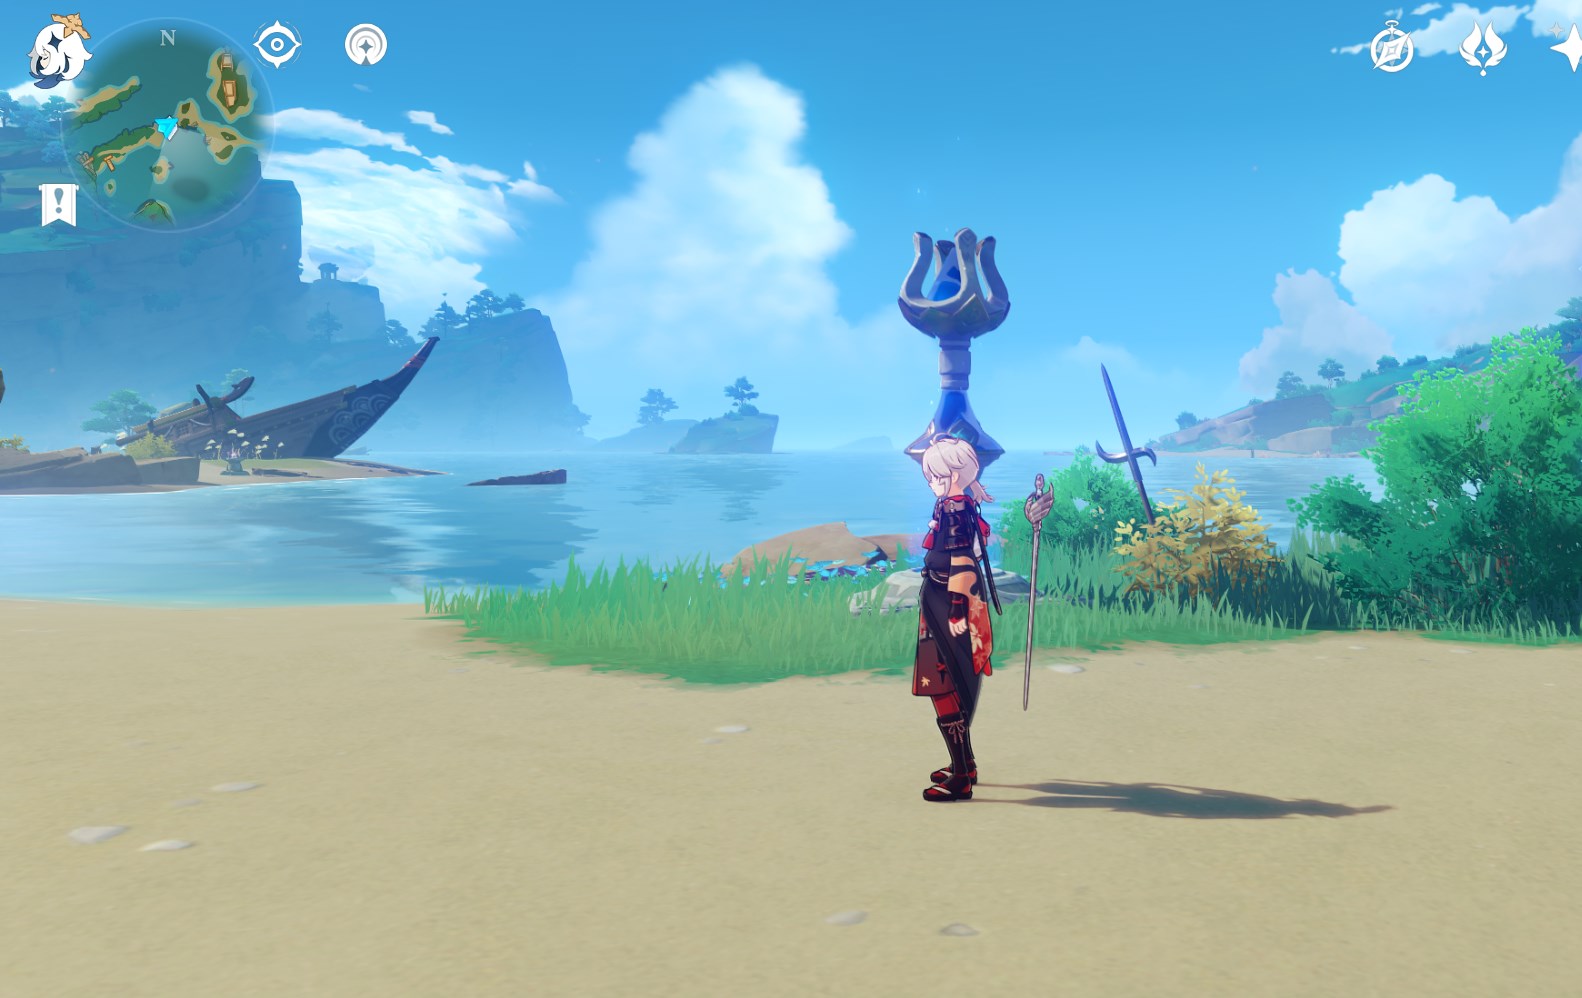
Other Actions
You can basically choose any location in Teyvat for the other actions as long as the videos can still be frame counted.
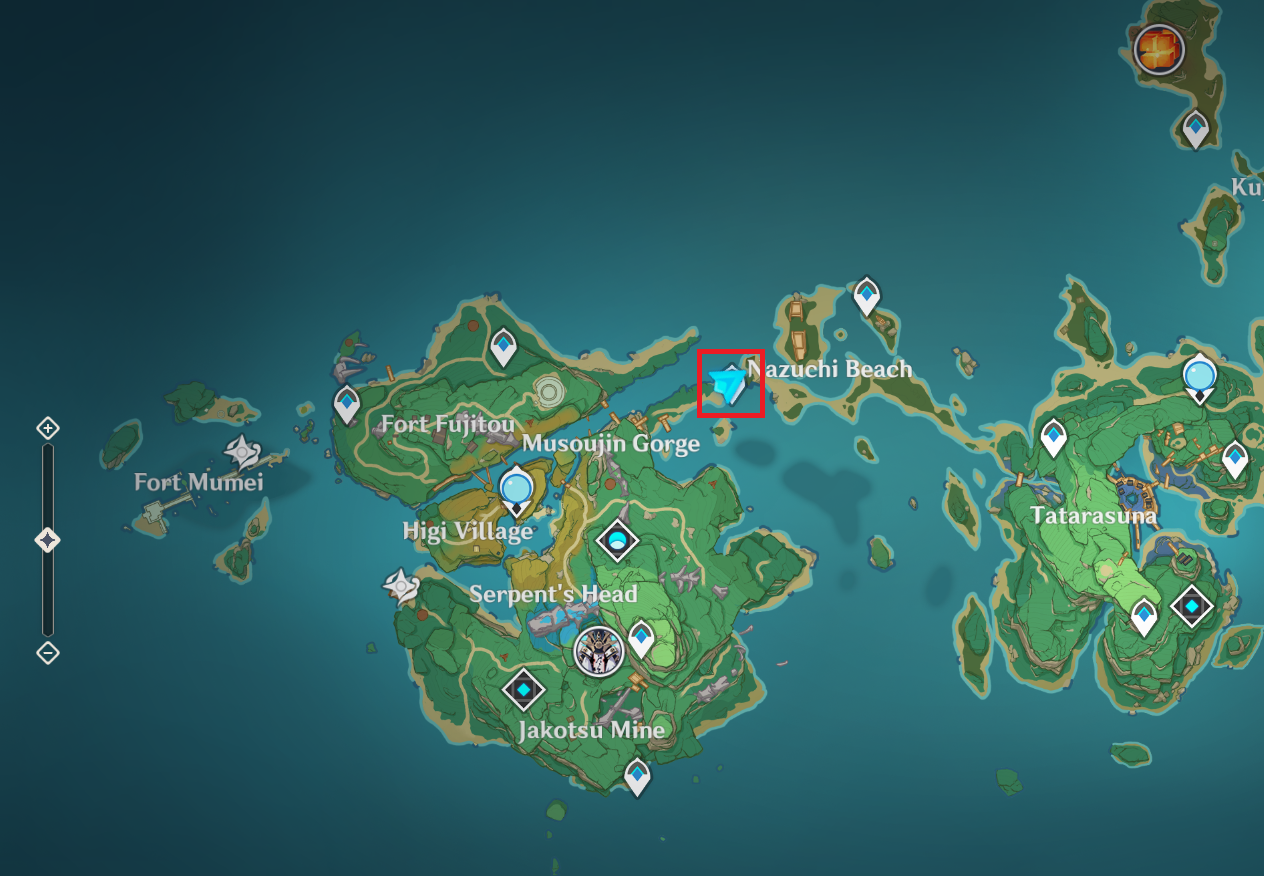
For example, you can use the beach area near the teleport point between Musoujin Gourge and Nazuchi Beach in Inazuma.
Find Shortest Durations For Macros
Stick to the macro guidelines when determining the timings.
Finding the shortest button press/delay durations between presses is basically brute force.
You can look at the videos linked in the Frames section of the individual character pages in the reference section to see some examples for timings.
Macro Finetuning Guidelines
- Change the duration in steps that are multiples of 25 ms.
- Verify that it is the shortest possible execution by checking that going any faster breaks the macro.
- Build on previously determined timings for longer chains of actions:
- Example: N4 ➔ CA builds on the N3 timings from N3 ➔ CA.
- For cancels that are very close to having the same timing as hitmark, try to see if you can hit an enemy using that cancel (avoid getting hitlagged).
- If the macro is not consistent, then try making it a bit slower.
- It is possible that a macro works outside of recording, but breaks during recording. In that case, also try making it a bit slower.
Record Macro Execution
After finding the shortest possible macro, you can record footage for the corresponding item in the TODO list.
Use the previously configured hotkeys to record!
Close unnecessary applications for more stable videos.
Recording Guidelines
It is heavily recommended and assumed that the TODO list is recorded in order. If it is not recorded in order, then you have to manually keep the order of the recorded videos the same as the TODO list.
Make sure that:
- you don't have any attack speed buffs active (character/weapon/artifact buffs).
- you don't have any movement speed buffs active (character/weapon/artifact buffs, anemo resonance).
- you have full energy.
- have at least one other character in the team at all times.
- the camera is facing the character from the side if possible.
- Q: do not stand close enough to the wall, because it would cancel the burst camera for 5* bursts like Eula otherwise.
- These "cam cancels" can have different frames from the normal version.
- See this sheet for reference.
- hitmarks: stand as close to the enemy as possible.
- Q hitmarks: perform "cam cancel", because it is necessary for determining cd start and energy drained frames.
- you record 3 trials per item on the TODO list.
- you hit nothing if this is not a hitmark recording.
For some actions it is possible to condense 3 trials into one recording (NA String, N1 ➔ CA, ...), while for others it is not feasible due to cooldowns (E ➔ N1, Q ➔ N1, ...) or the enemy attacking back (hitmarks).
It might be worth it to wait for a bit after hitmark before ending the recording to also include counts for certain timings. Example: Alhaitham Mirror Gain timing on CA hitmark.
Other guidelines:
- Start from a neutral position with the weapon out if possible:
- Left-click.
- Immediately jump.
- Wait until neutral.
- Start recording.
- Perform action cancel.
- Stop recording.
- Special case for NA String:
- Start recording.
- Jump.
- Immediately start holding down the NA String macro (needed because of the Wootomation problem).
- Hold until right before finishing N1 after performing the entire NA String.
- Wait until N1 is over.
- Go to step 2 until you have 3 trials.
- Stop recording.
- Check the OBS stats for frame drops and rerecord if it shows that a frame drop occurred.
- It is also possible that the OBS stats missed a frame drop, so make sure to also pay a bit of attention to that outside of looking at the OBS stats.
Record Dash/Jump Individually
It might be necessary to record just a dash/jump (all the guidelines still apply) on its own, in order to get the frames for those. This is the case, when there are no 3 dash/jump cancel trials recorded that show a clear ungray of the team icons before the dash/jump starts.
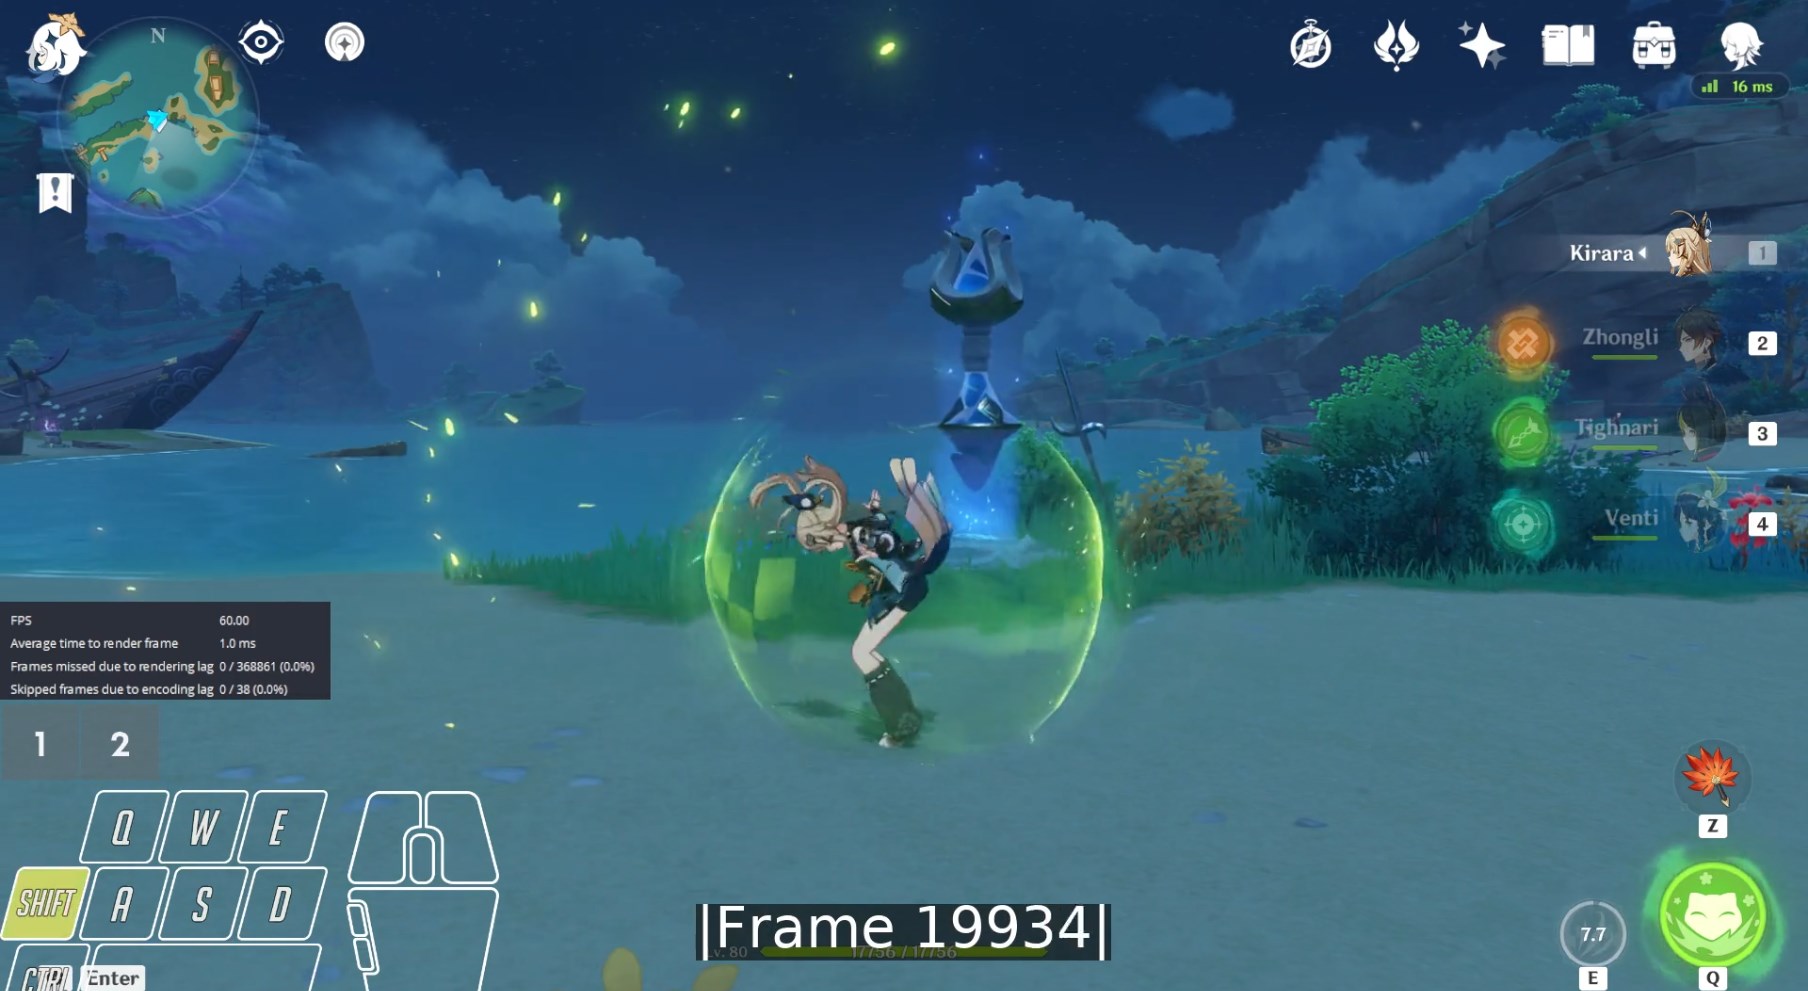
Examples using Kirara
Kirara Tap E ➔ D Can Be Used
Last team icon greyout frame from Tap E:
Team icon ungray:
Assume dash pose:
Team icon greyout (dash starts here, Tap E frames end here):
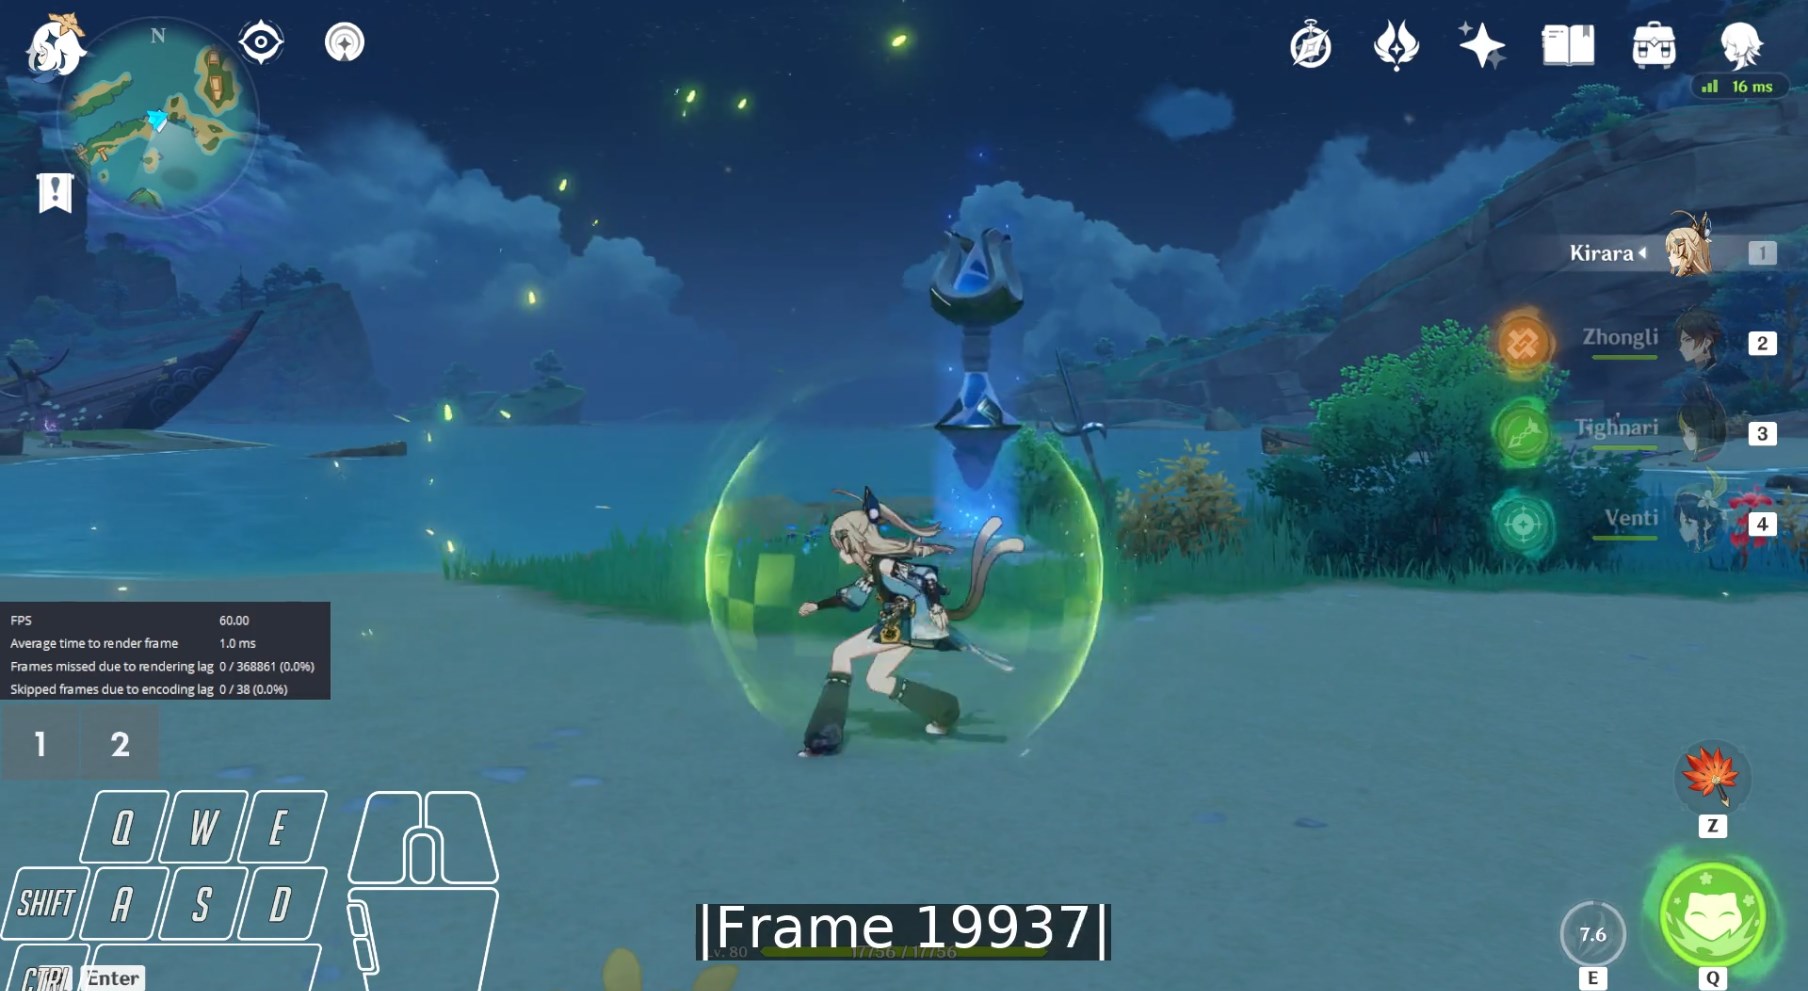
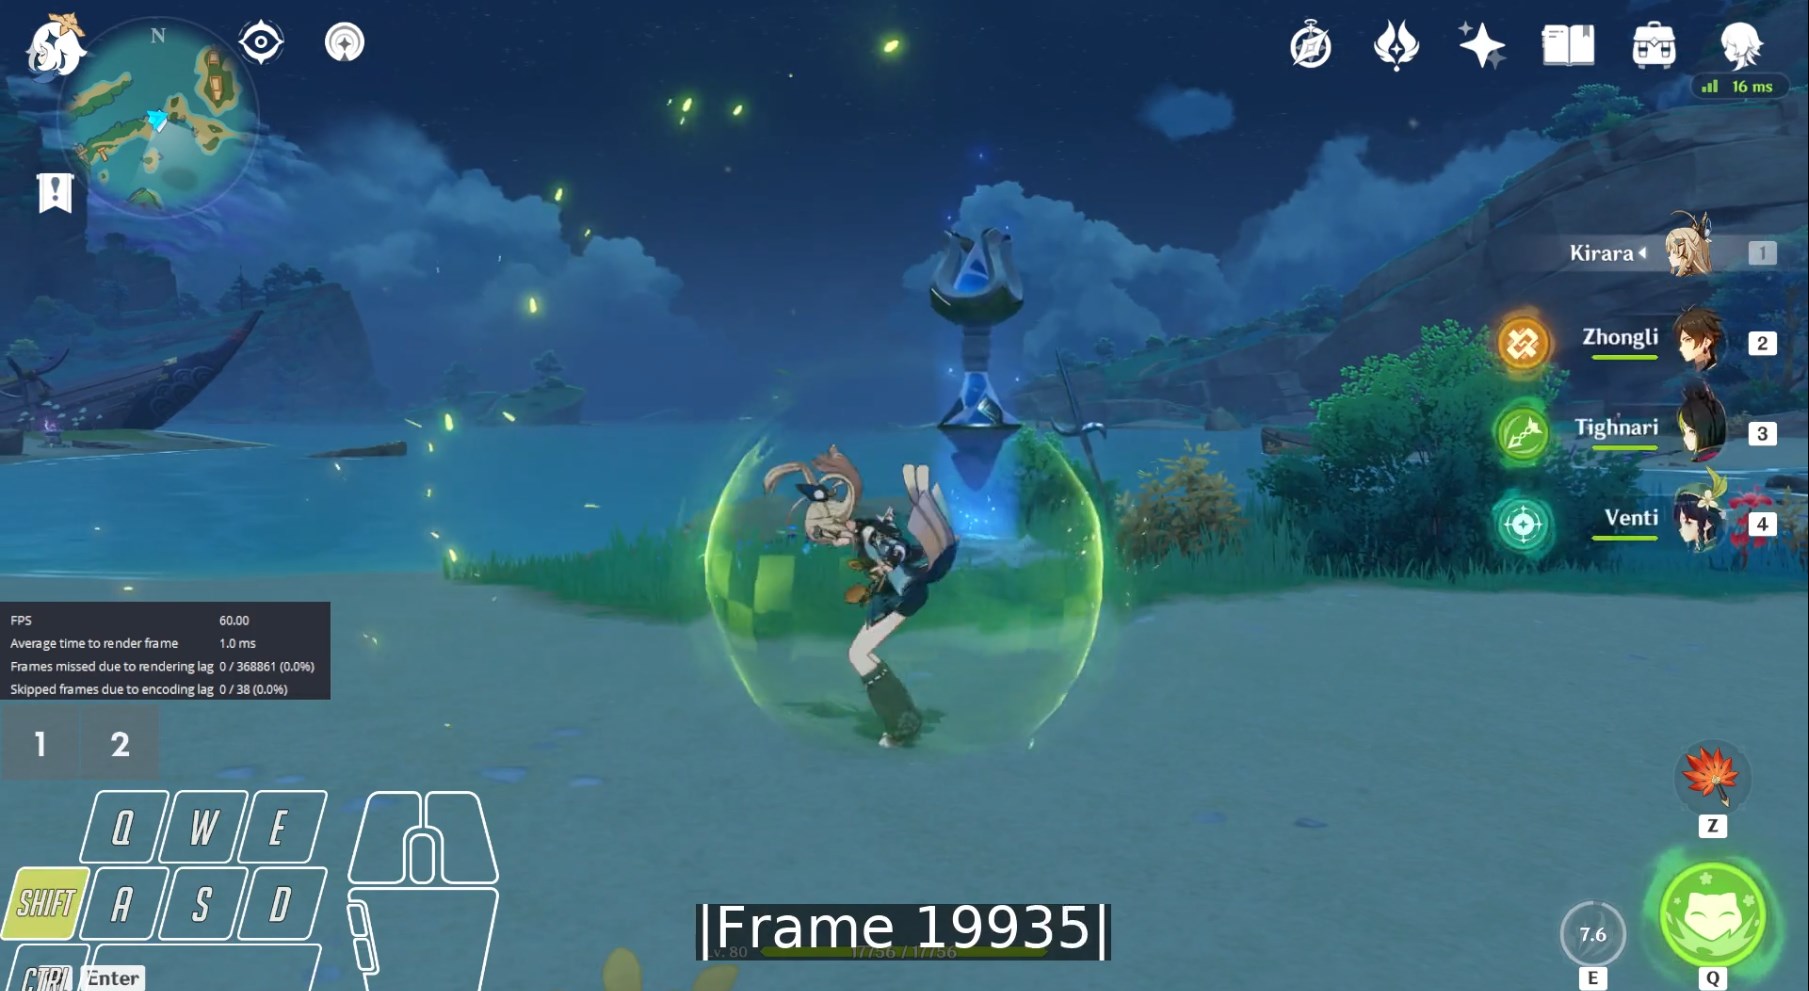
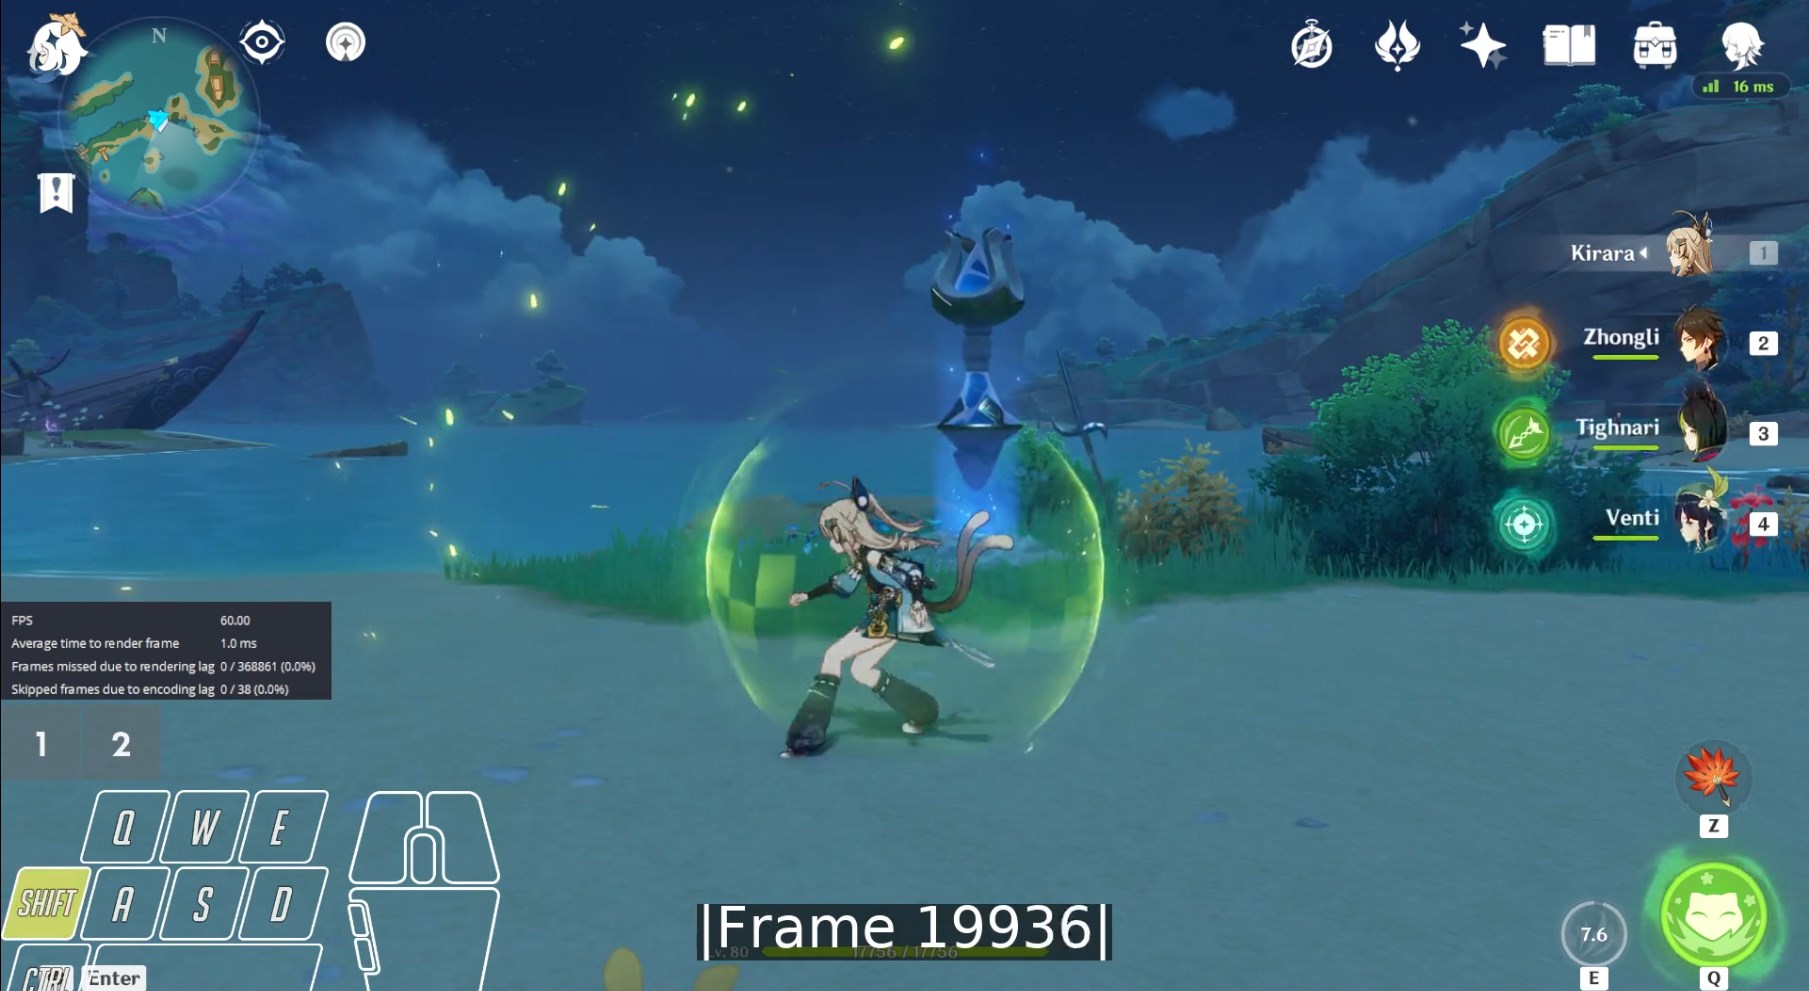
Kirara Q ➔ D Cannot Be Used
Frame before dash pose:
Assume dash pose:
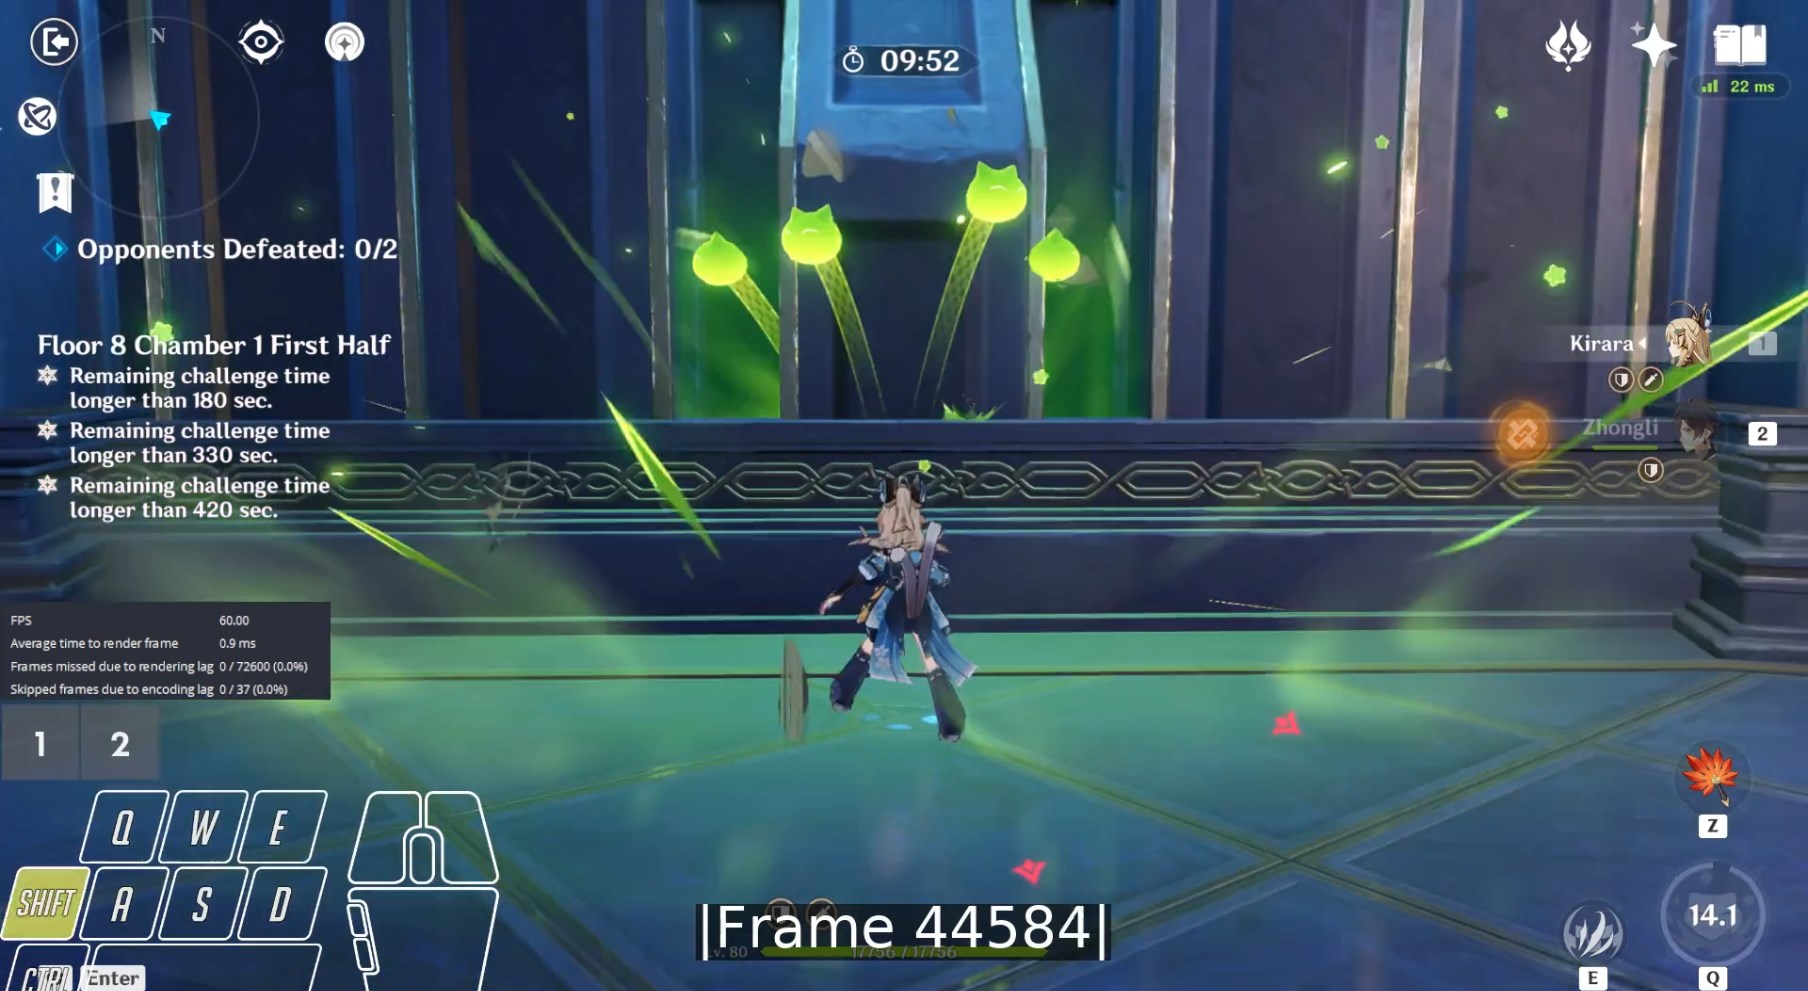
Team icon greyout would have happened here (dash starts here, Q frames end here):
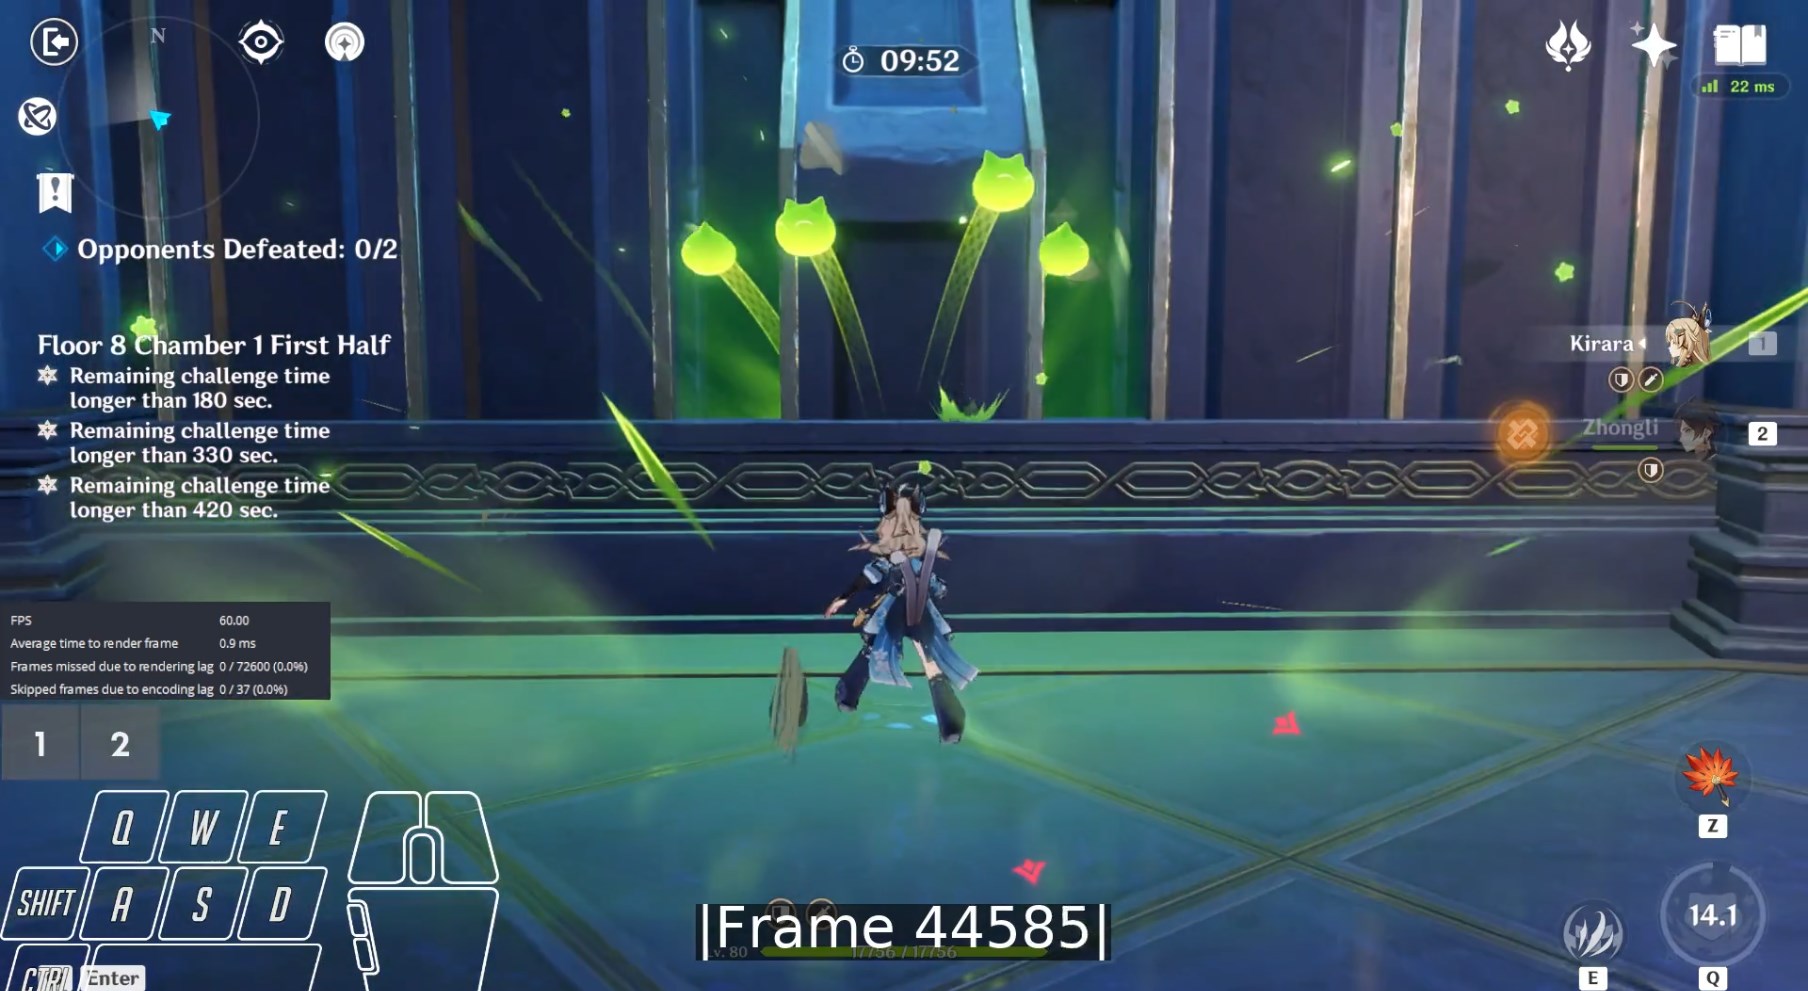
As you can see, there was no ungray.
After Recording
The current folder structure should look like this:
└── genshin-frames
    ├── nahida
    │   ├── nahida_todo.txt
    │   └── ... (many videos)
    ├── chapter.sh
    └── merge-videos.sh
Optional: Rename Videos
To have a better overview later, it is recommended that you rename the videos while keeping the order matched to the TODO list order.
For example, you can follow this naming scheme: <item count>_<item recording count>_<name for item with - instead of space>.mp4.
Naming examples:
02_01_NA-String.mp418_03_N2-Q.mp4
Execute Video Scripts
If you get any errors in the form of <command name>: command not found, then try to sudo apt install <command name> and let us know on Discord (top right).
- Open the
genshin-framesfolder in the Windows File Explorer. - Click in the text box containing the path.
- Delete the existing text.
- Type
wsl. - Press Enter.
- Type
./merge-videos.sh nahida.nahidacan replaced by any other folder name ingenshin-frames. - Type in your WSL credentials.
This will create two files in the nahida folder:
in_frames.mp4: contains the videos from thenahidafolder in alphabetical order together with chapter markersout_frames.mp4: version ofin_frames.mp4that has a frame counter overlay
The folder structure should then look like this:
└── genshin-frames
    ├── nahida
    │   ├── nahida_todo.txt
    │   ├── in_frames.mp4
    │   ├── out_frames.mp4
    │   └── ... (many videos)
    ├── chapter.sh
    └── merge-videos.sh
Add Video Timestamps To TODO List
It can take quite some time until out_frames.mp4 is done.
This time can be used to go through in_frames.mp4 and write down the timestamps for when each TODO list item starts in the video.
The chapter markers at the bottom are especially useful for this.
Example:
NA String - hitmark
CA - hitmark

Tap E - hitmark
Tri-Karma Purification - hitmark
Hold E - hitmark
Hold E - max duration
becomes
0:00 NA String - hitmark
0:11 CA - hitmark

0:20 Tap E - hitmark
0:28 Tri-Karma Purification - hitmark
0:37 Hold E - hitmark
0:47 Hold E - max duration
If out_frames.mp4 is finishes before you are done with this step, then do the next step before returning to this one.
Upload Video To YouTube
- Go to YouTube.
- Click on the top right camera icon with the ➕ on it.
- Click on
Upload videoin the menu that opens up. - Drag and drop the
out_frames.mp4to the page. - Choose a suitable title. Example:
Nahida - frames. - Copy paste the TODO list from
nahida_todo.txtas the description. - Disclose whether the video is made for kids at the bottom.
- Click
NEXTon the bottom right. - Click
NEXTon the bottom right. - Click
NEXTon the bottom right. - Choose the visibility for the video. Example:
Unlisted. - Click
Saveon the bottom right.
While the video is uploading, you can move on to the next step.
Create Google Sheet
Please base your frames sheet on one of the Google Sheets linked in the Frames section of the individual character pages in the reference section.
Since many characters share similar mechanics (Kirara E vs. Sayu E), it can be helpful to look into the frame sheets of similar characters.
Here are some examples for the different weapon types:
Count Frames
Open the shown images in new tabs and swap between them to make noticing the subtle differences easier.
Generally, the frames for an action are calculated as end frame - start frame.
The start frame is the starting frame for the action that the frames are currently being counted for. The end frame is either the hitmark frame for hitmarks or the start frame of the next action for cancels.
If you click on a particular number in one of the character frame sheets, you will see which start and end frames are used to arrive at that number.
Those numbers can be used together with stepping through the related videos frame-by-frame on YouTube or in mpv (after downloading the videos) to get a feeling for what indicators are used in frame counting (use , and . to go backward/forward frame-by-frame).
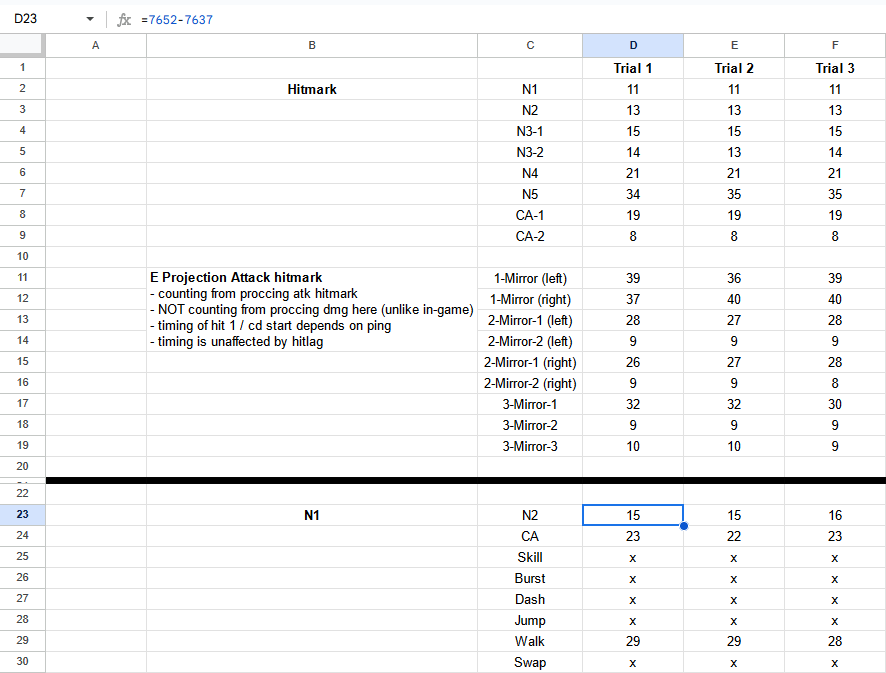
Example Alhaitham N1 ➔ N2:
Entry in his frames sheet:
1 frame before start frame:
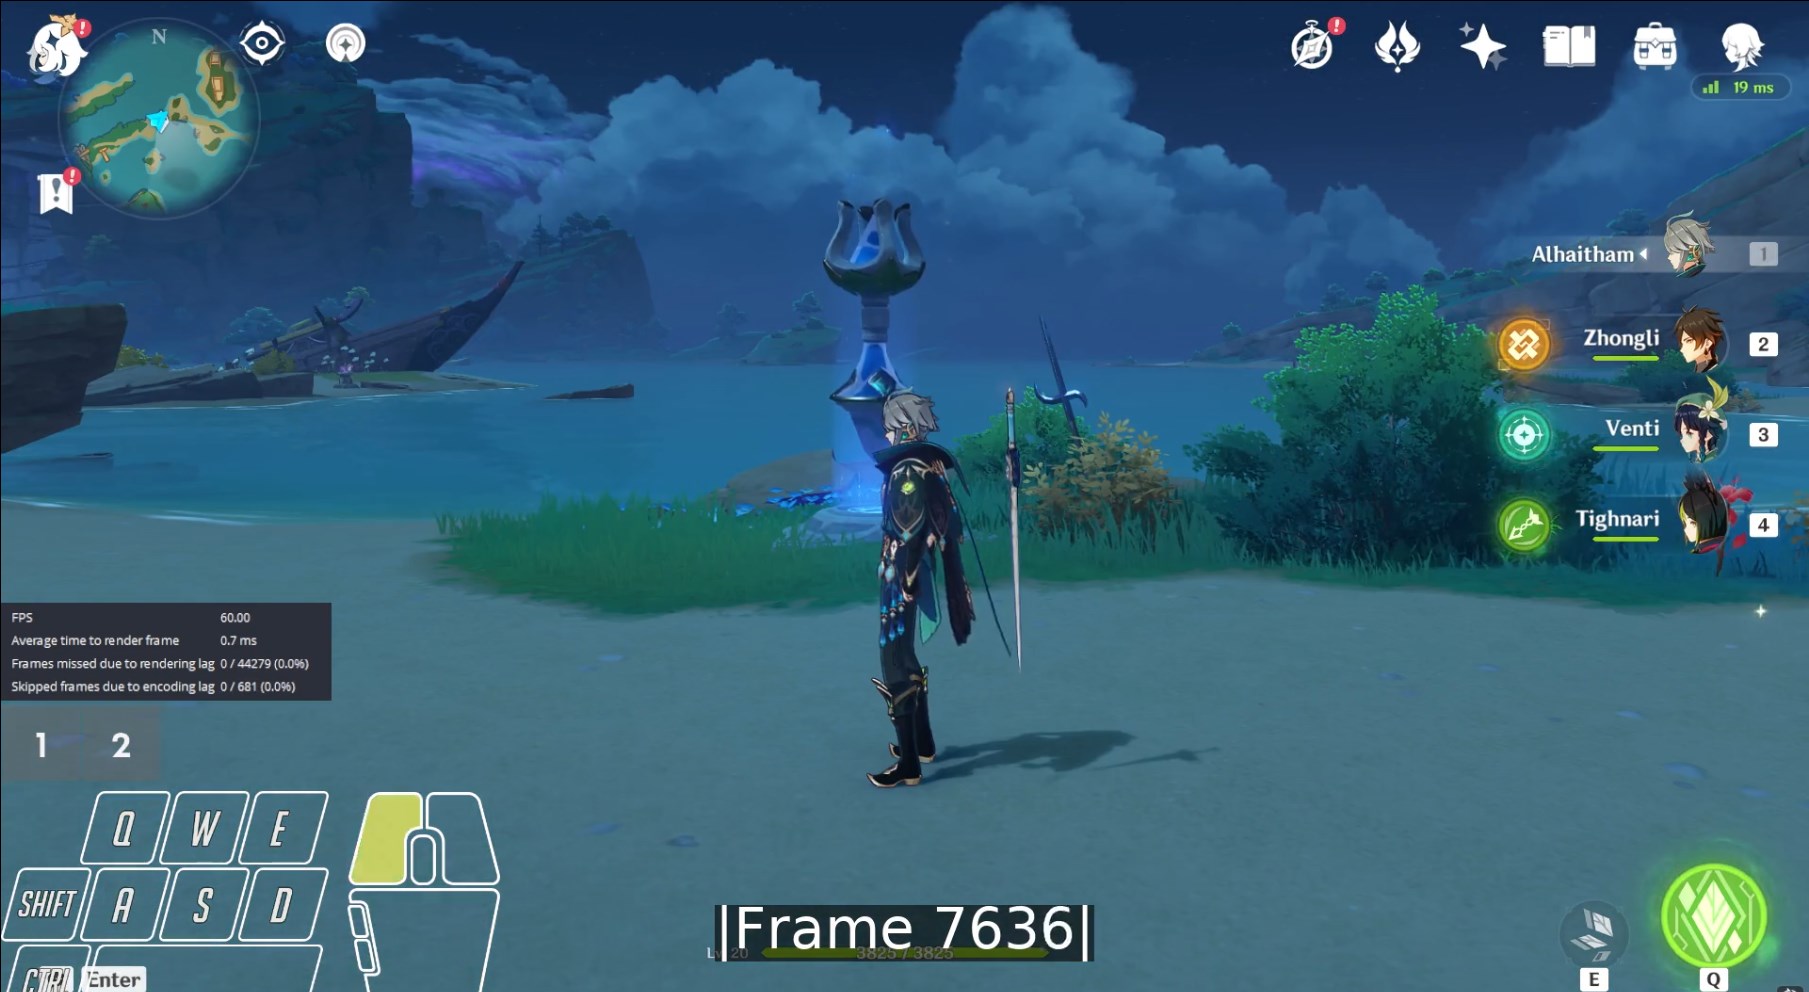
start frame (N1 starts here):
1 frame before end frame:
end frame (N1 ends here, N2 starts here):
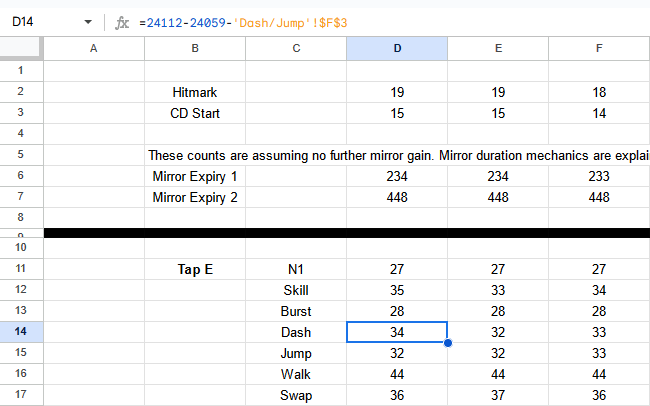
Some dash cancels reference the Dash/Jump page, because in those cases it is not possible to use the swap greyout on the right side as an indicator, see a previous section for more information.
Use 'Dash/Jump'!$F$3 for dash and 'Dash/Jump'!$F$4 for jump frames.
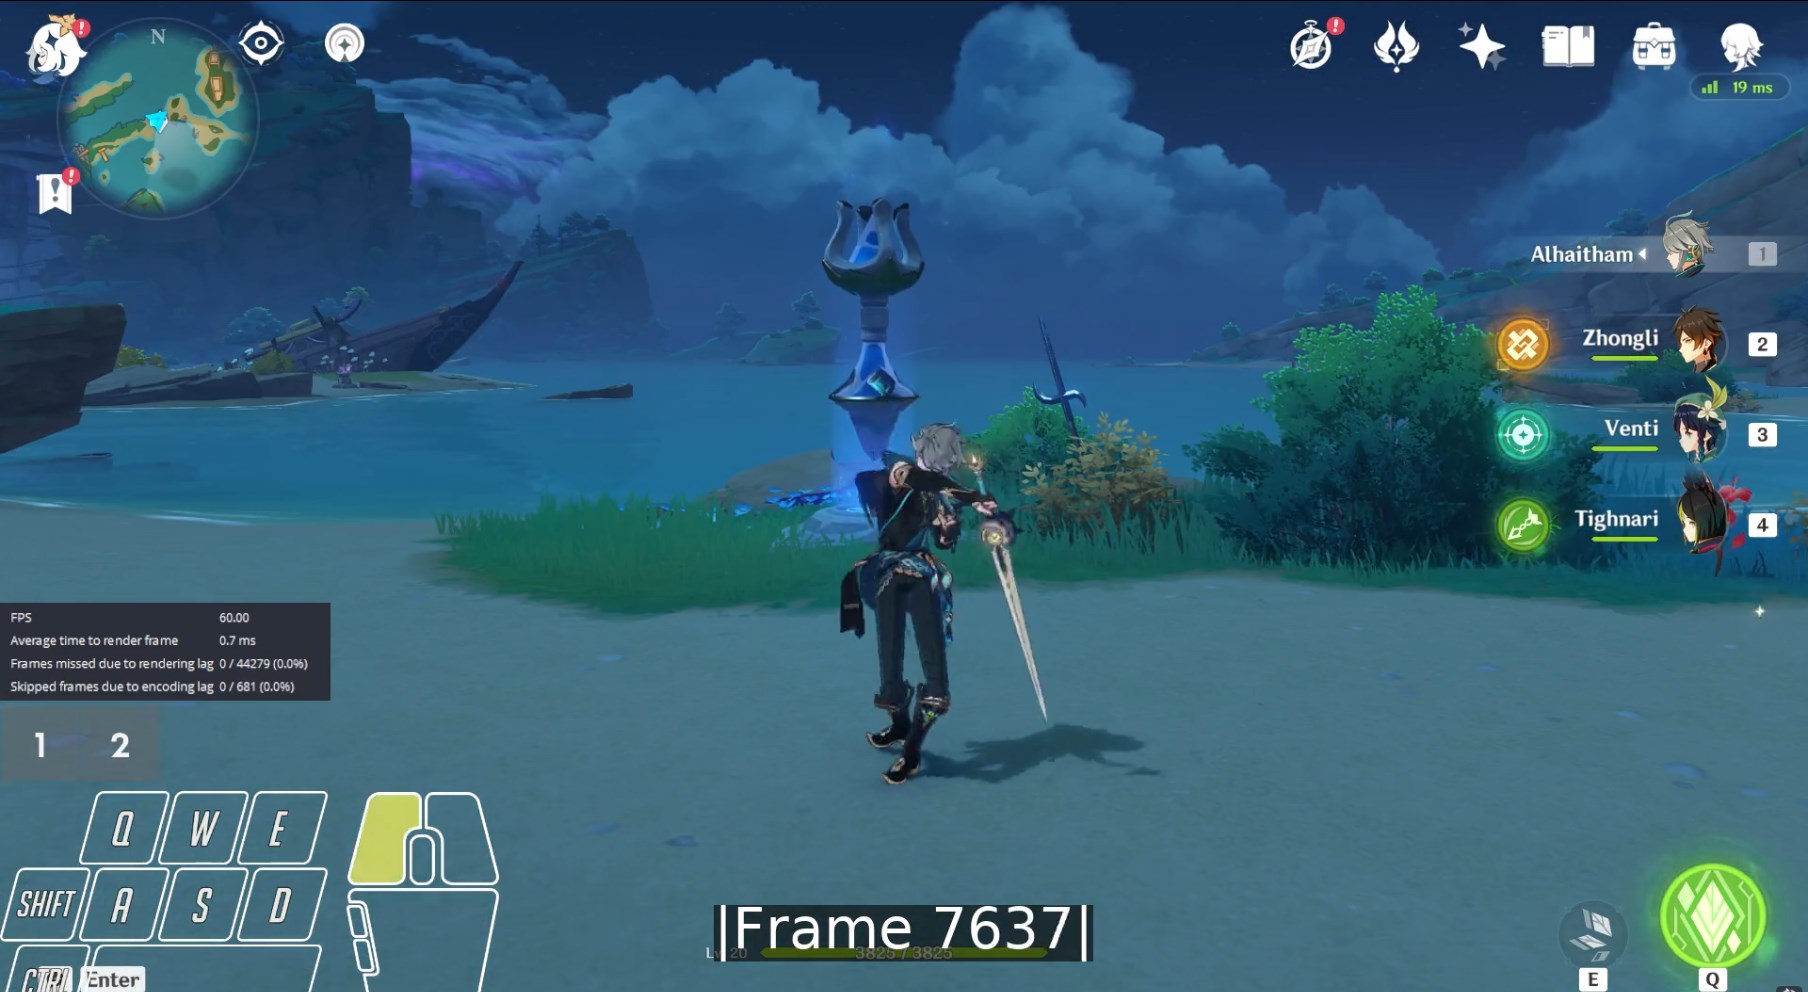
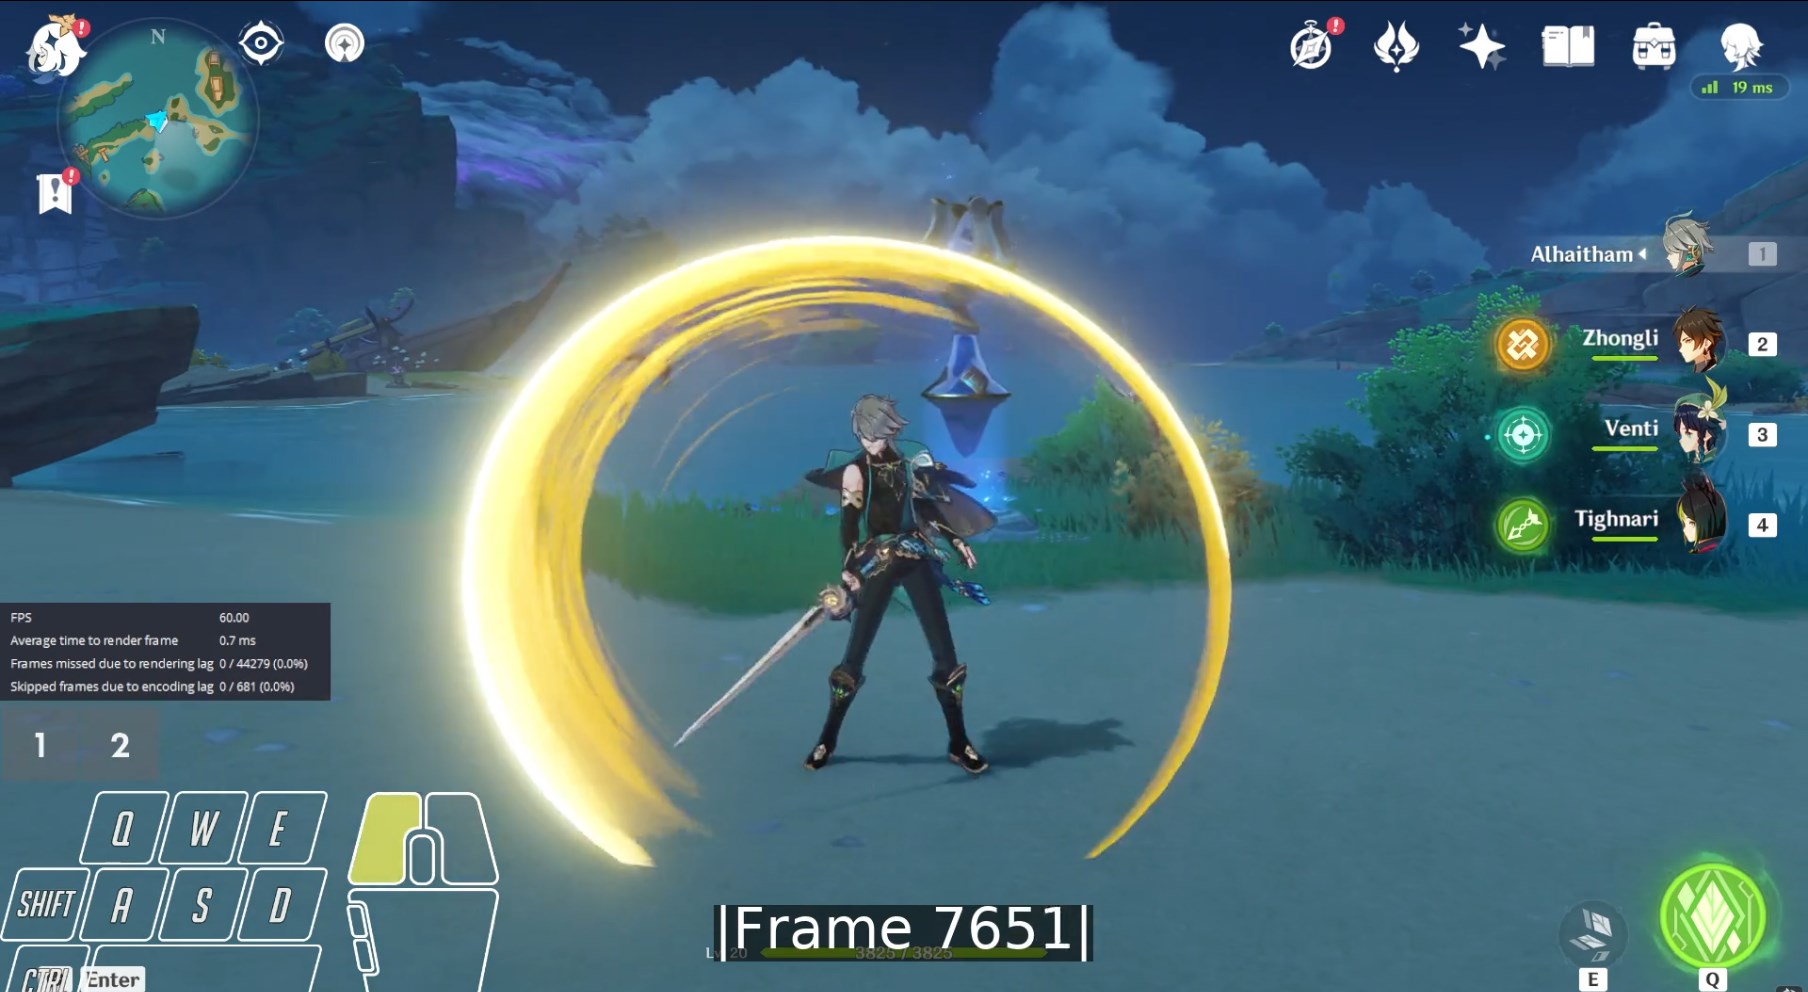
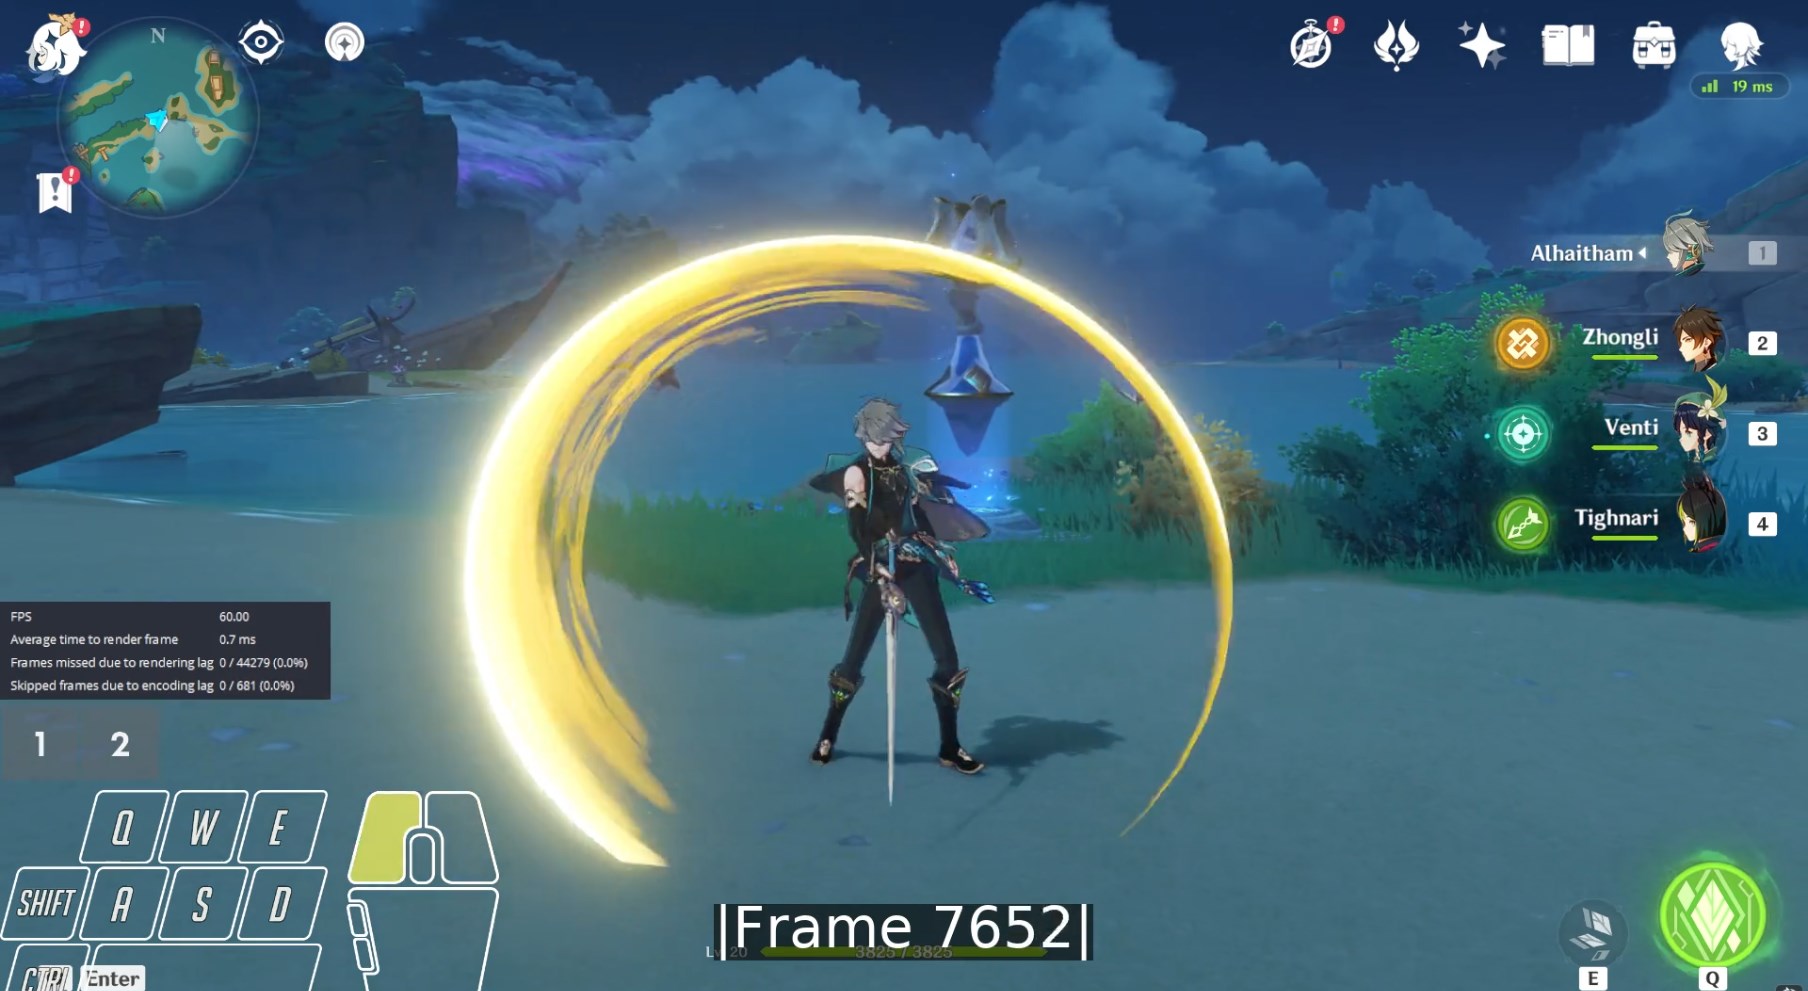
Example Alhaitham Tap E ➔ D:
Actions
NA
Use the first frame that the character/weapon/camera moves abruptly as start frame.
Example: Nahida N1 ➔ N2
1 frame before N2 start frame:
N2 start frame:
CA
Use either the team icon greyout frame or E/Q greyout frame (needed cases like Kuki and Nahida, where there is no team icon greyout on CA) as start frame. These two events happen on the same frame and can thus be used interchangeably.
Example: Nahida N3 ➔ CA
1 frame before CA start frame:
CA start frame (notice bottom right E/Q greyout):
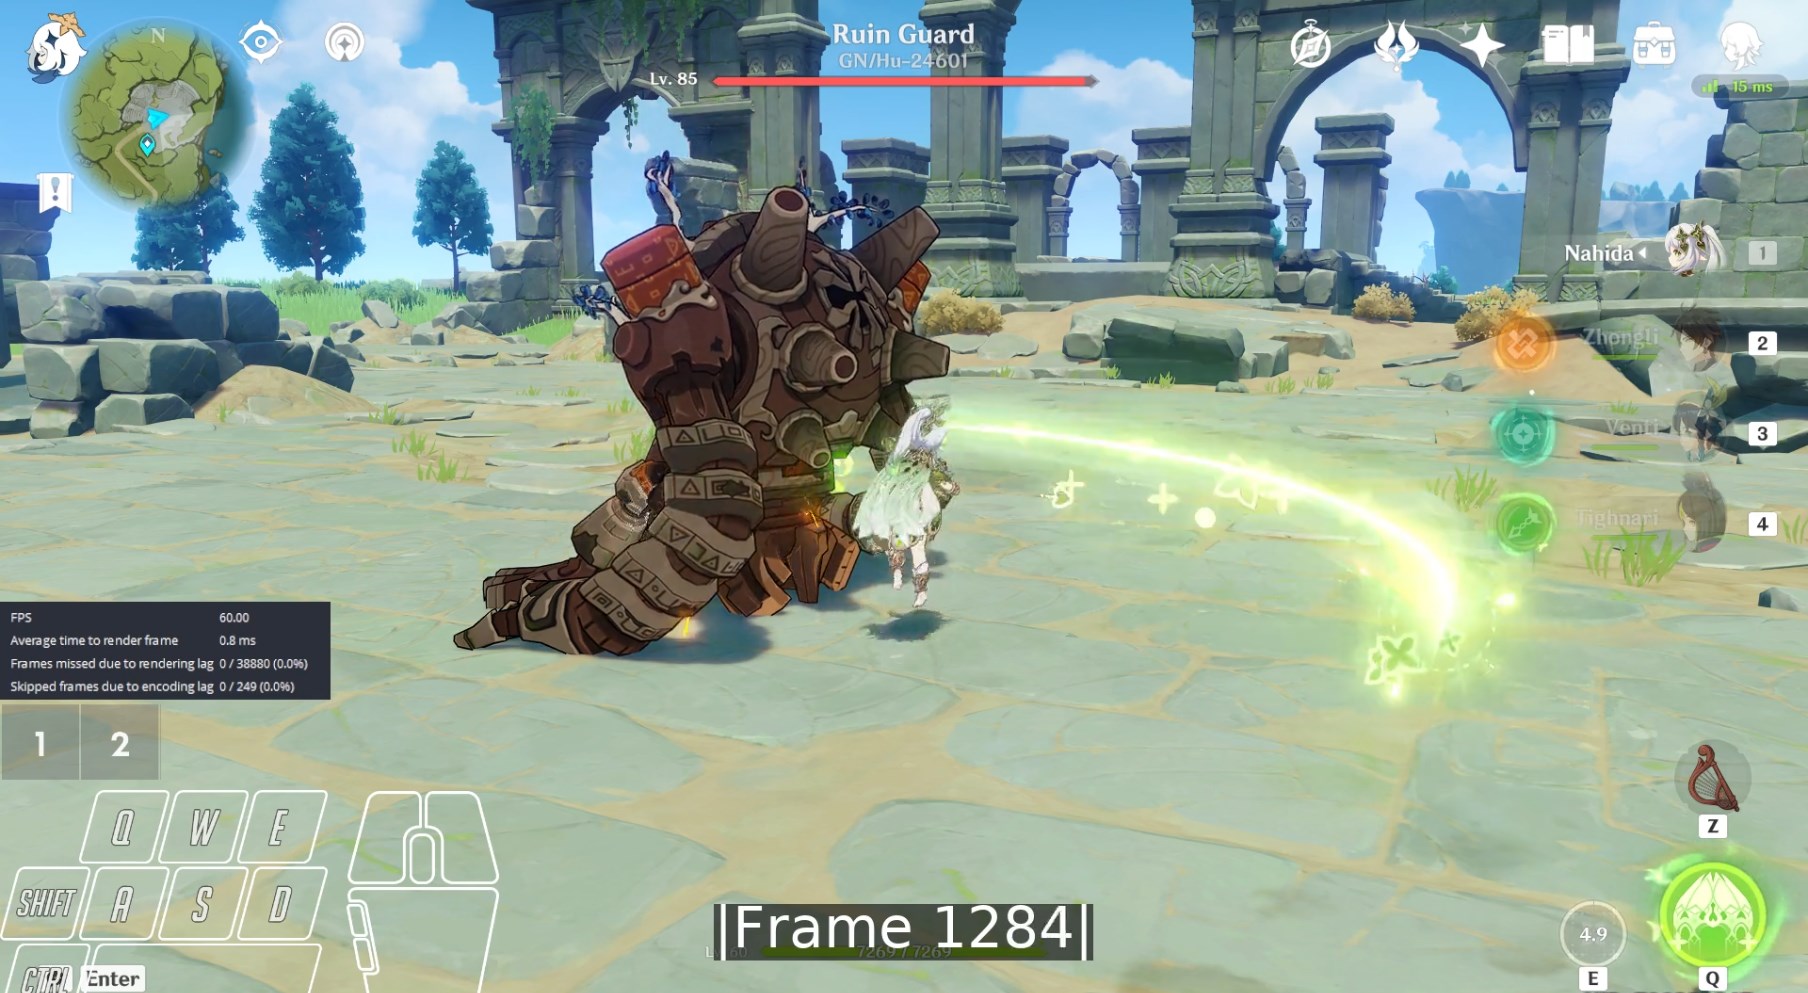
E
Use the E/Q greyout frame as start frame.
Do not forget to count the cd start frame either from an E hitmark or E cancel recording (usually happens before hitmark).
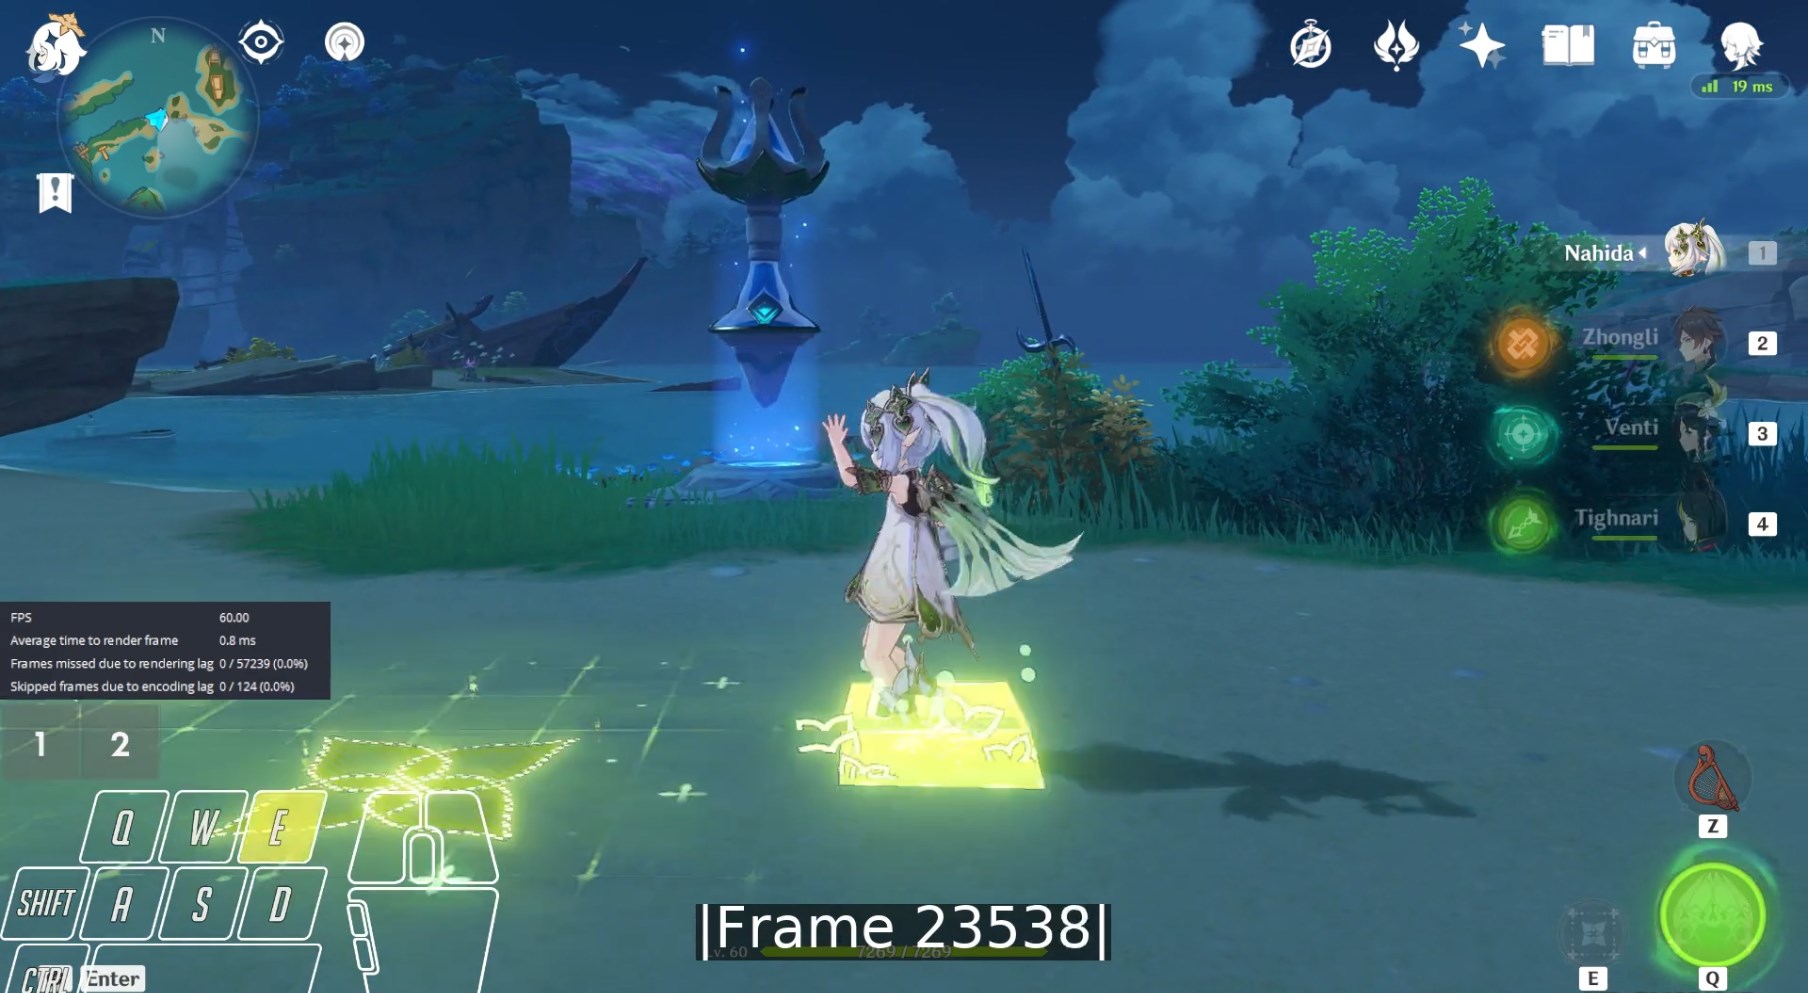
Example: Nahida N4 ➔ Tap E
1 frame before E start frame:
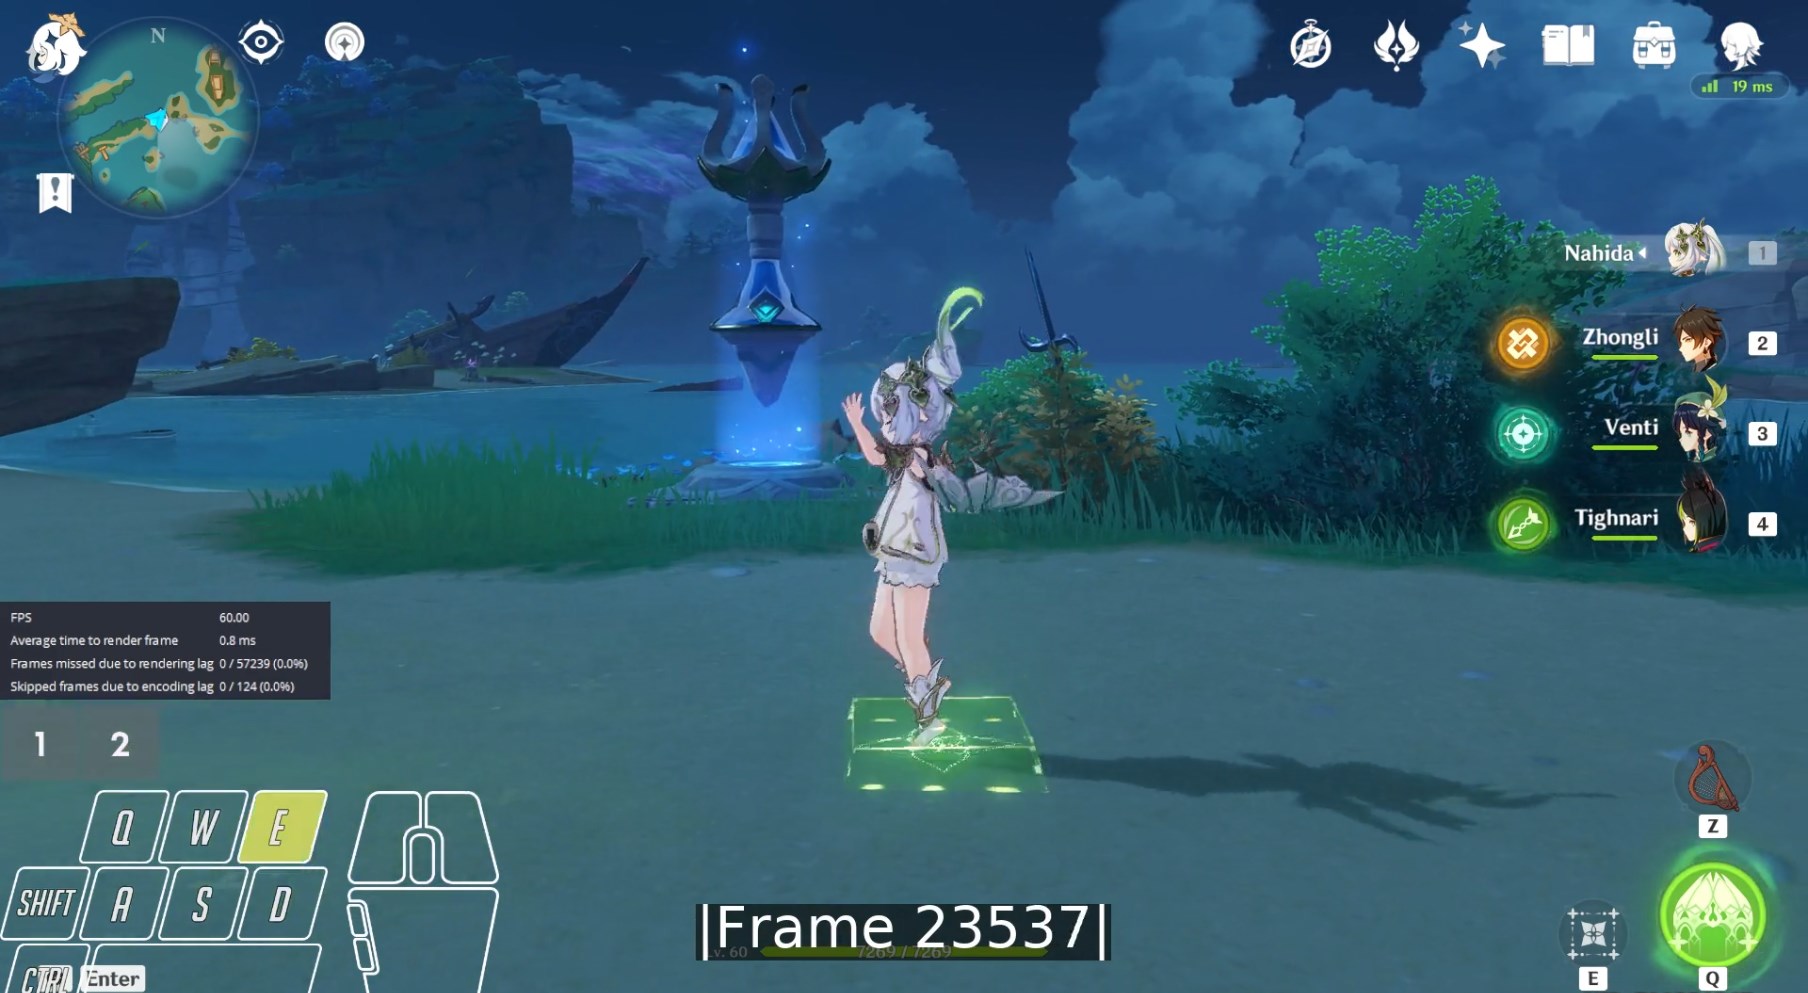
E start frame (notice bottom right E/Q greyout and right team icon greyout):
1 frame before E cd start frame:
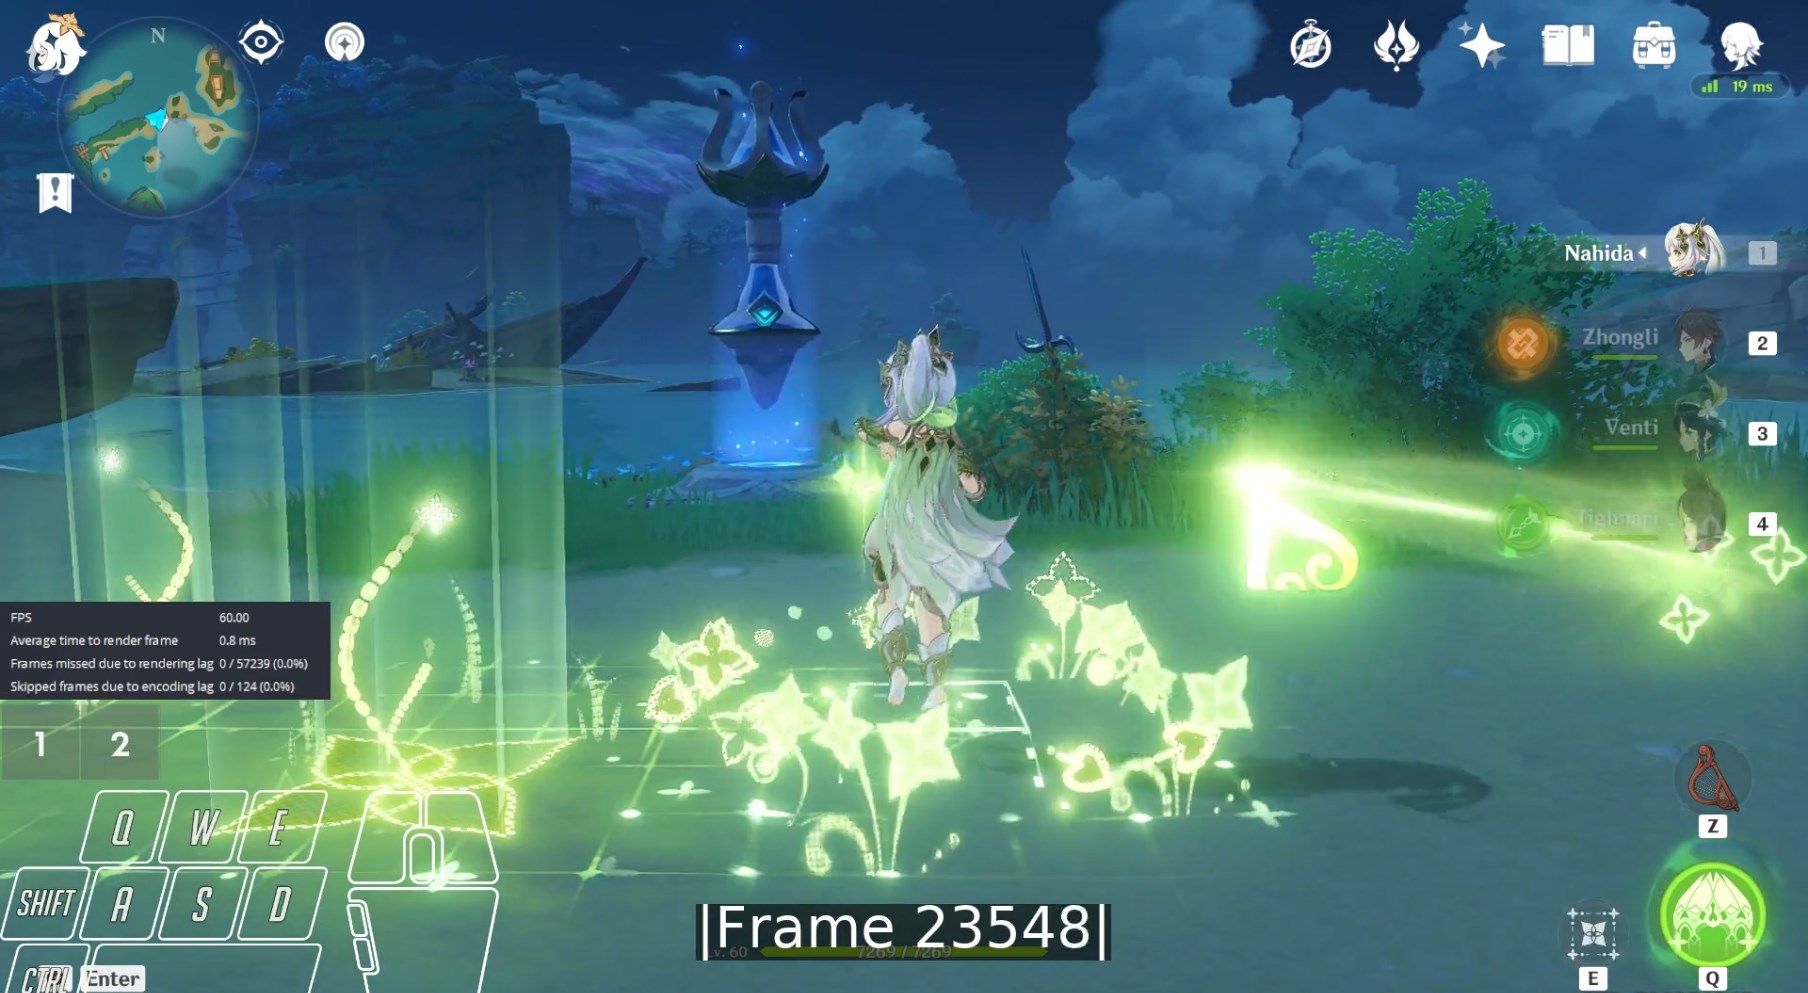
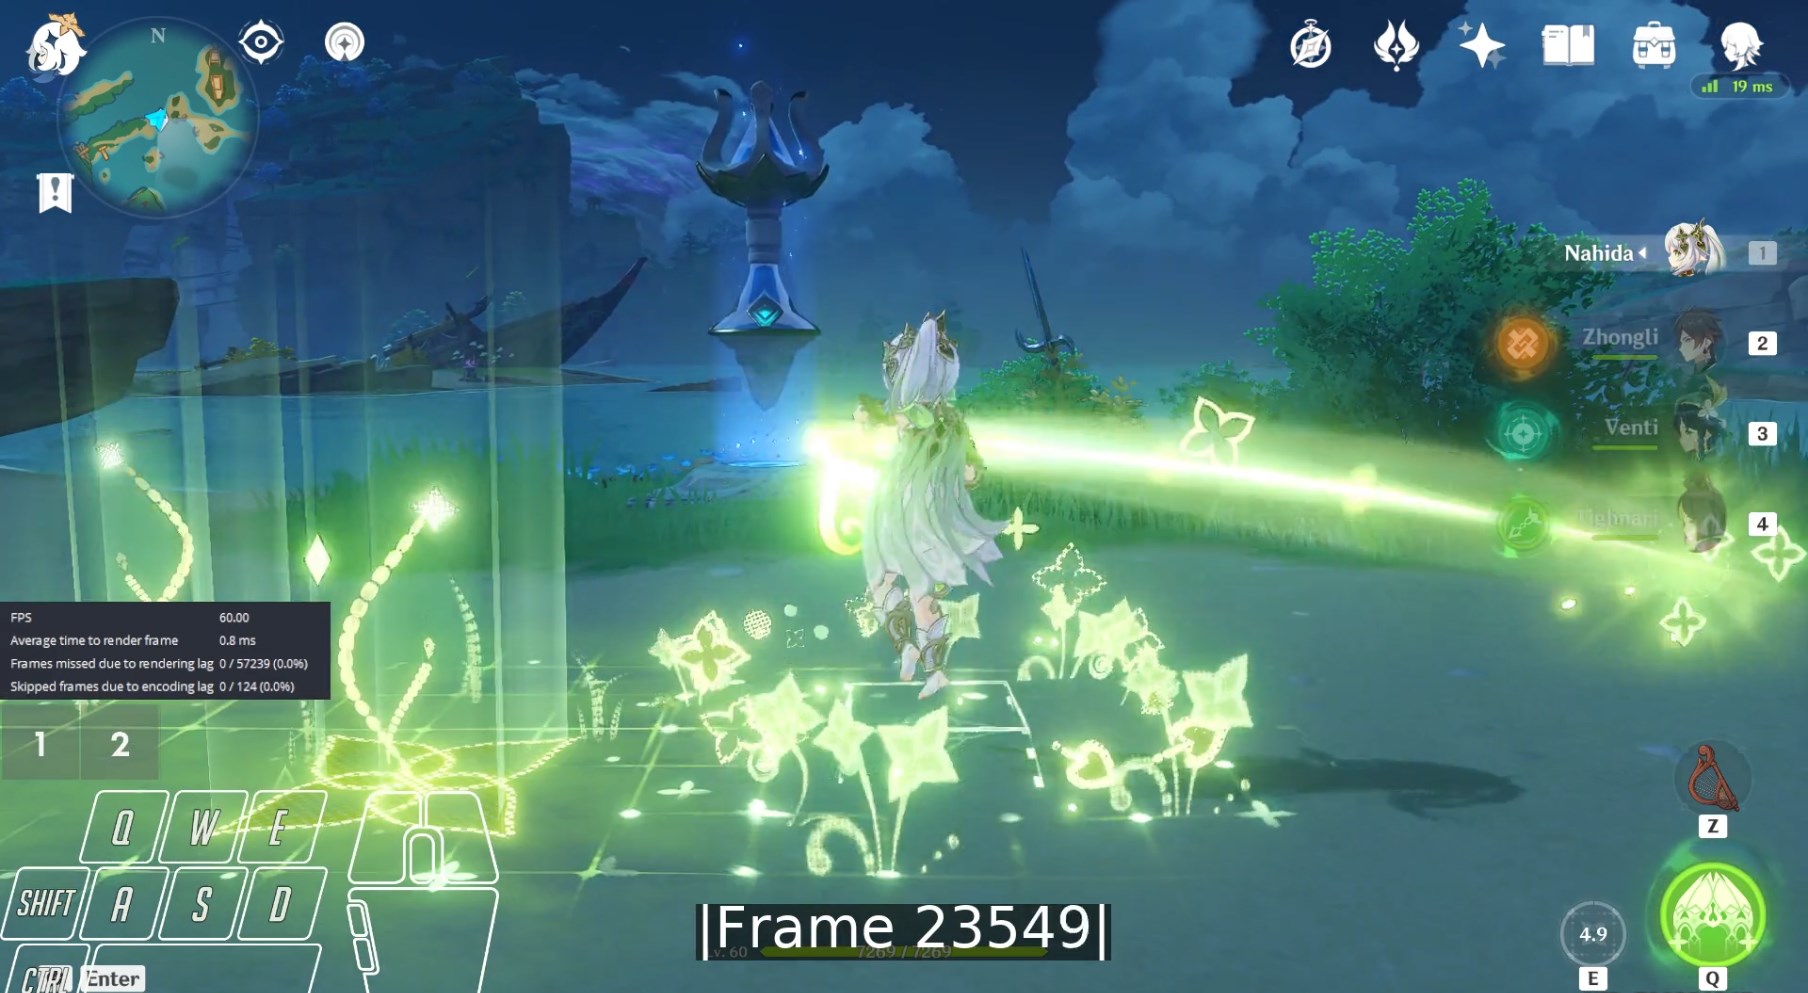
E cd start frame (notice bottom right cd starting as 4.9):
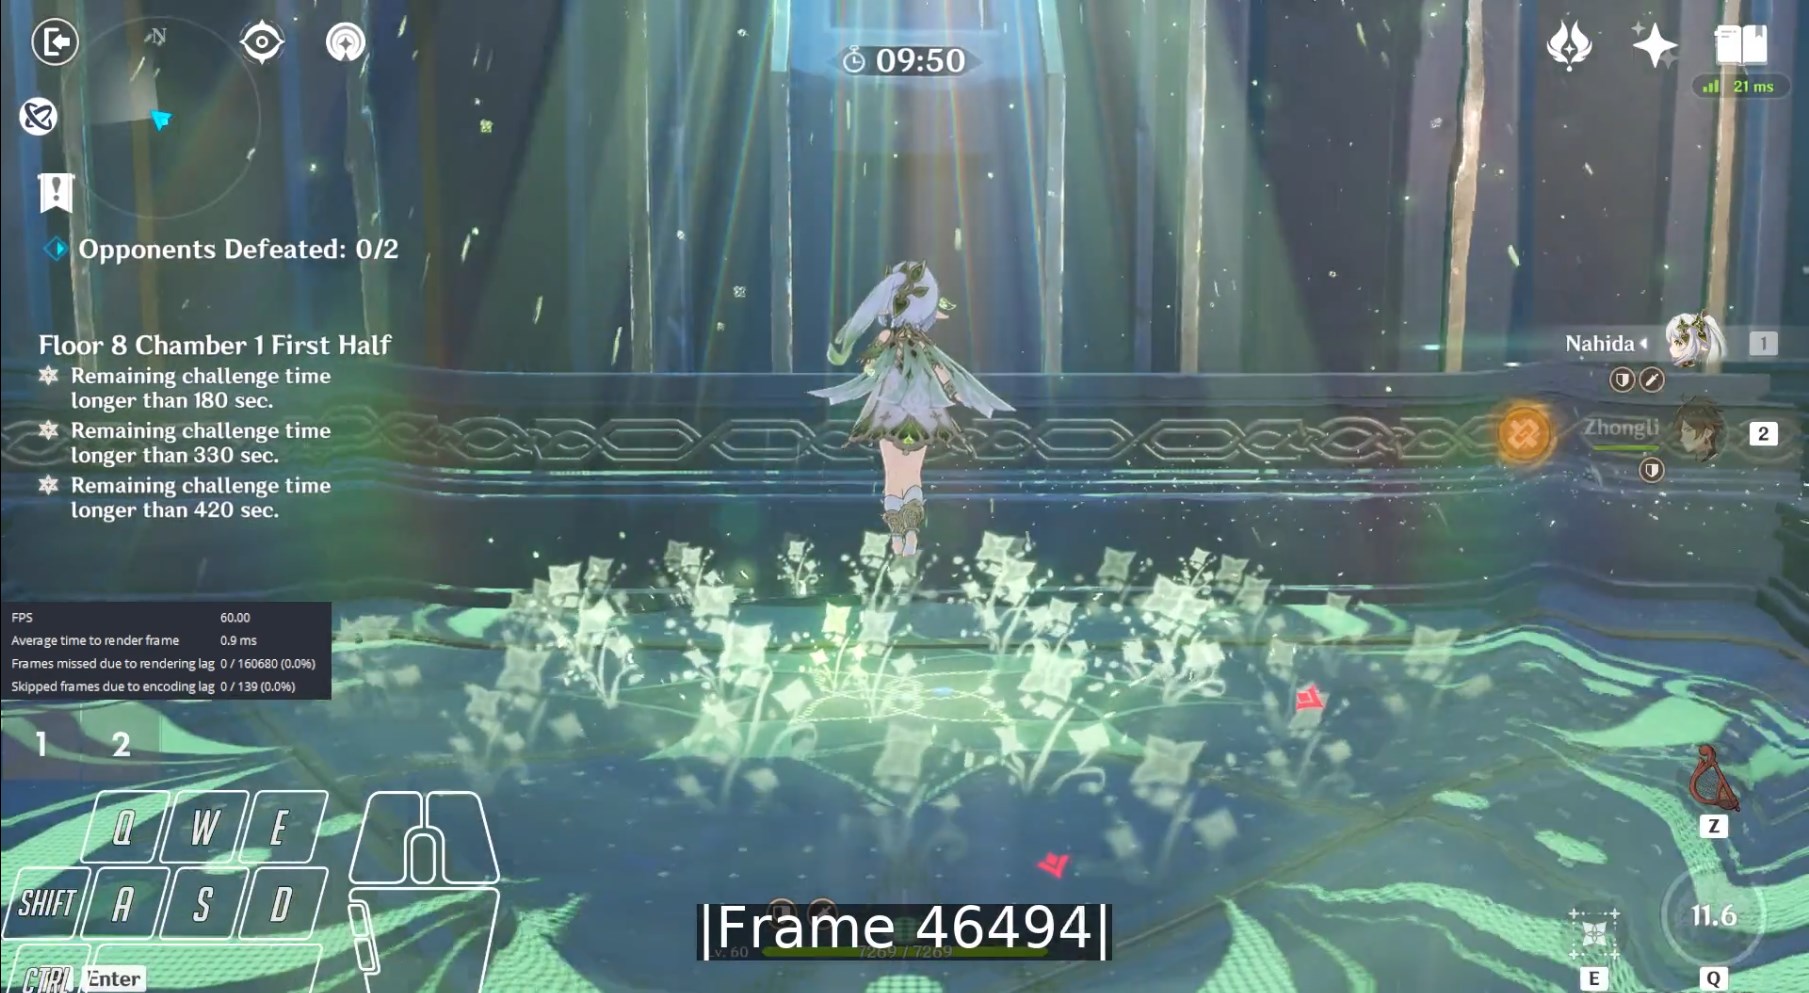
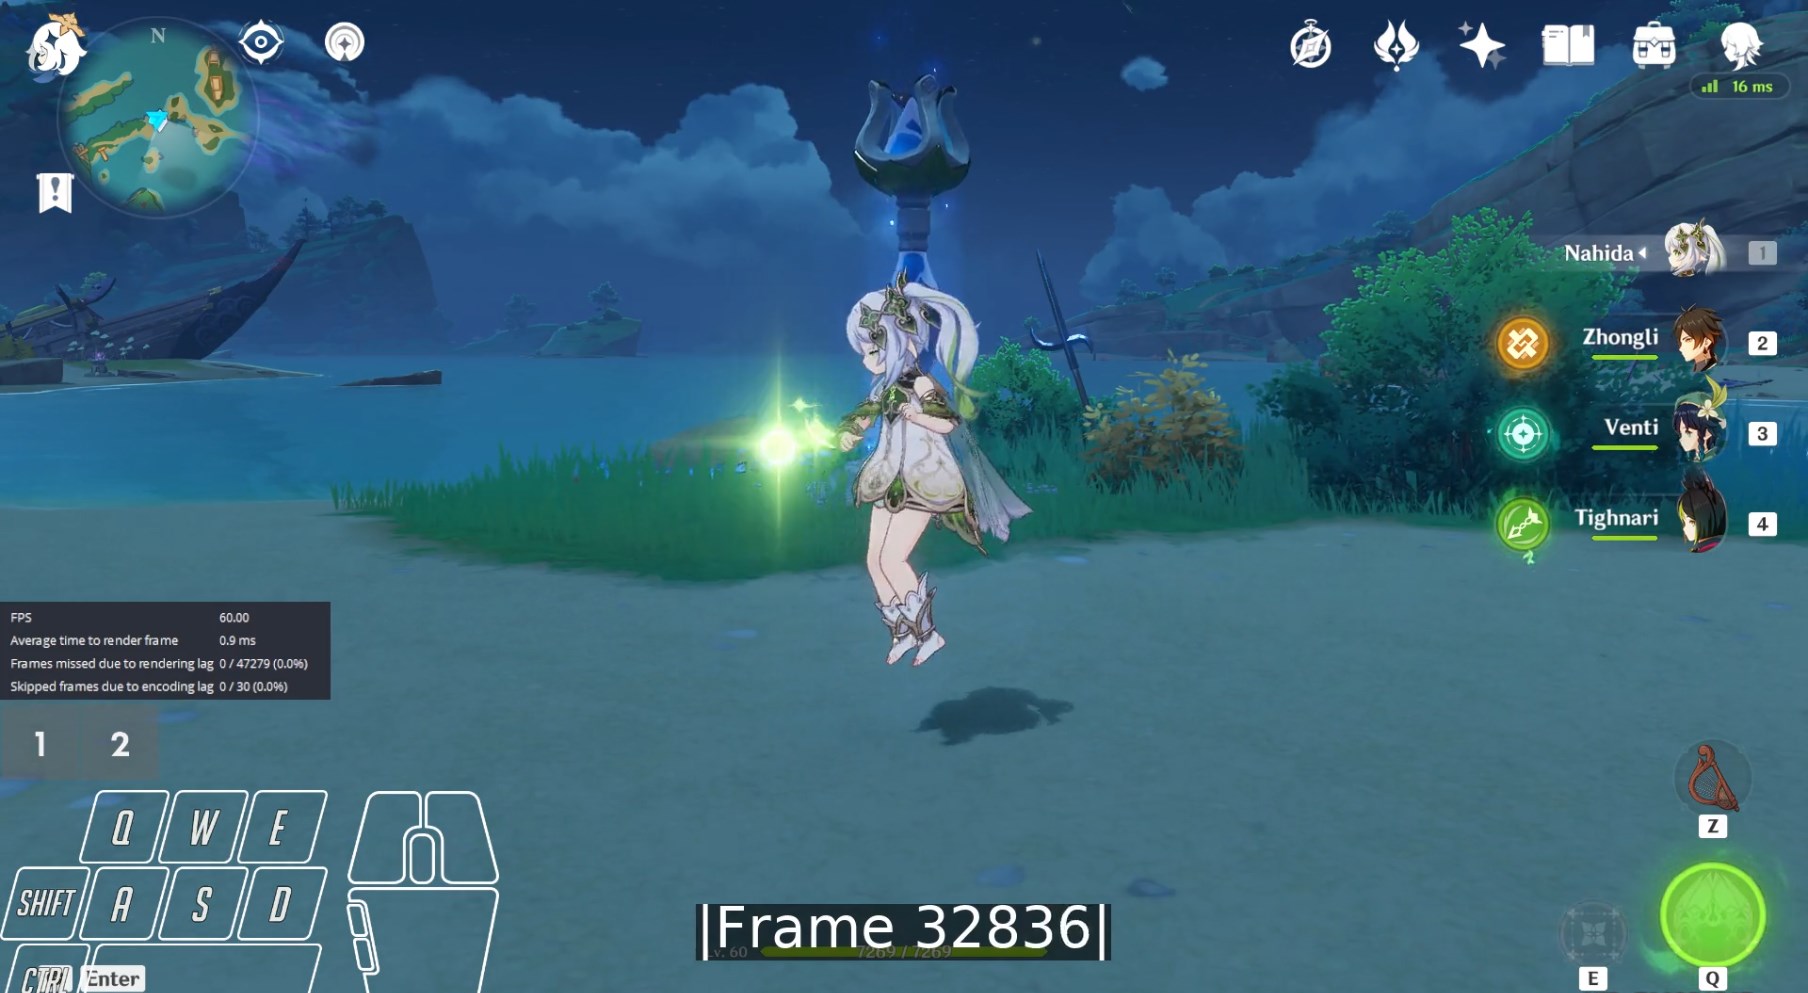
Q
Use the E/Q greyout frame as start frame for 4* Qs. Use the frame that the camera switches to burst cam for 5* Qs.
Do not forget to count the cd start and energy drain frames from the Q hitmark recording. The Q cancel recordings cannot be used for this in the case of 5* Qs, because cam cancels should be avoided there.
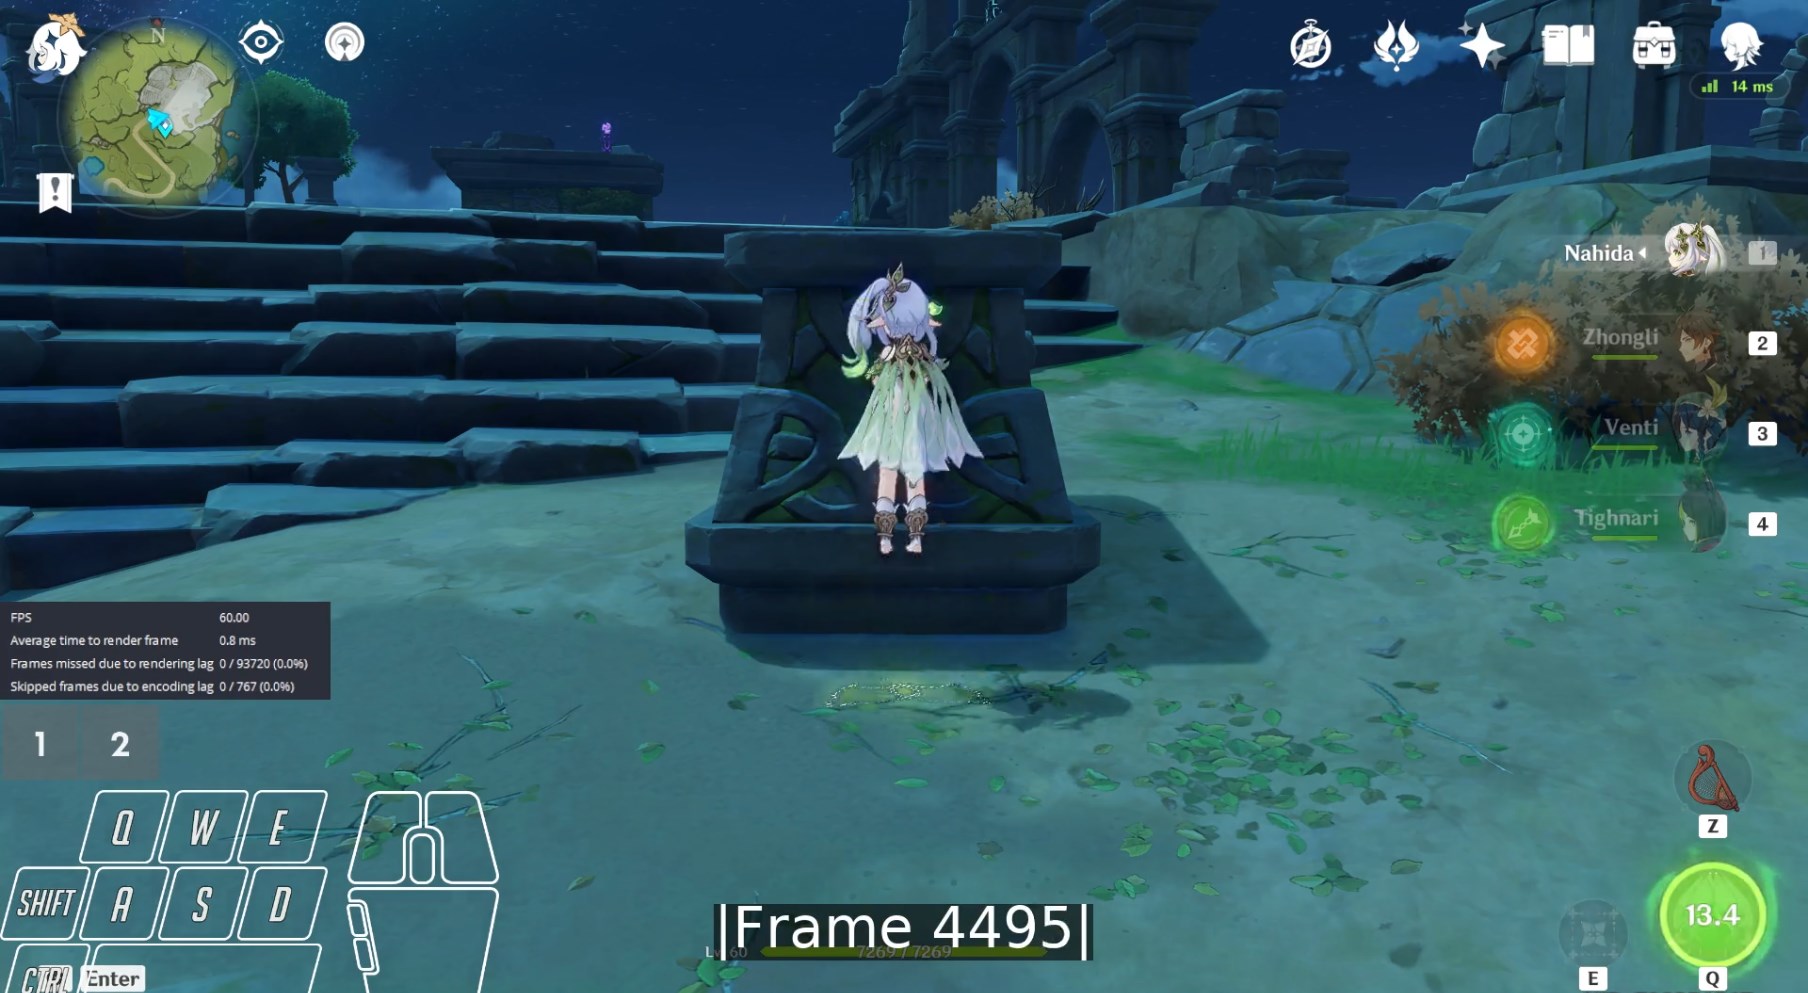
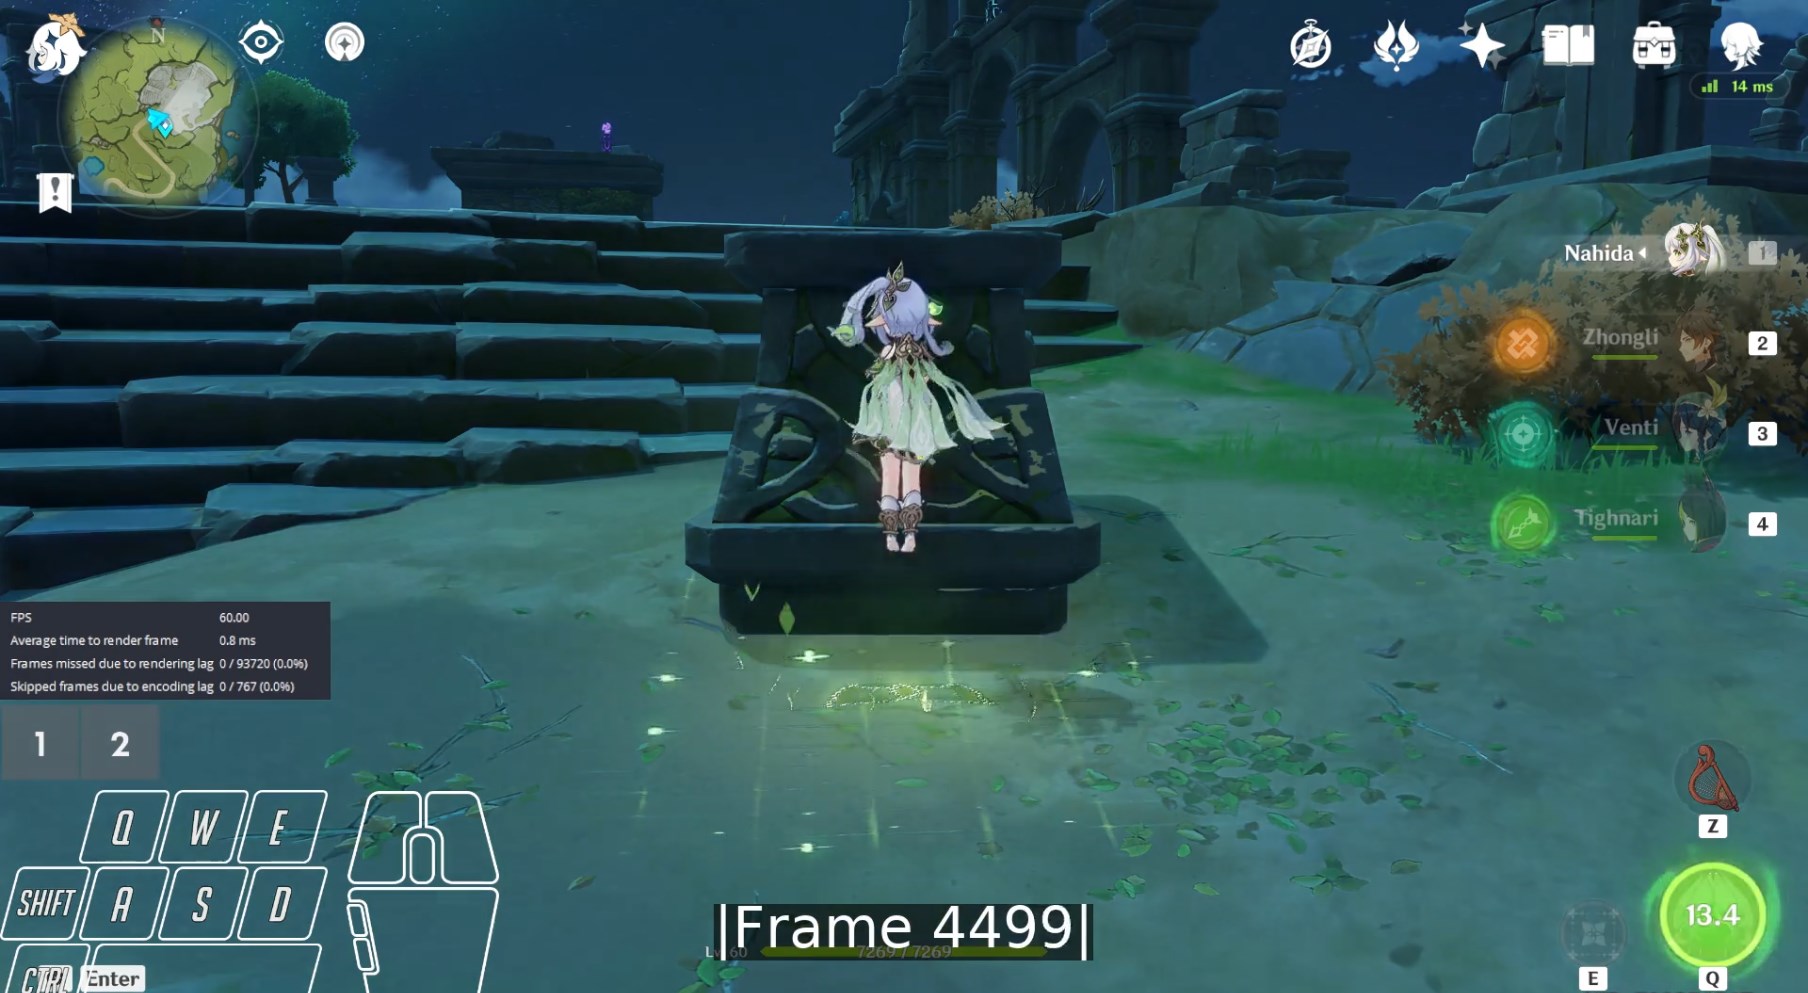
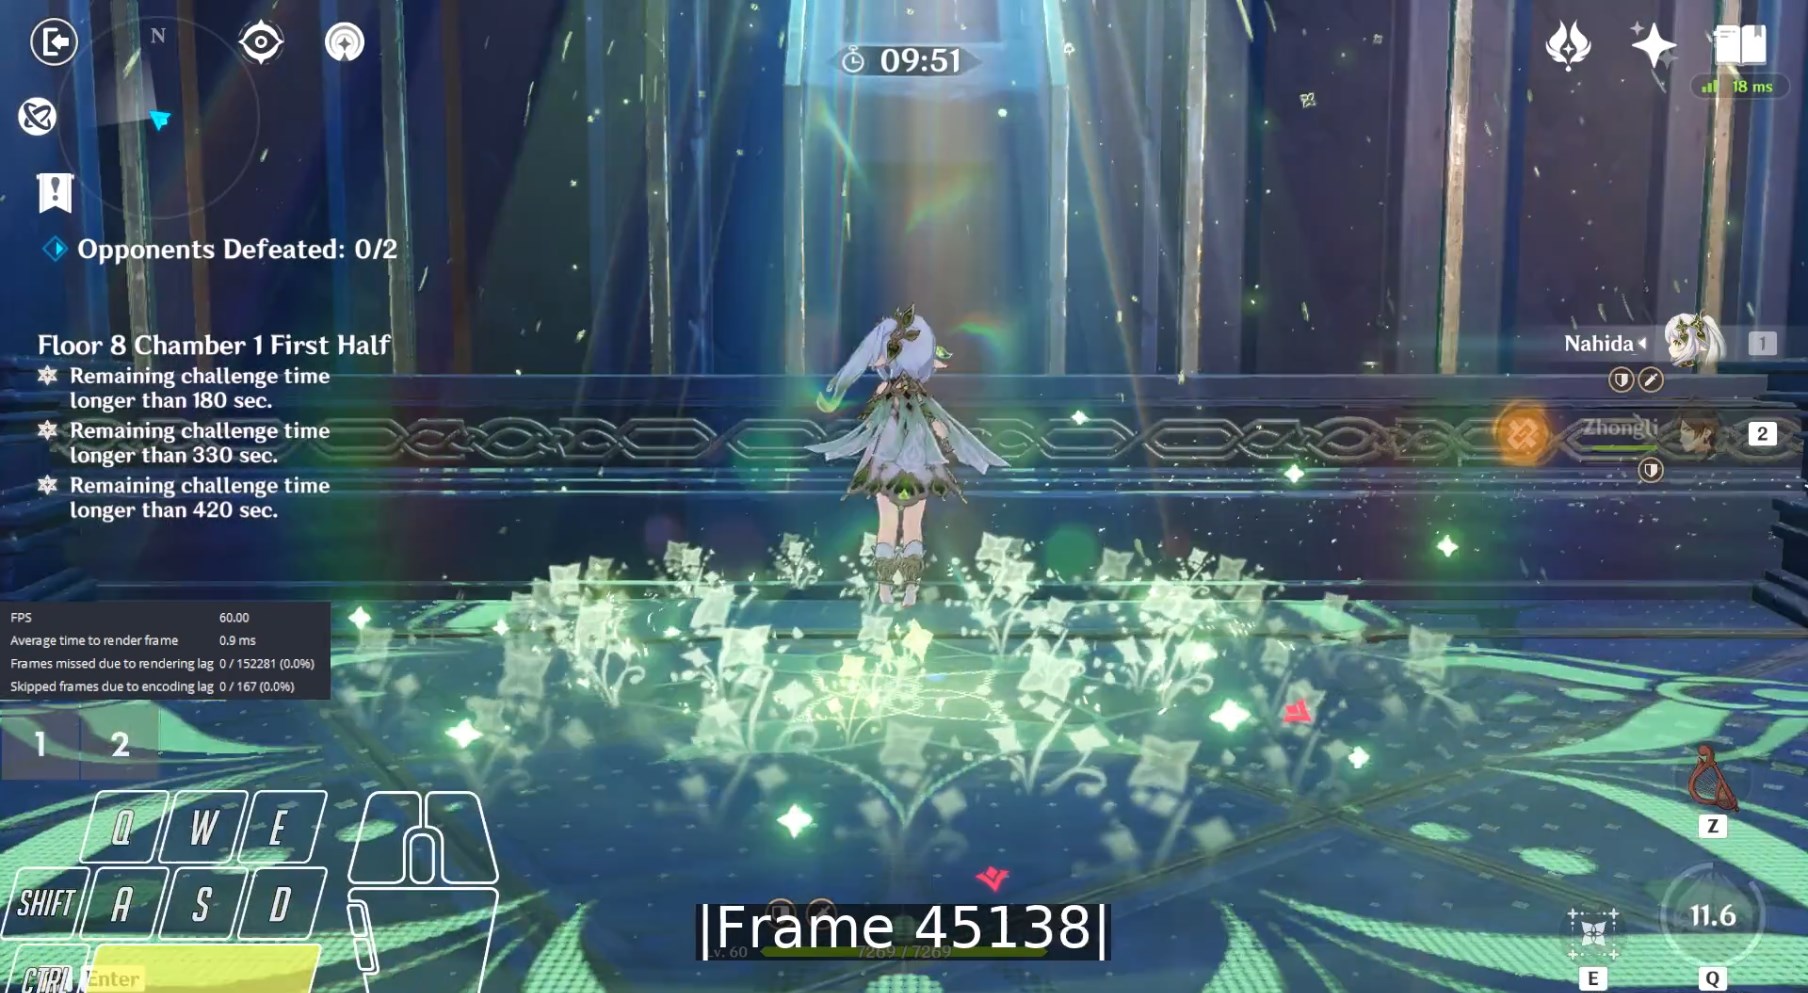
Example: Nahida Q Duration
1 frame before Q start frame:

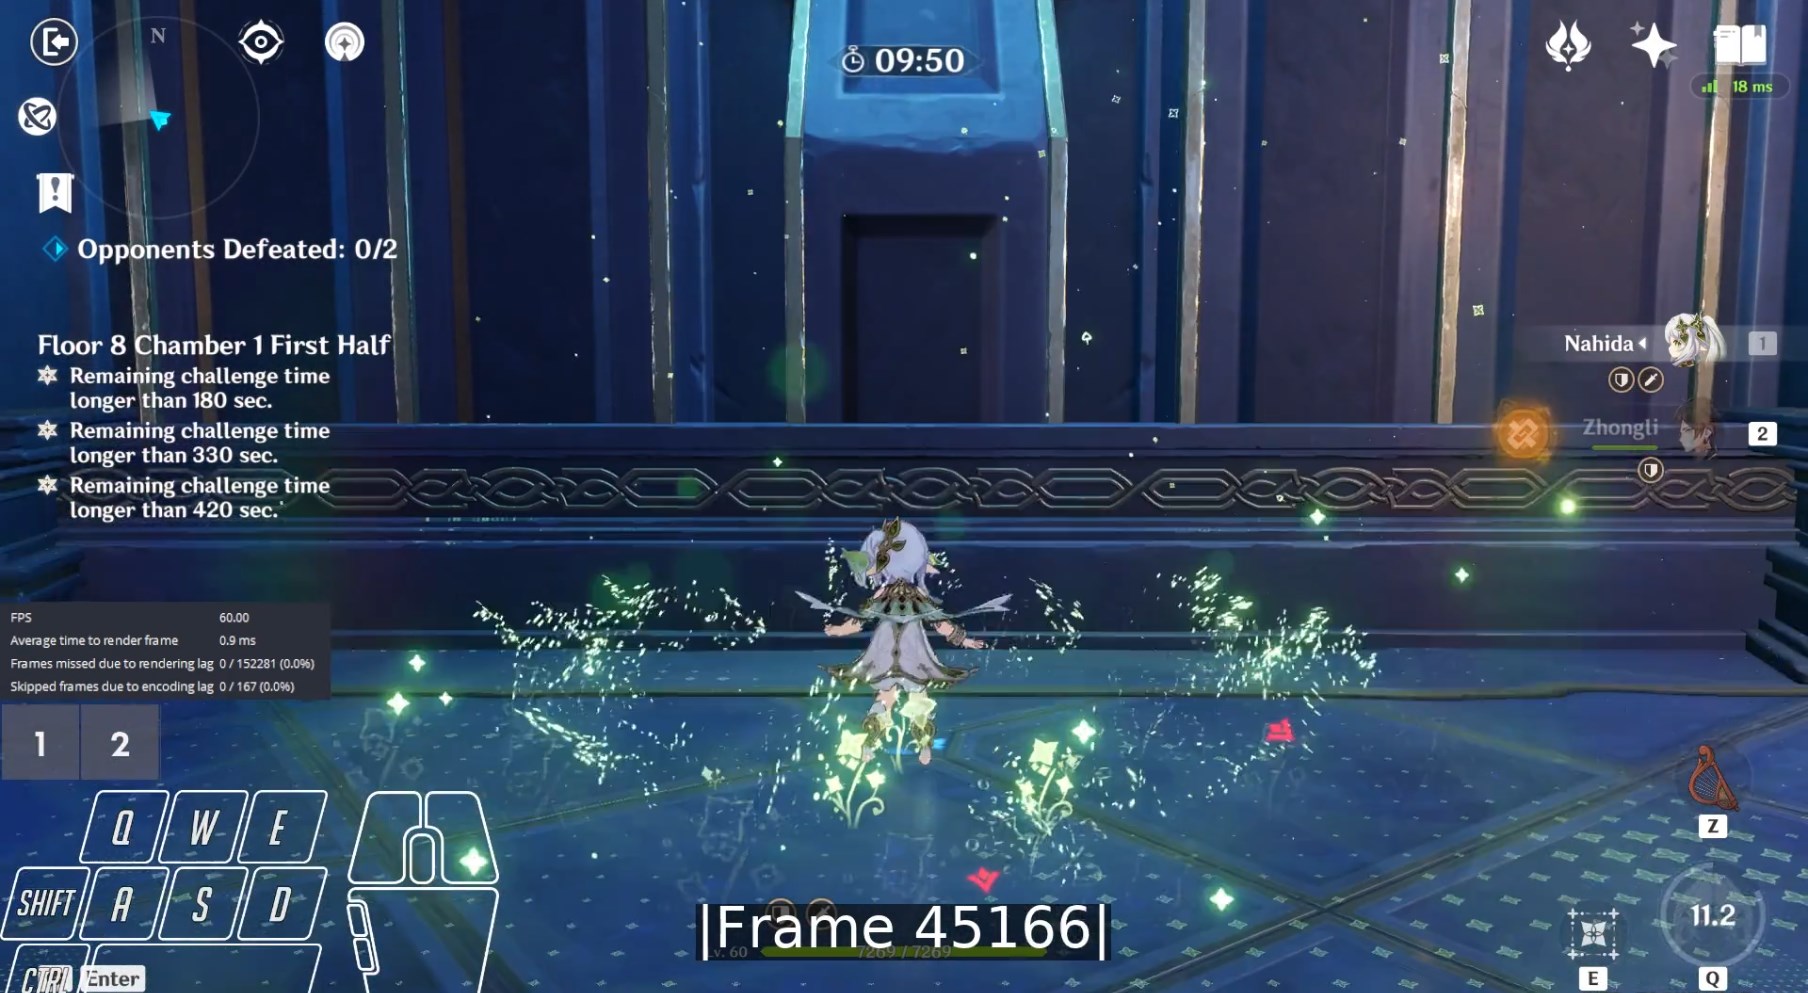
Q start frame (same as cd start in this case, notice bottom right q cd starting as 13.4):
1 frame before Q energy drain frame:
Q energy drain frame (notice bottom right energy fully draining):
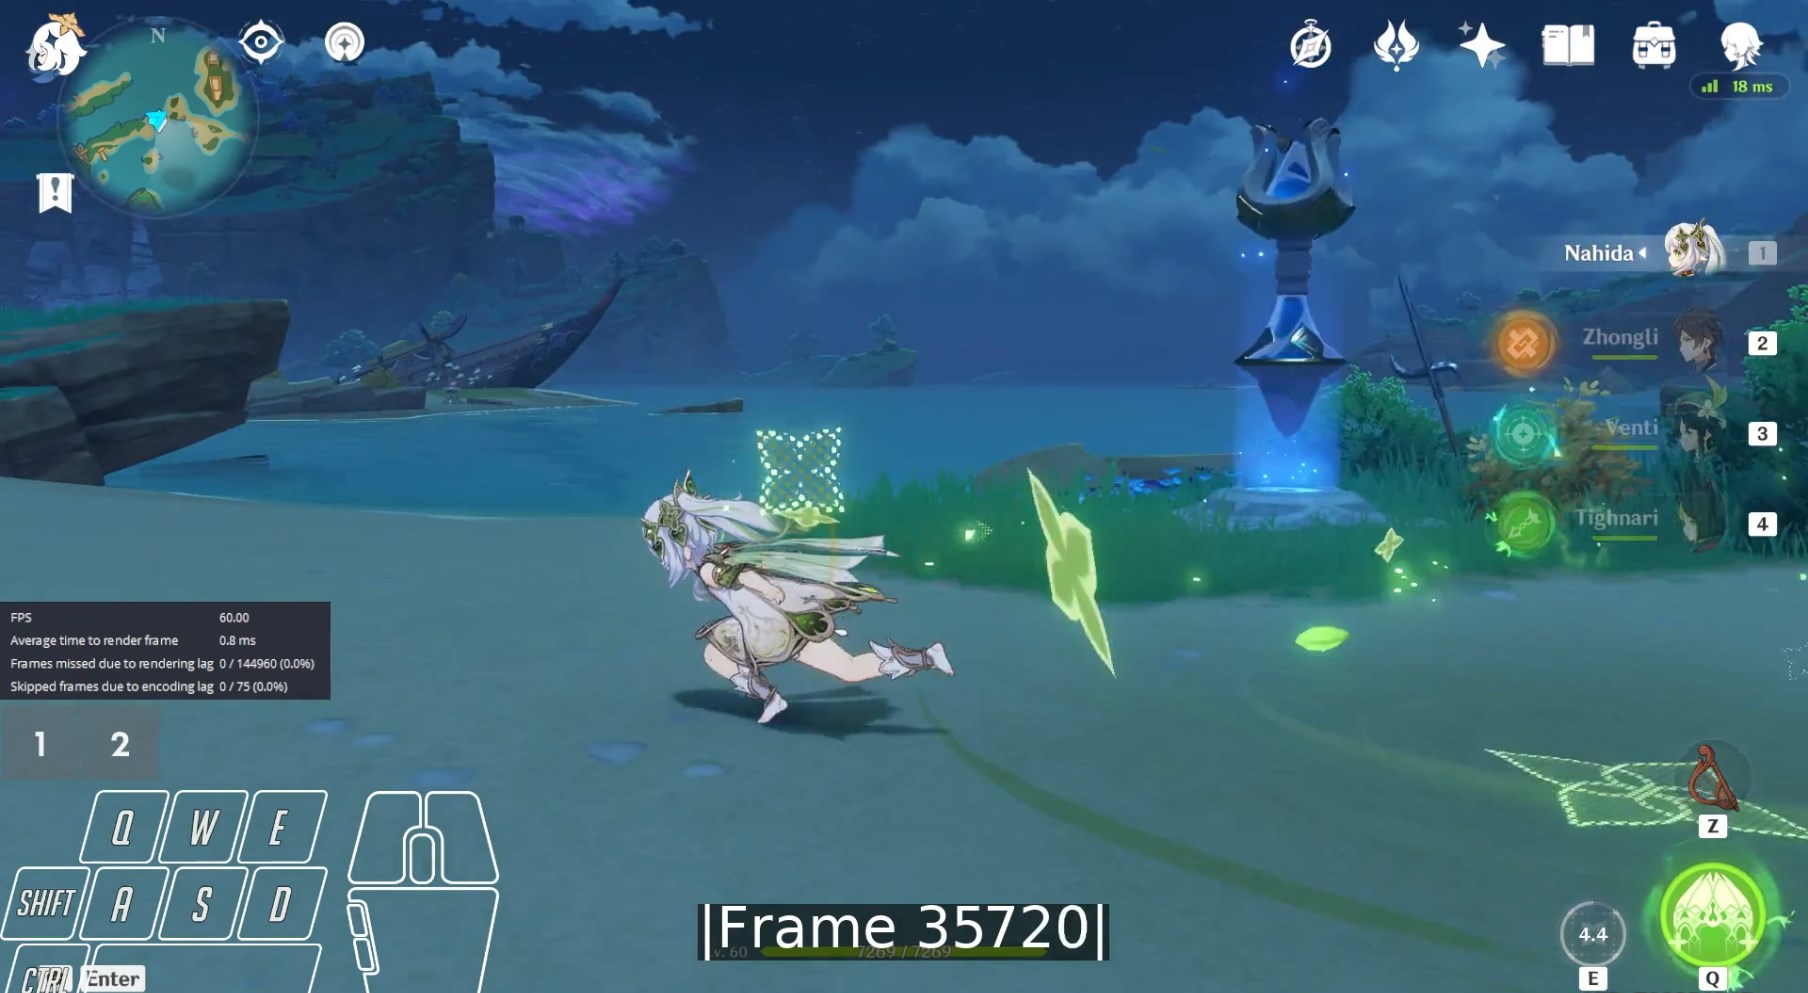
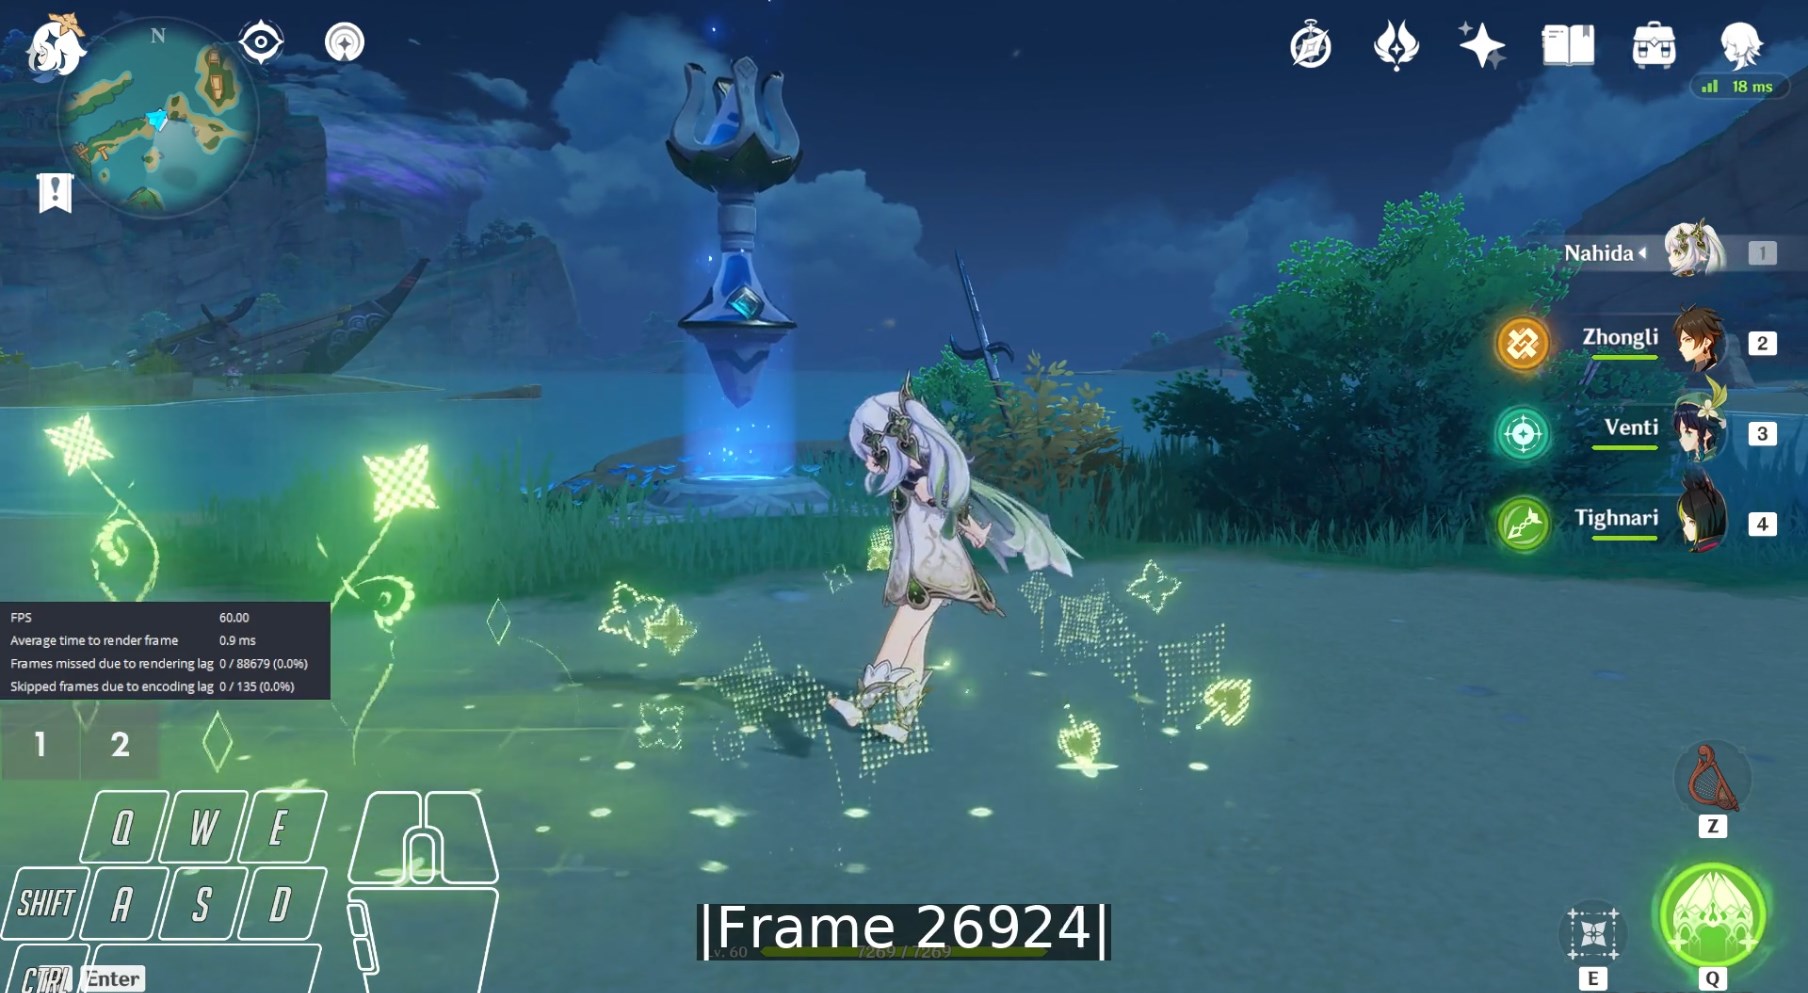
D
Use the team icon greyout frame as start frame.
Use the team icon ungray frame as end frame if counting dash length for the Dash/Jump page.
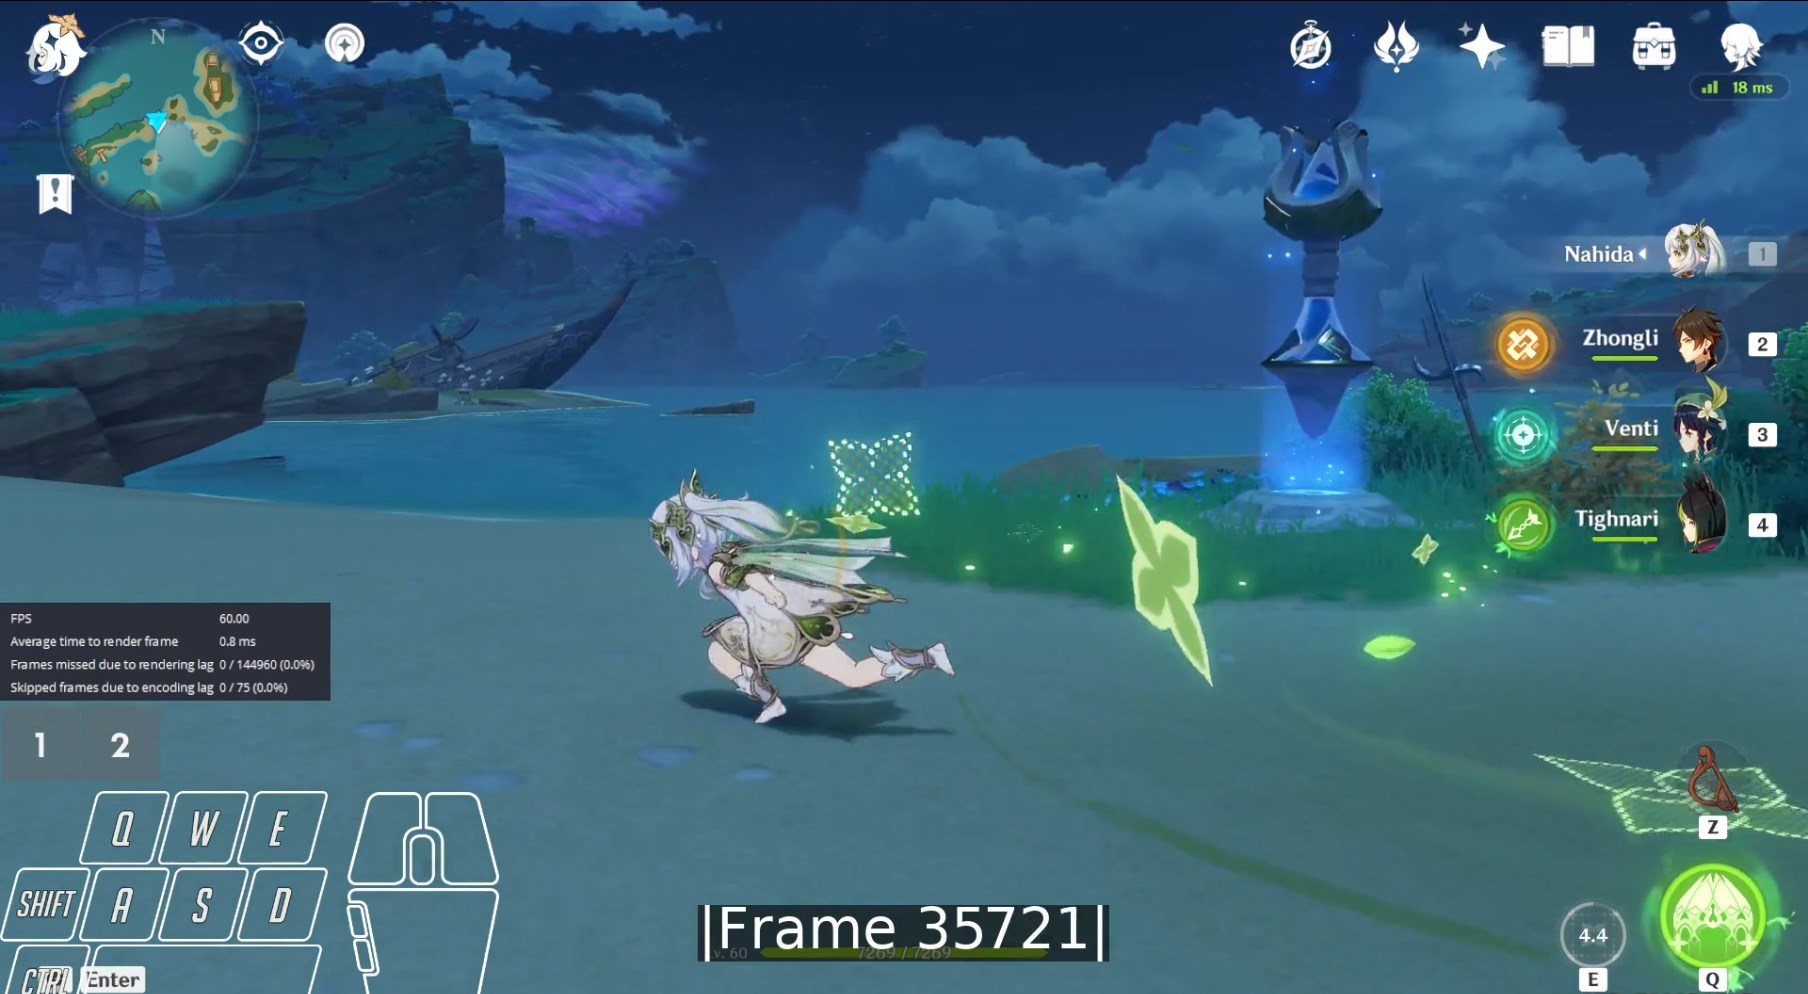
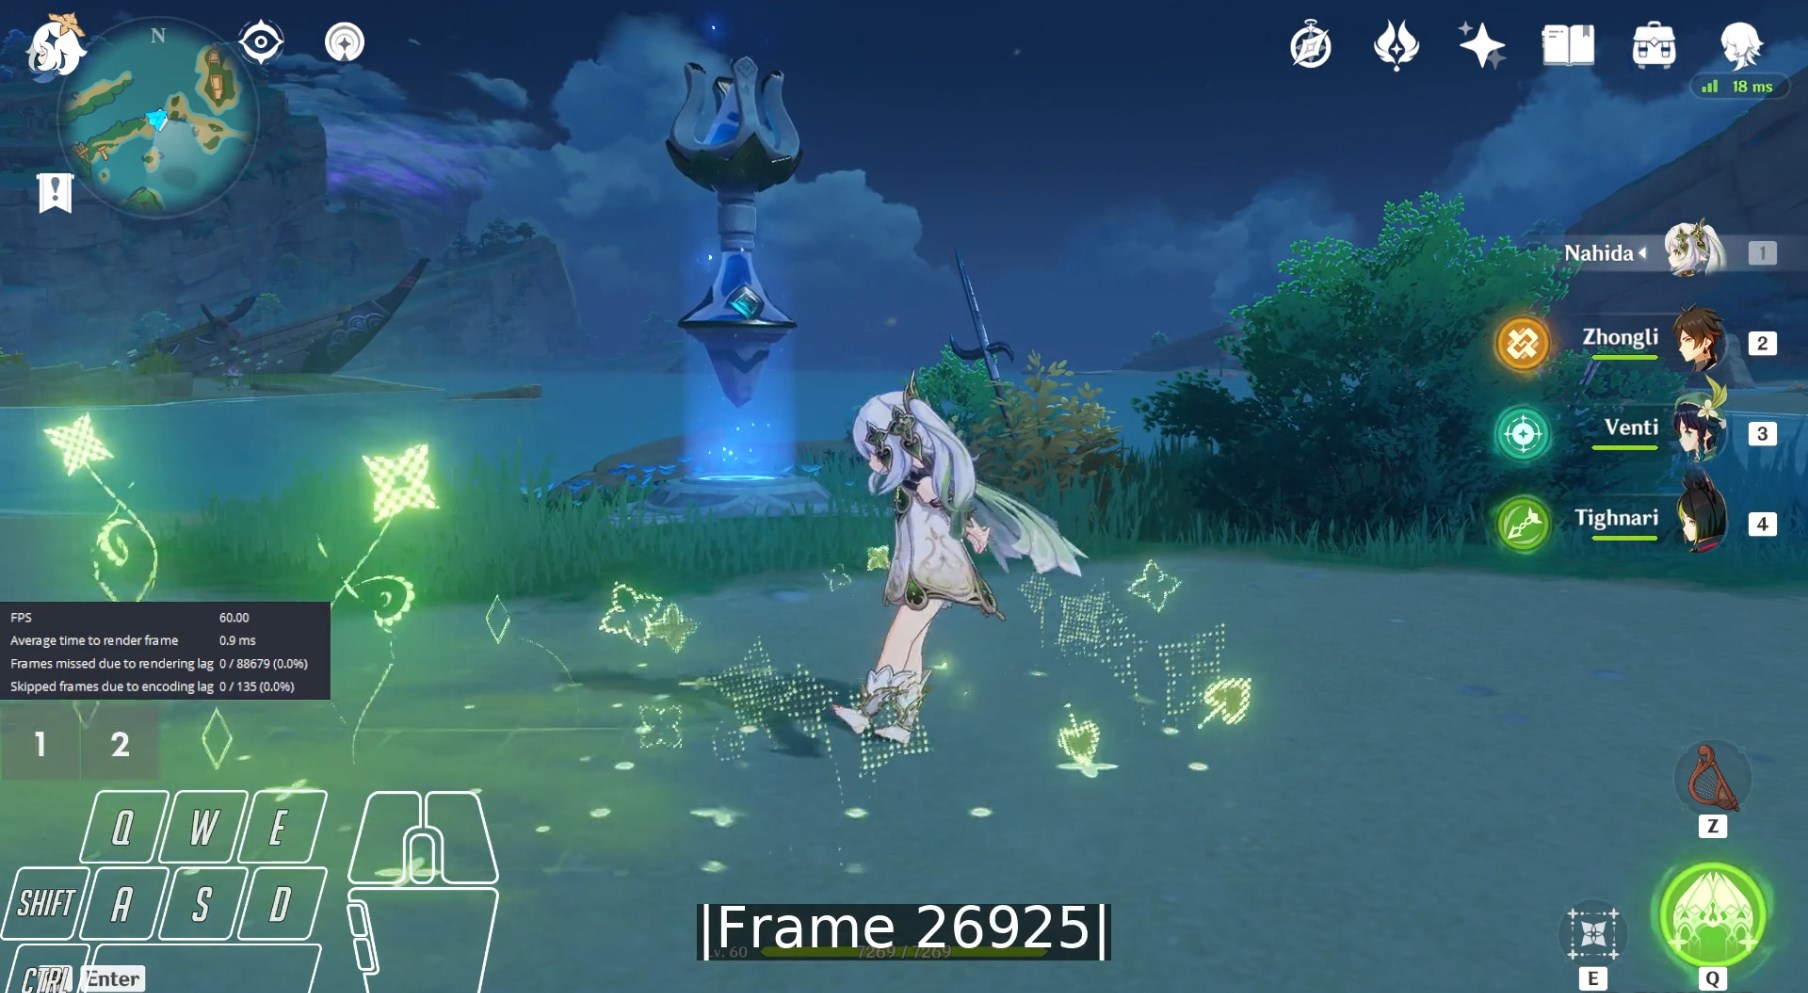
Example: Nahida Tap E ➔ D
1 frame before D start frame:
D start frame (notice right team icon greyout):

1 frame before D end frame:
D end frame (notice right team icon ungray):
J
Use the team icon greyout frame as start frame.
Use the team icon ungray frame as end frame if counting dash length for the Dash/Jump page.
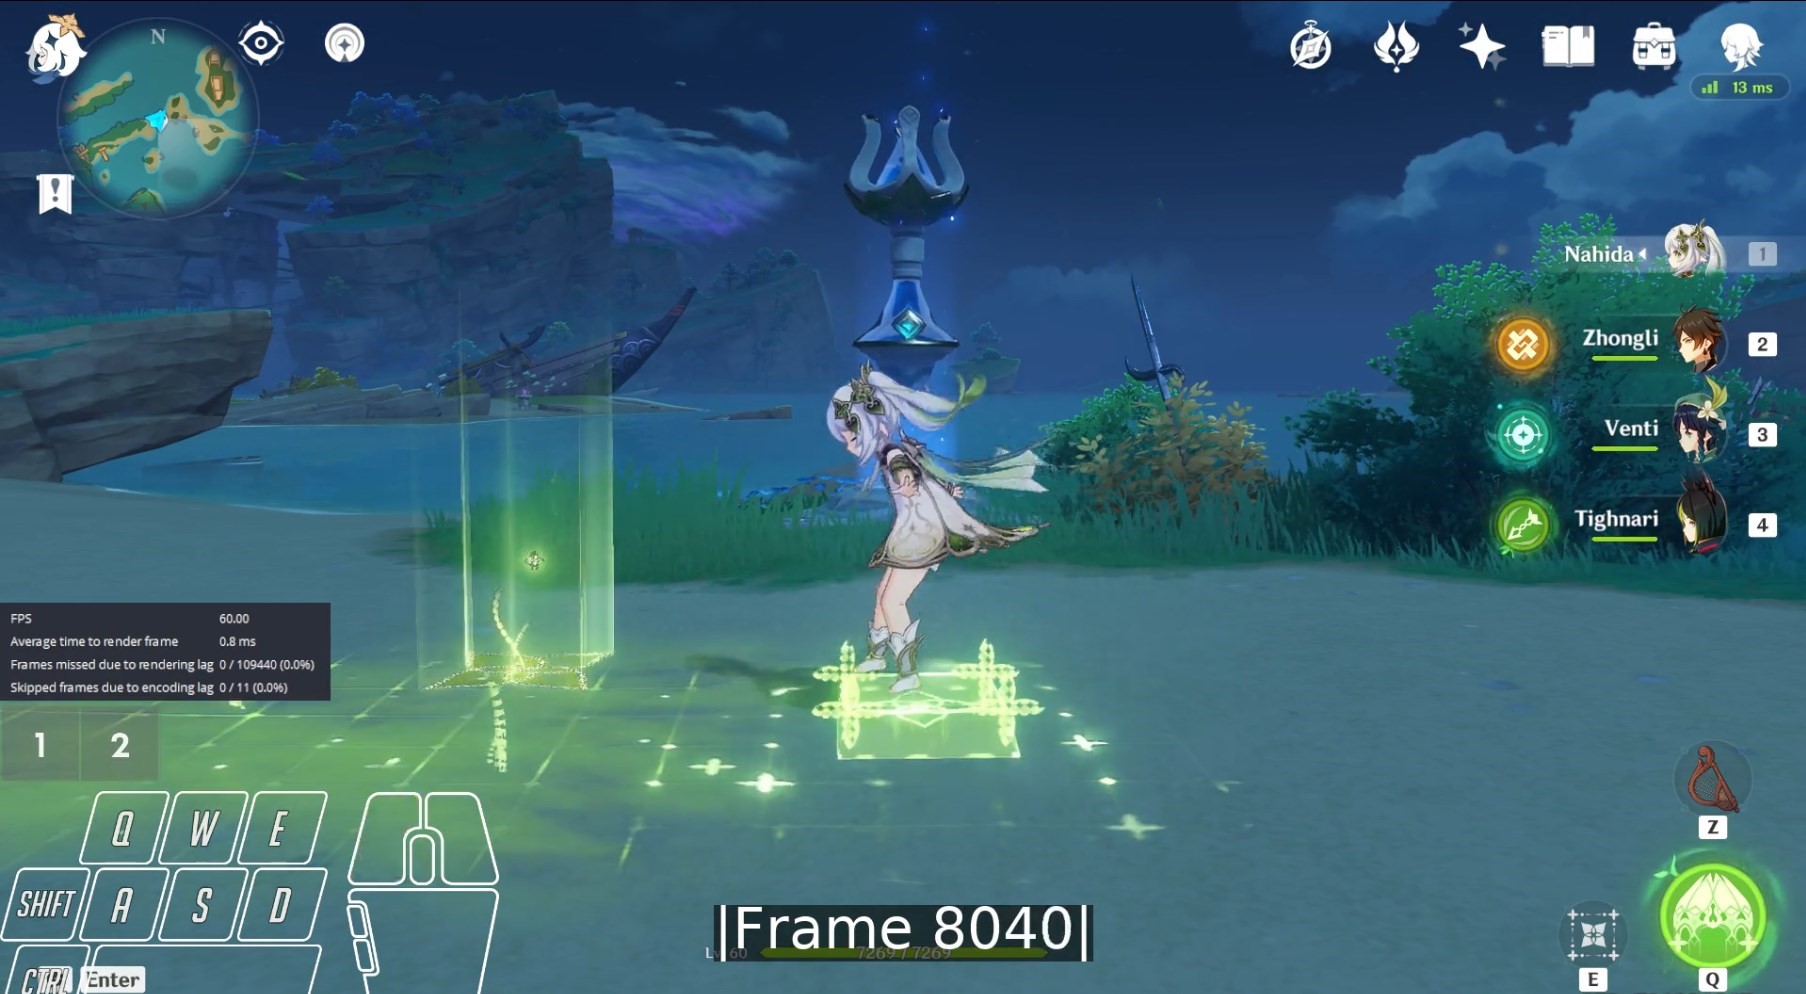
Example: Nahida Q ➔ J
1 frame before J start frame:

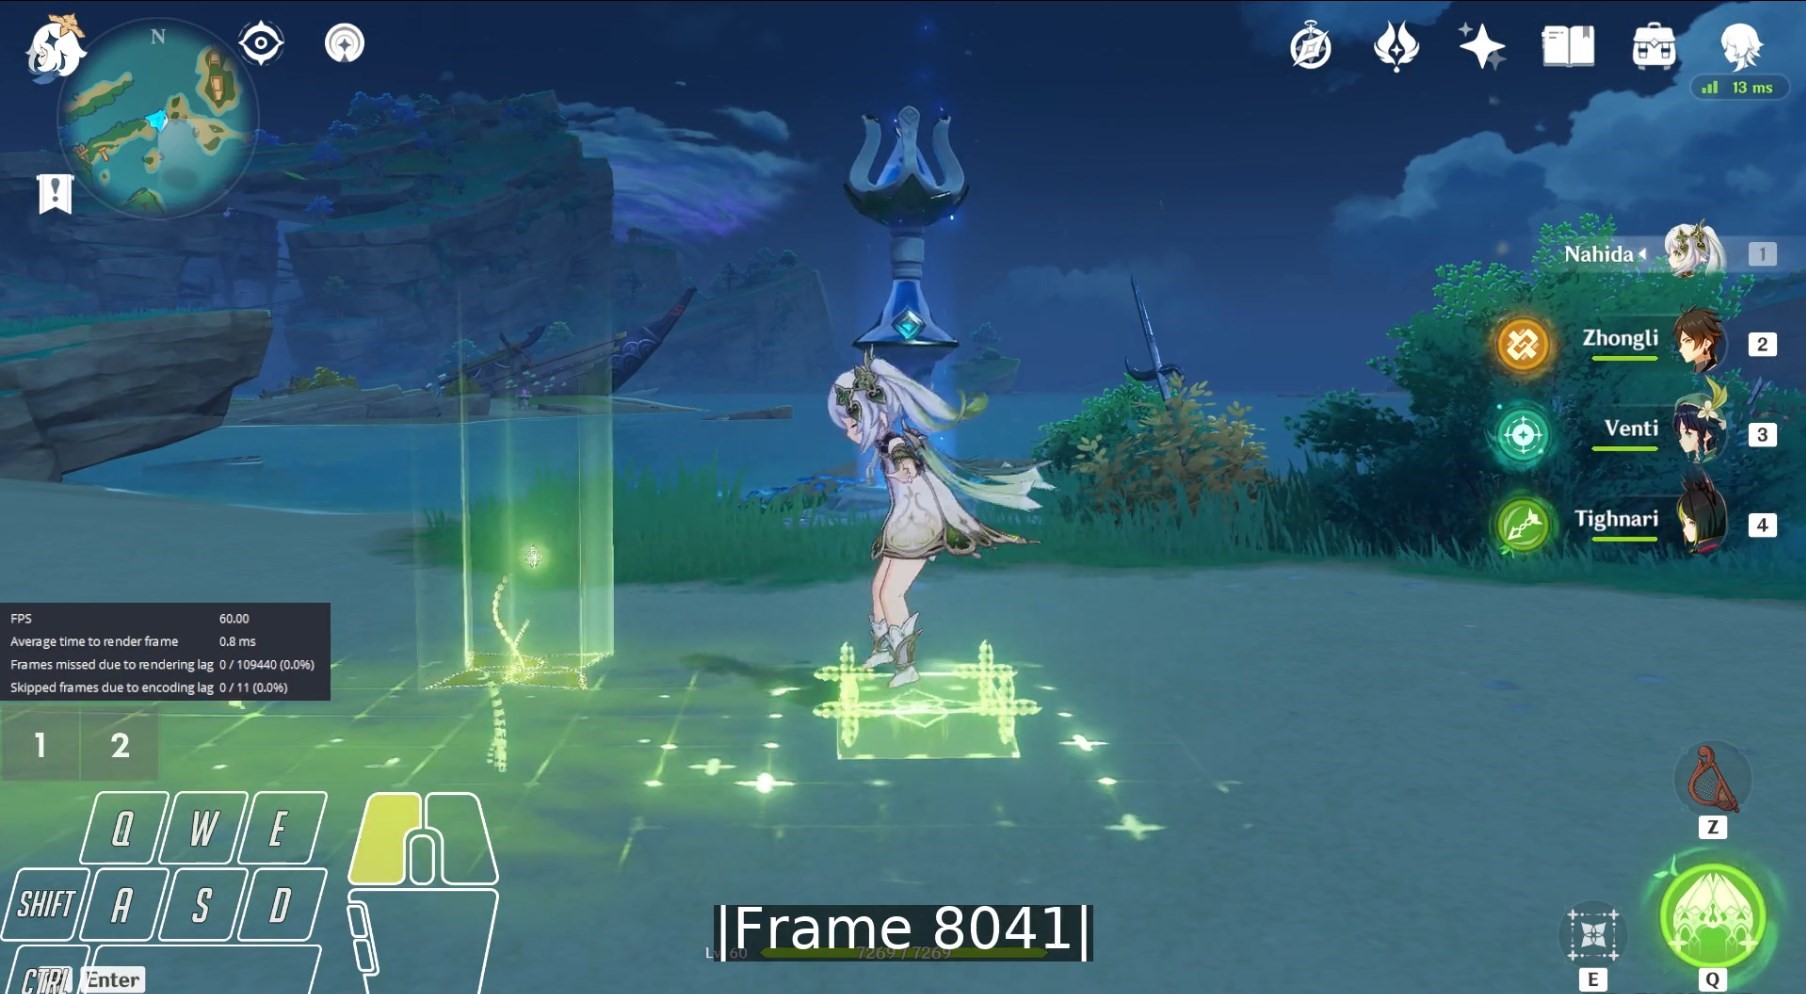
J start frame (notice right team icon greyout):
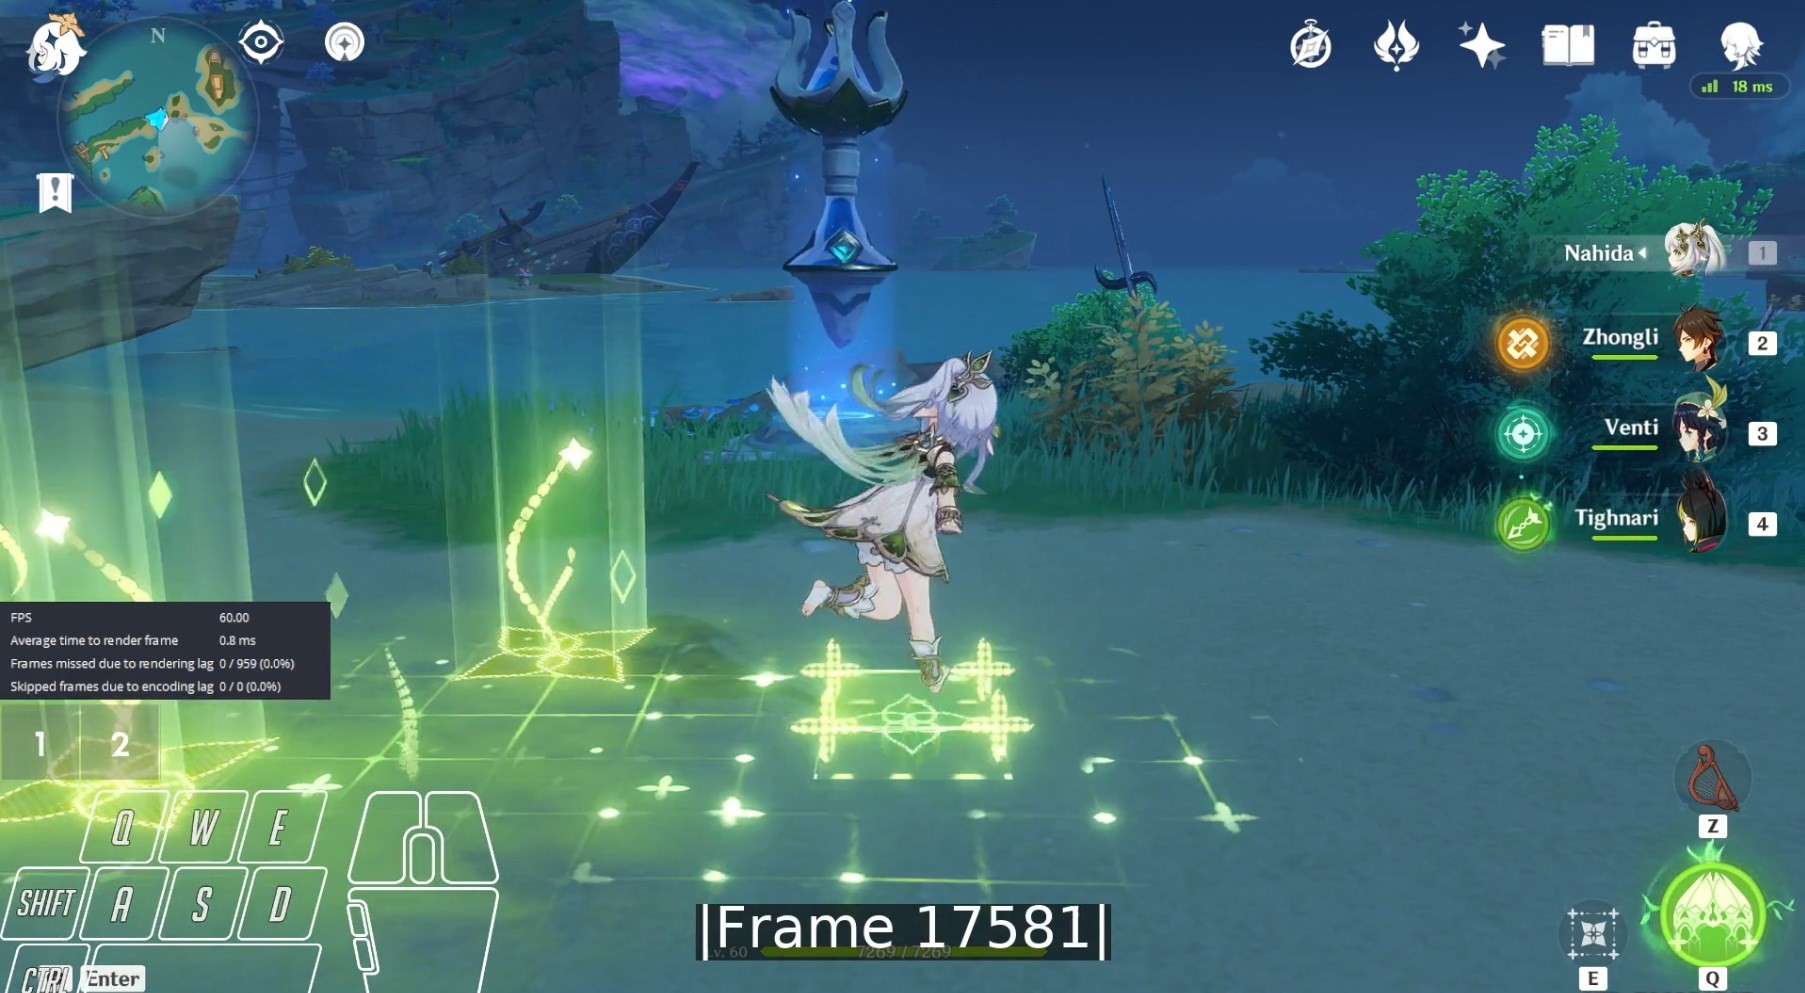
1 frame before J end frame:
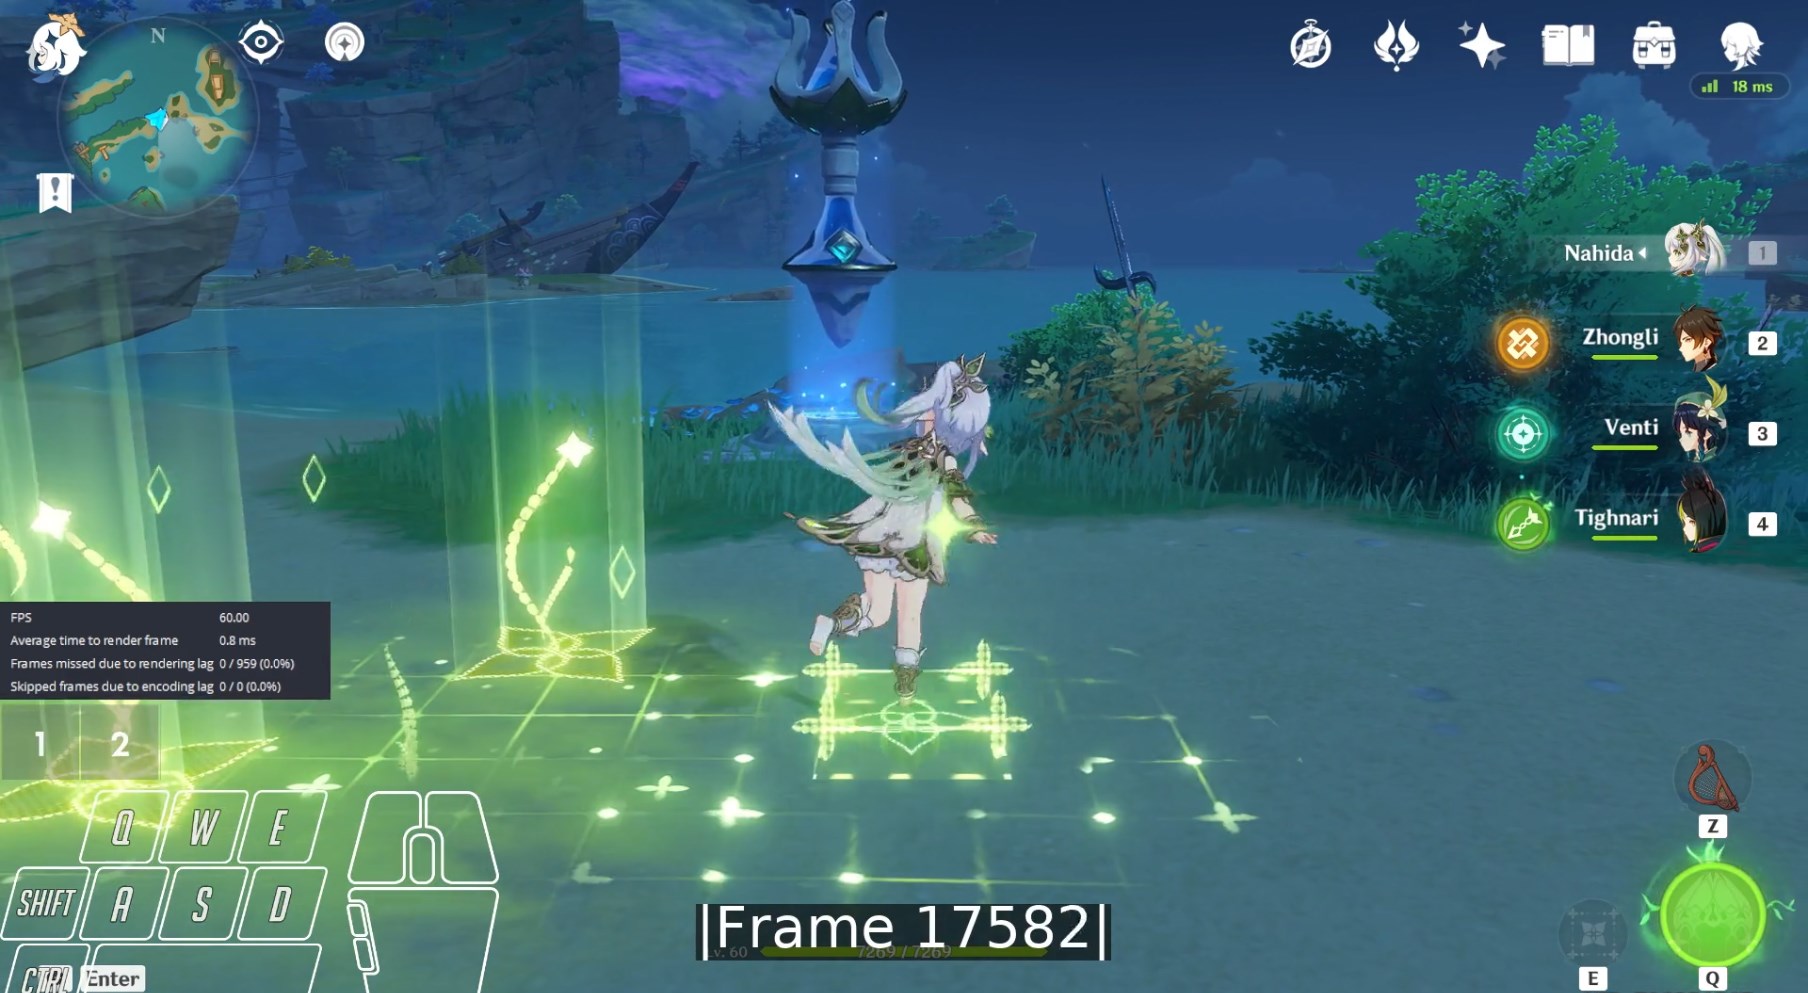
J end frame (notice right team icon ungray):
Walk
Use the first frame that the character/weapon moves abruptly as start frame.
Example: Nahida N4 ➔ Walk
1 frame before Walk start frame:
Walk start frame:
Swap
Use the team icon ungray frame as start frame if the previous action grayed those out. Use the swap frame as start frame if the previous action did not gray those out.
Example With Greyout: Nahida Q ➔ Swap
1 frame before team icon ungray frame:
Team icon ungray frame:

Example Without Greyout: Nahida CA ➔ Swap
1 frame before swap frame:
Swap frame:

Hitmark
Within the hitmark end frame category, there is a split between hitlag and non-hitlag hitmarks.
For abilities with multihits that contain both hitmarks with and without hitlag, exclude the hitlag frames from the counts entirely.
Example Kazuha N5:
- N5-1 has hitlag, so count from N5 start until N5-1 hitlag start
- since N5-1 had hitlag, use the N5-1 hitlag end as start for the next part of the multihit
- N5-2 has no hitlag, so count from N5-2 start (N5-1 hitlag end in this case) until N5-2 hitmark
- no hitlag, so N5-2 hitmark is used as N5-3 start
- N5-3 has hitlag, so count from N5-3 start (N5-2 hitmark in this case) until N5-3 hitlag start
In the end, the amount of frames between N5 start and N5-2 hitmark can be calculated via summing up the counts up until the N5-2 hitmark.
For more details, please refer to Kazuha's frames sheet and video linked in the sheet.
Hitlag
For more information on hitlag, please refer to the hitlag page in this section
Any abilities with hitlag should use the hitlag start frame as the hitmark/end frame.
Example: Alhaitham N1 Hitmark
1 frame before N1 hitlag start frame:
N1 hitlag start frame:
No Hitlag
This category can be split by whether the non-hitlag hitmark applies an element or not.
Elemental Application
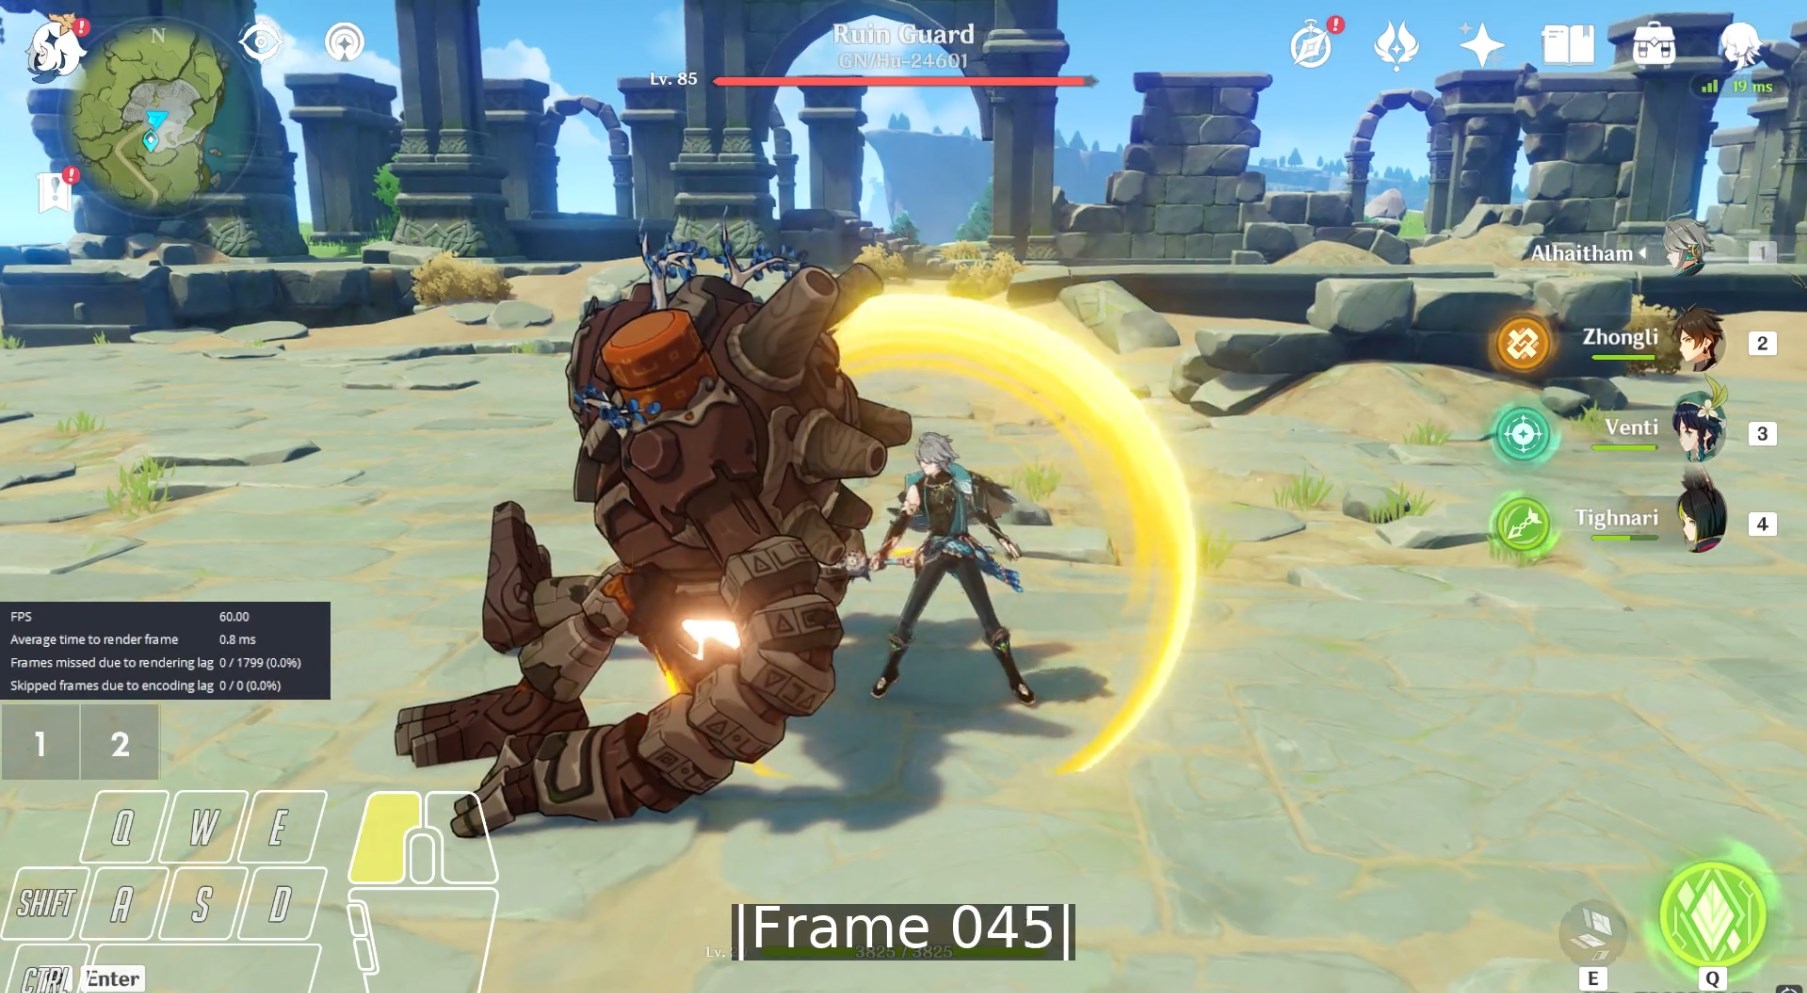
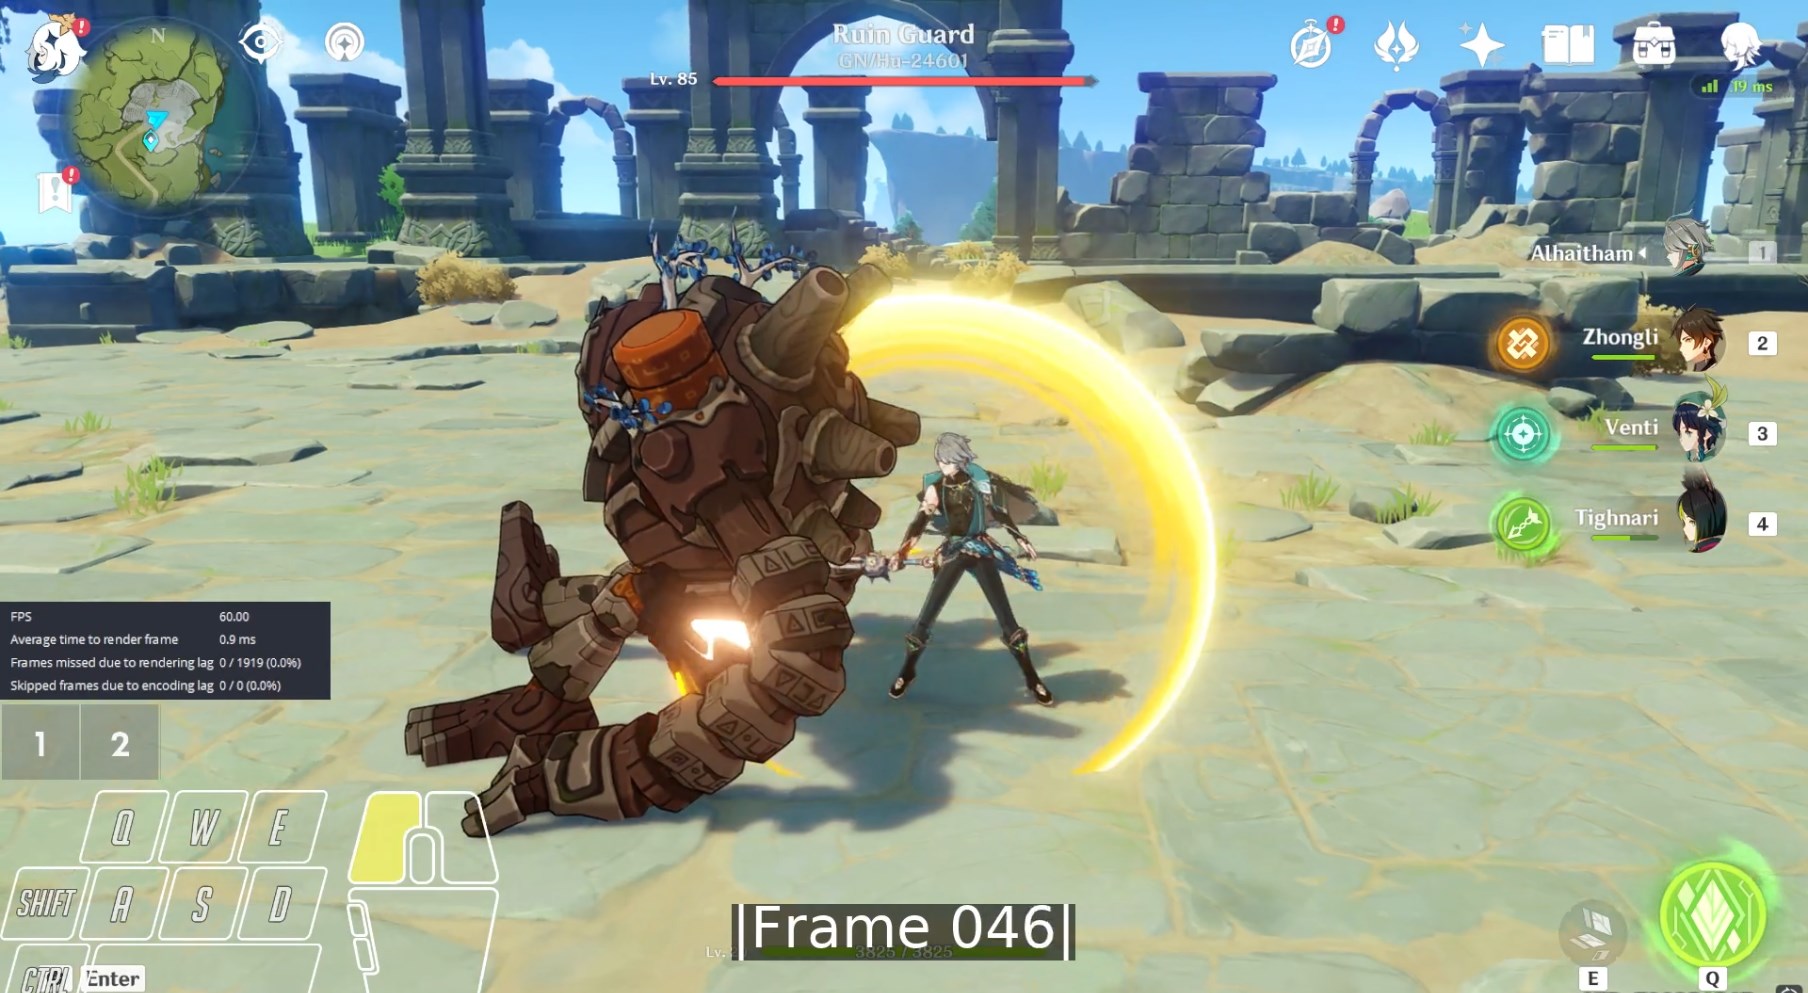
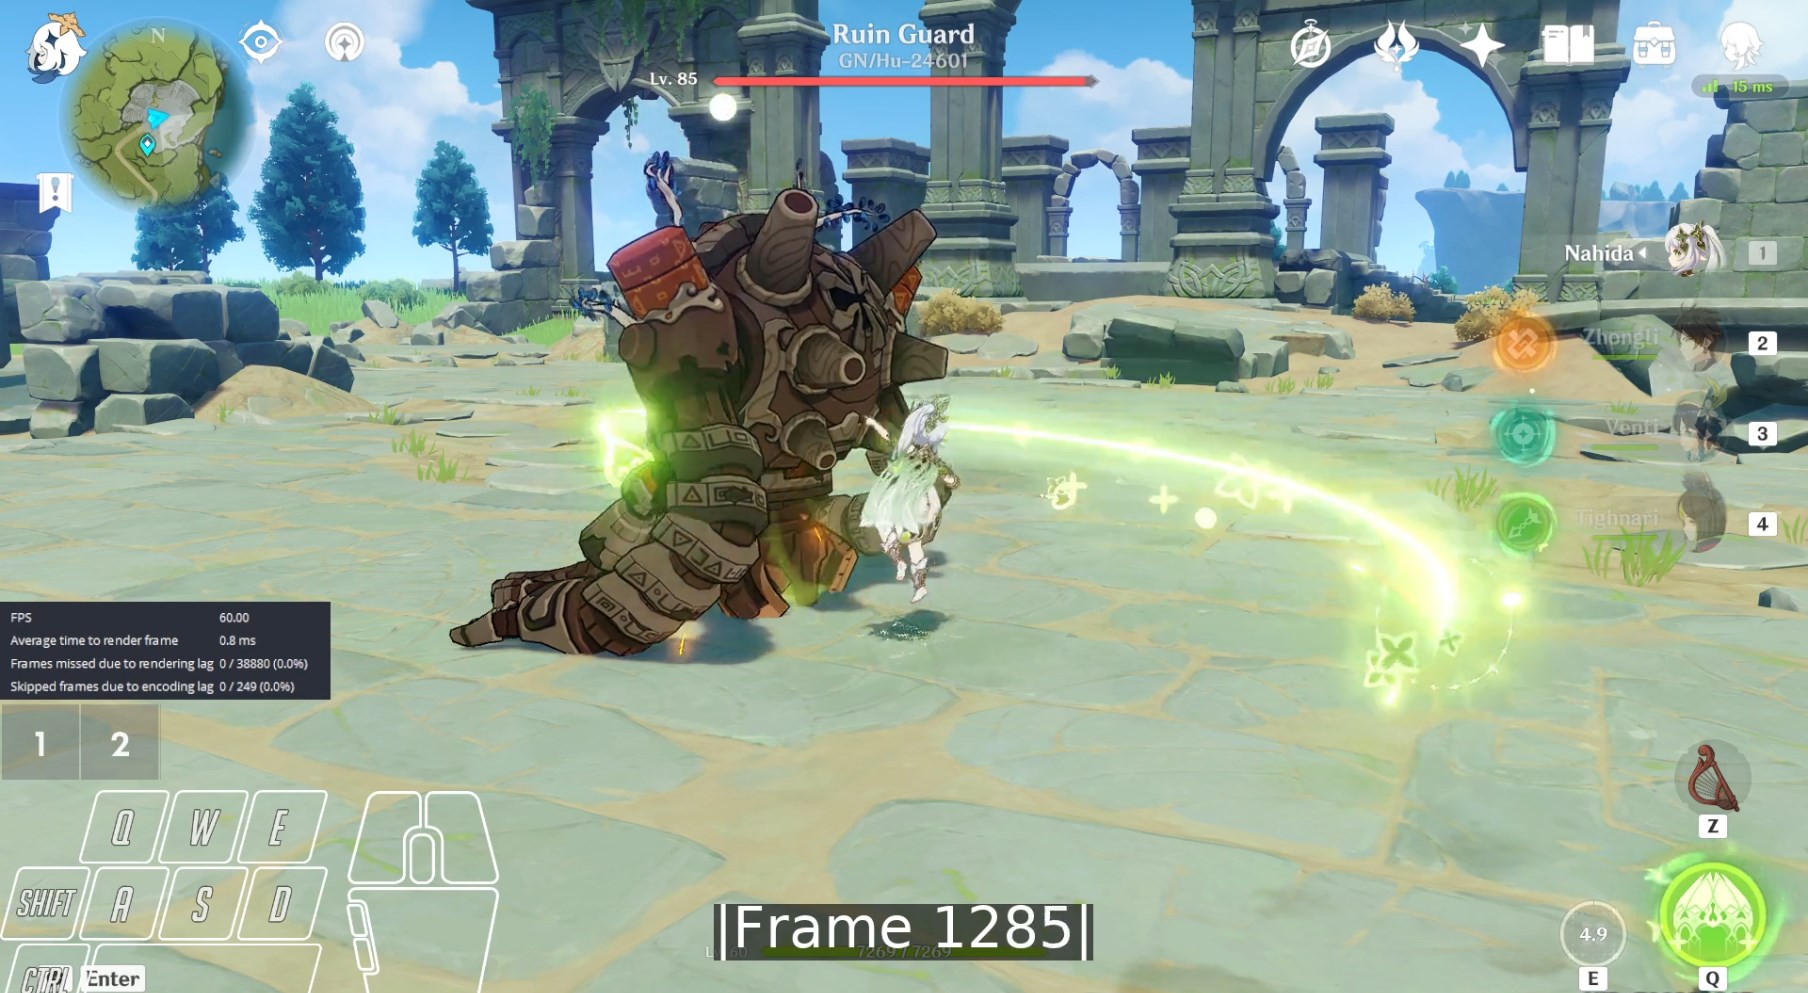
If the ability does not have hitlag and does apply an element, then use the frame that the element is applied on as hitmark/end frame. If using the Ruin Guard from here, then that frame is equal to the frame that the element appears below the Ruin Guard's HP bar at the top of the screen.
Example: Nahida Tap E Hitmark
1 frame before elemental application frame:
Elemental application frame (notice top middle dendro icon appearing below hp bar):
No Elemental Application
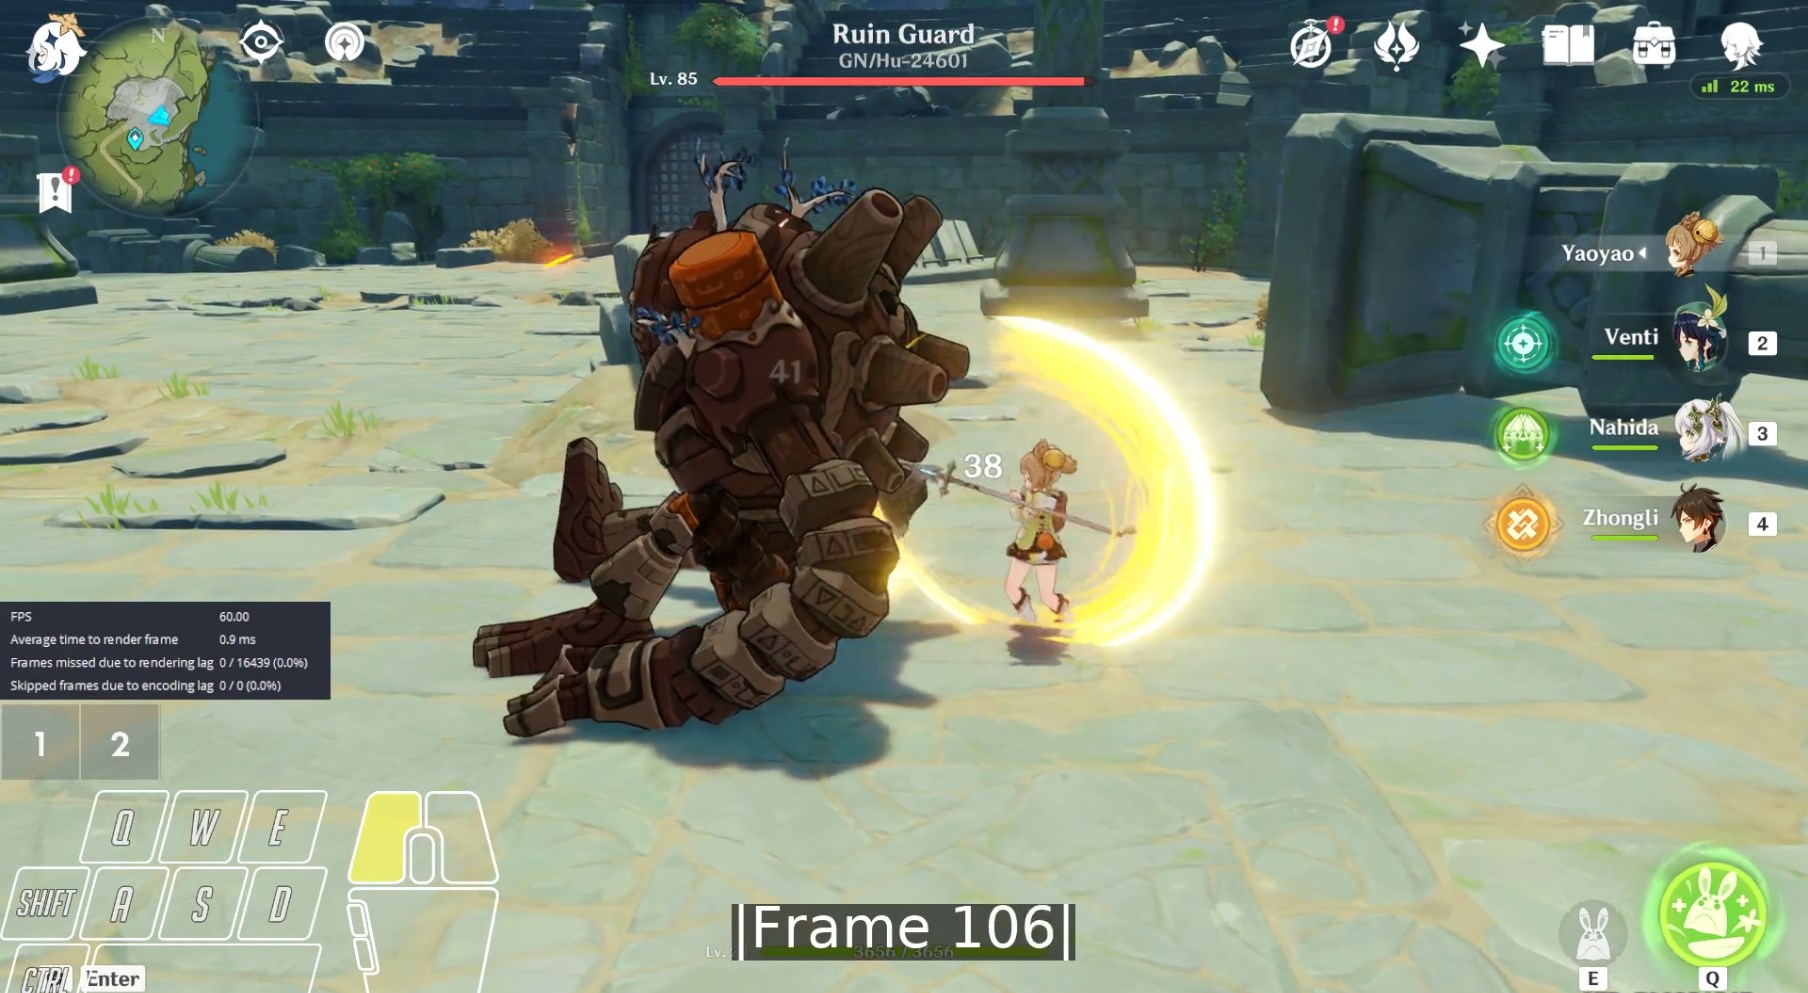
If the ability does not have hitlag and does not apply an element, then use one frame before the bright yellow flash appears on the enemy (not the yellow circle!) as the hitmark/end frame.
Example: Yaoyao N3-1 Hitmark
1 frame before N3-1 bright yellow flash frame (this is the hitmark frame, not the next one):
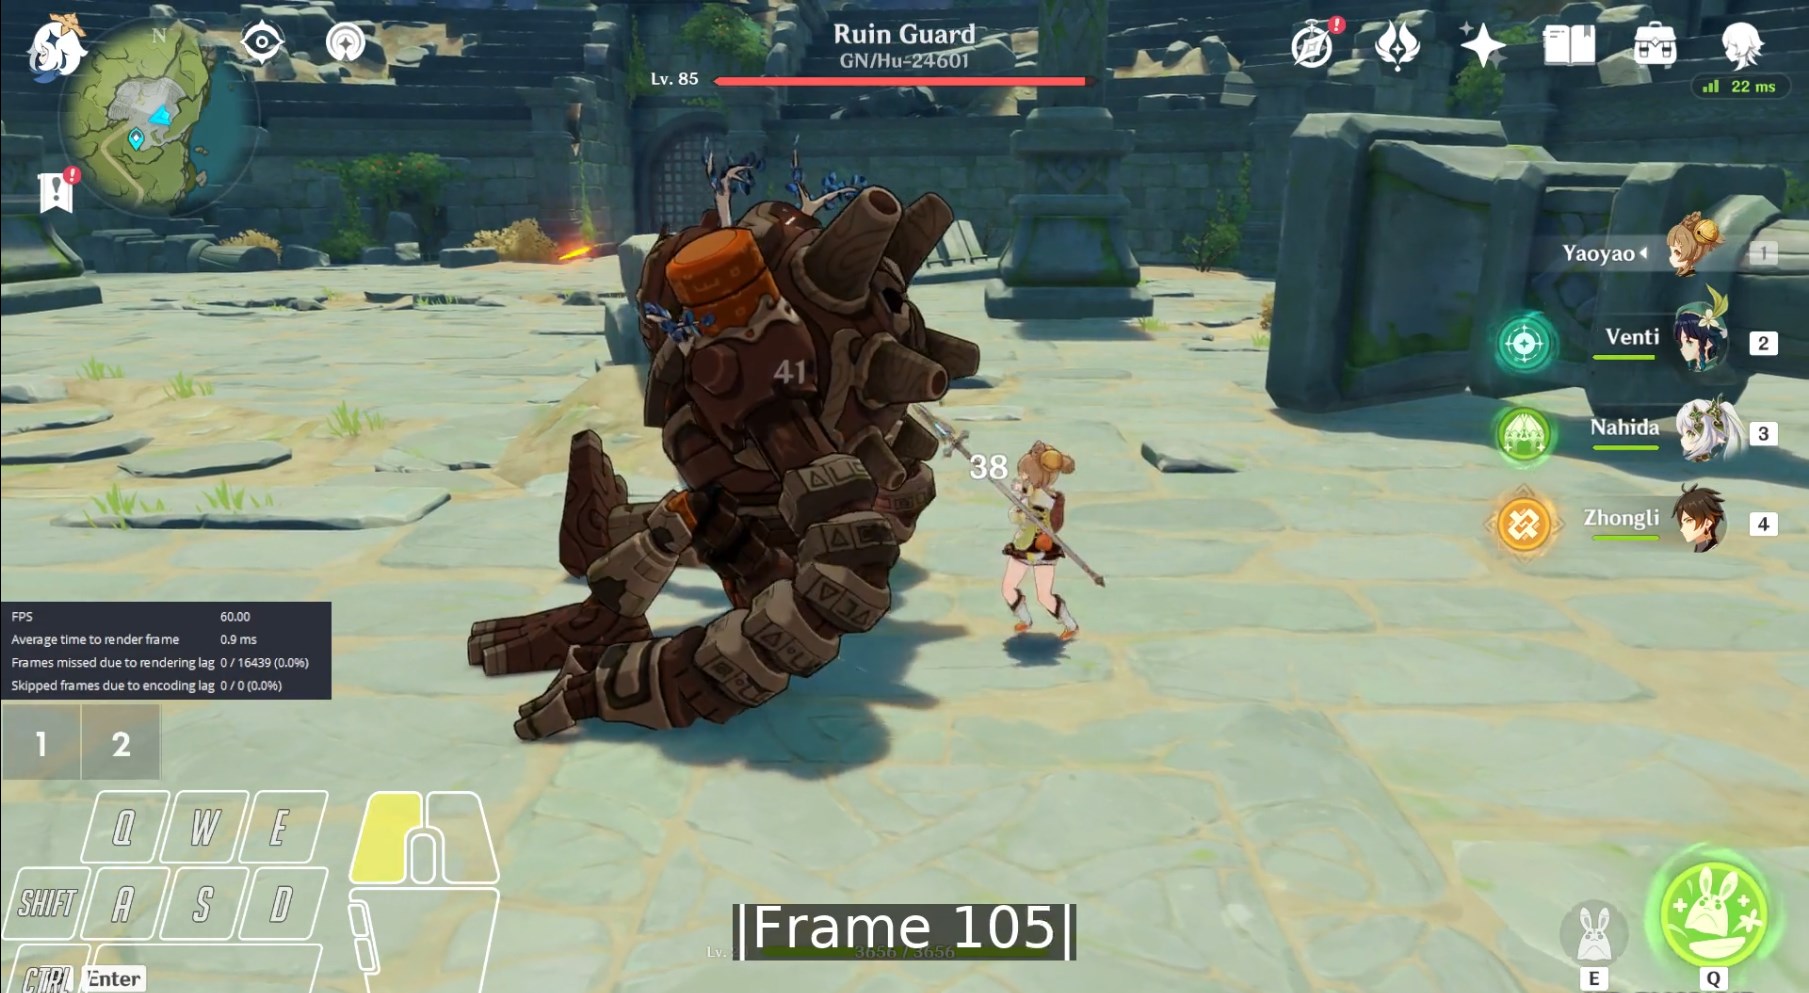
N3-1 bright yellow flash frame:
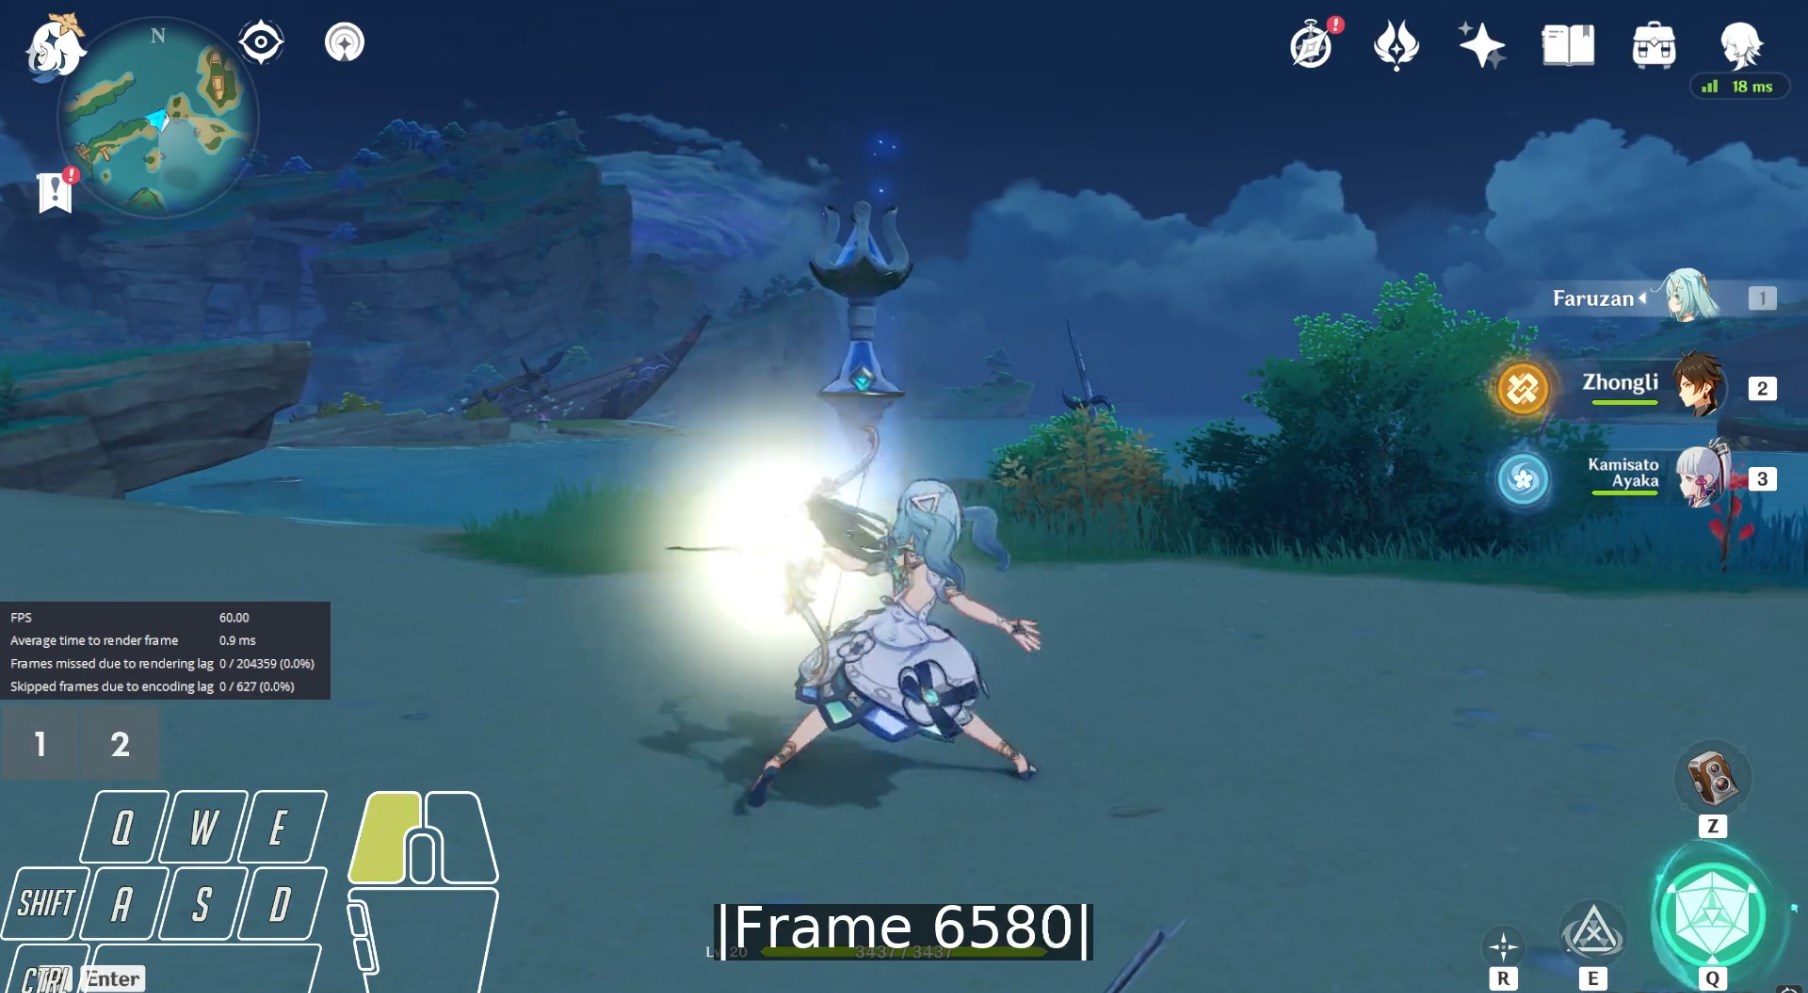
Release And Travel
The release frame can be determined by looking for a bright circle appearing. The travel frames can then be counted by using the release frame as start frame and the hitmark frame as end frame. The hitmark frame follows the logic established in the previous few sections.
Example: Faruzan N2 Release
1 frame before N2 bright circle appearing frame:

N2 bright circle appearing frame:
Duration
This part is mostly guesswork, but you can look out for obvious signs of indicators appearing/disappearing.
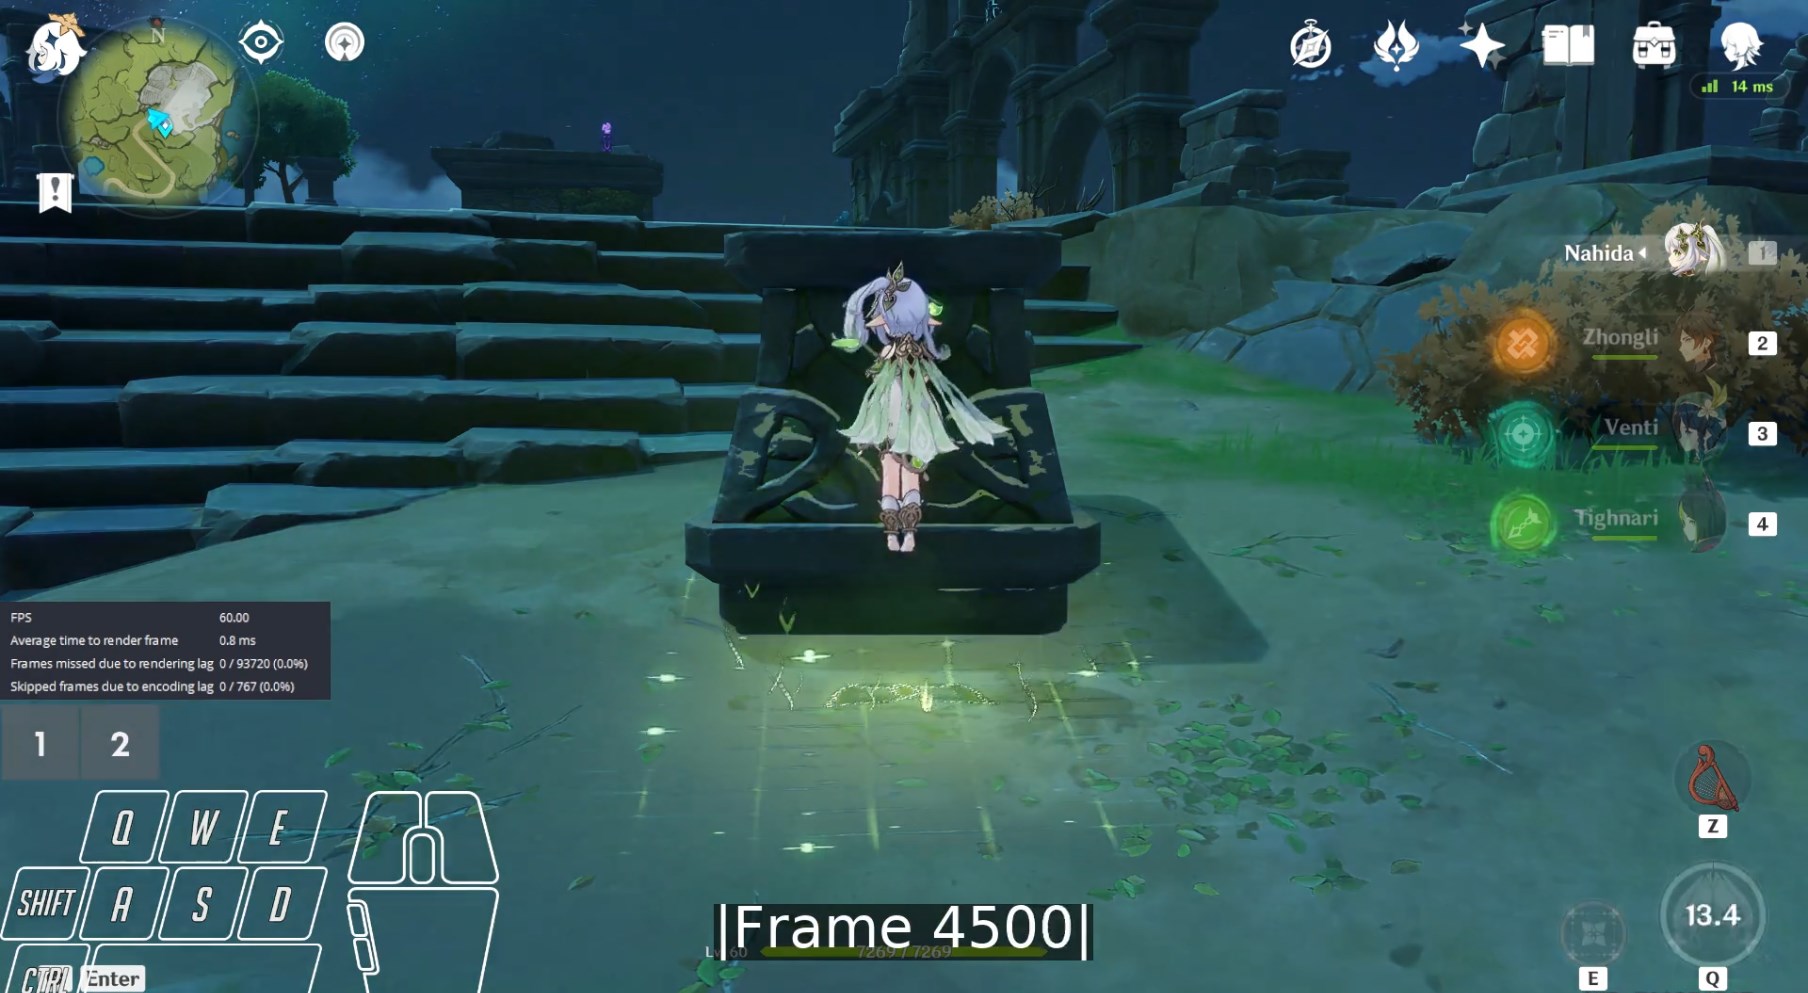
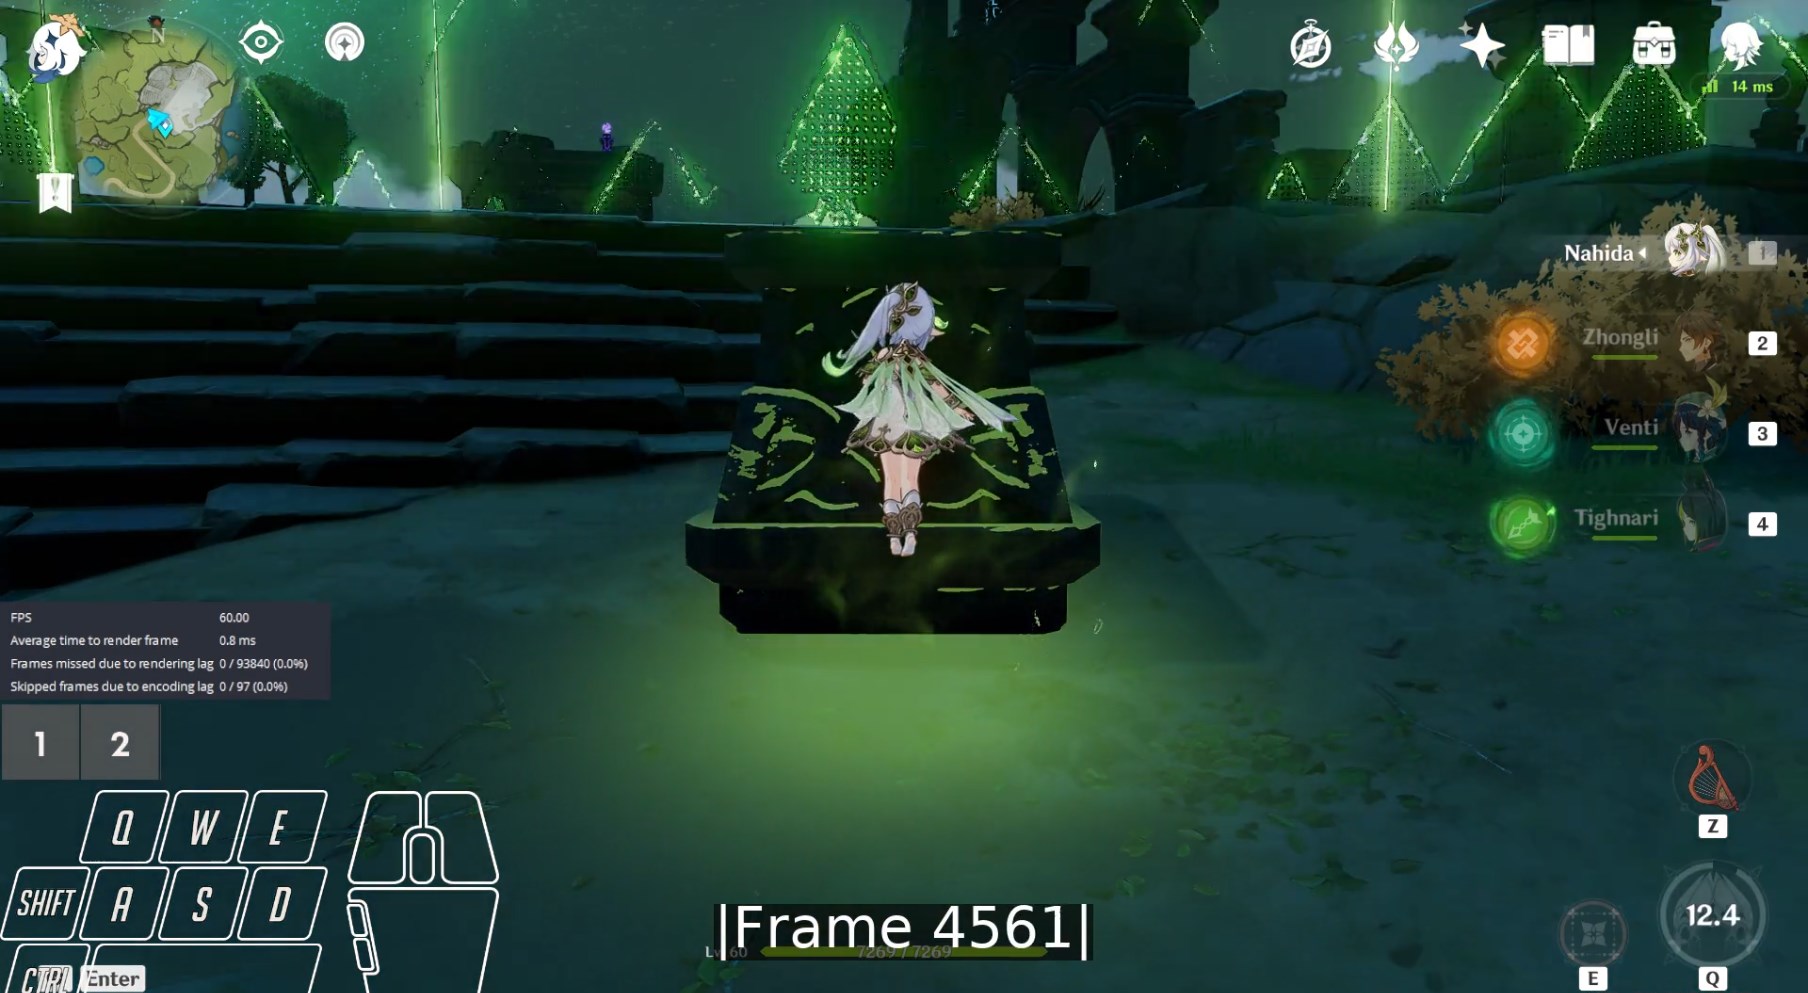
Example: Nahida Q Duration
1 frame before Q field appearing frame:
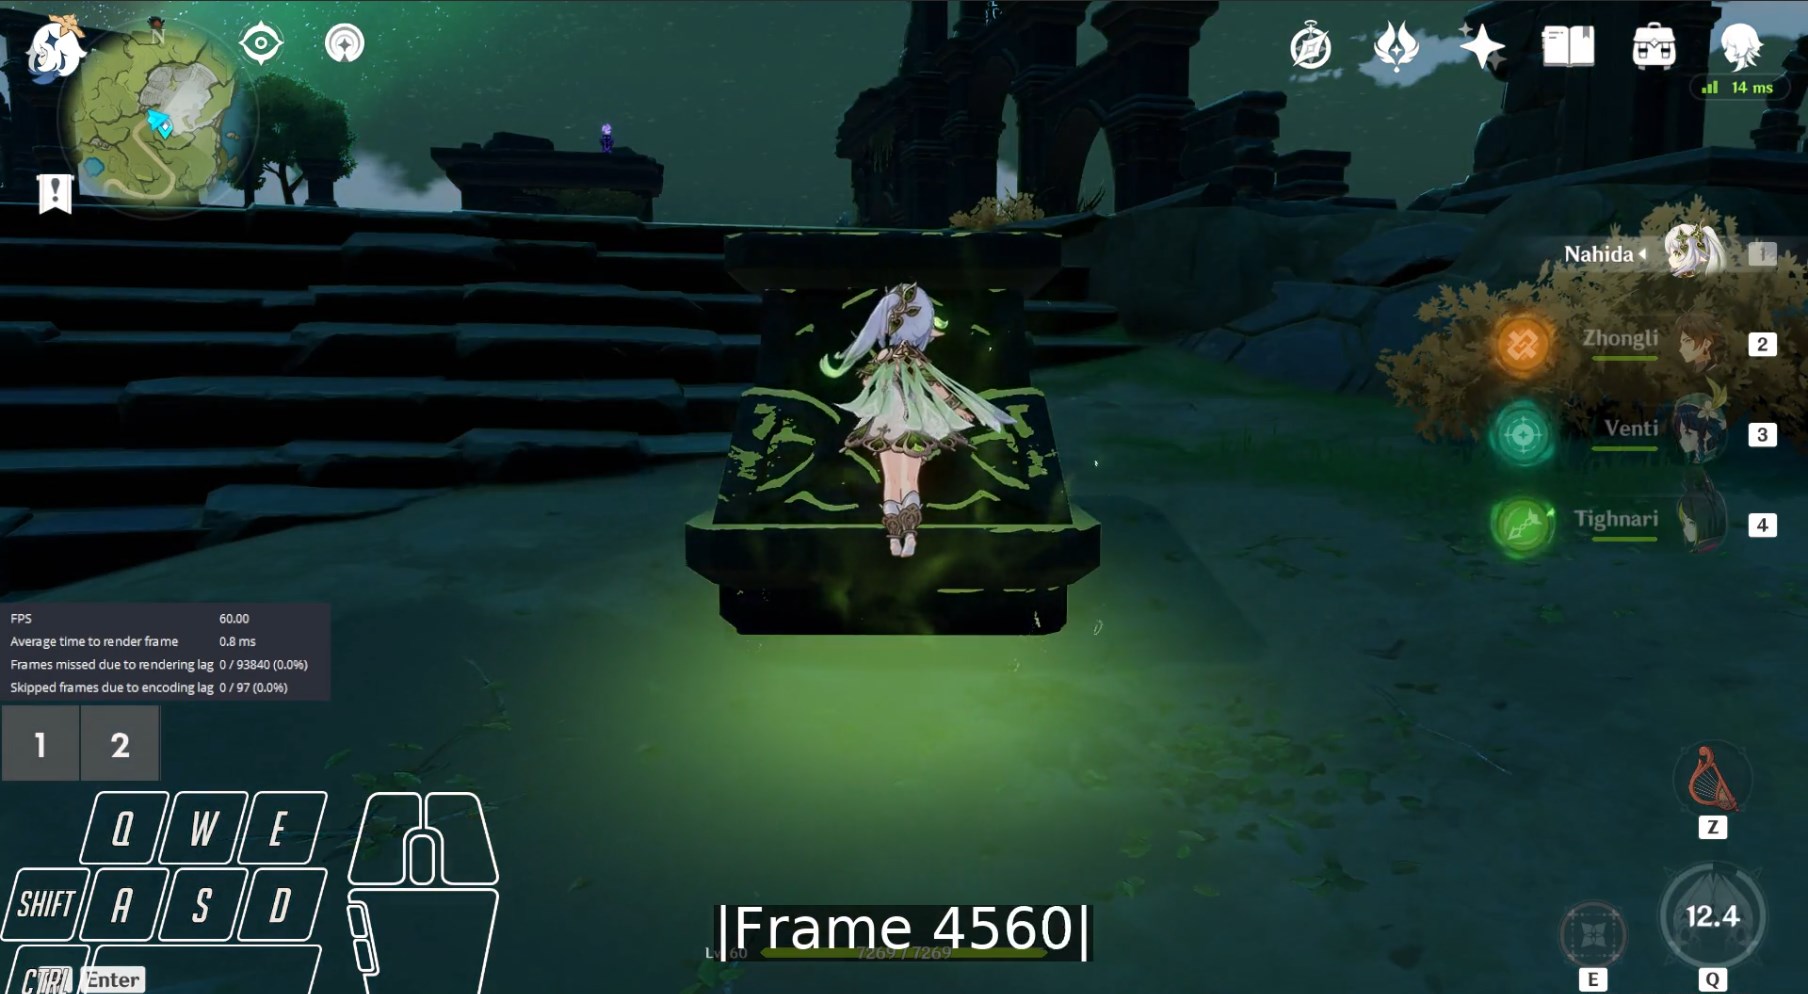
Q field appearing frame:
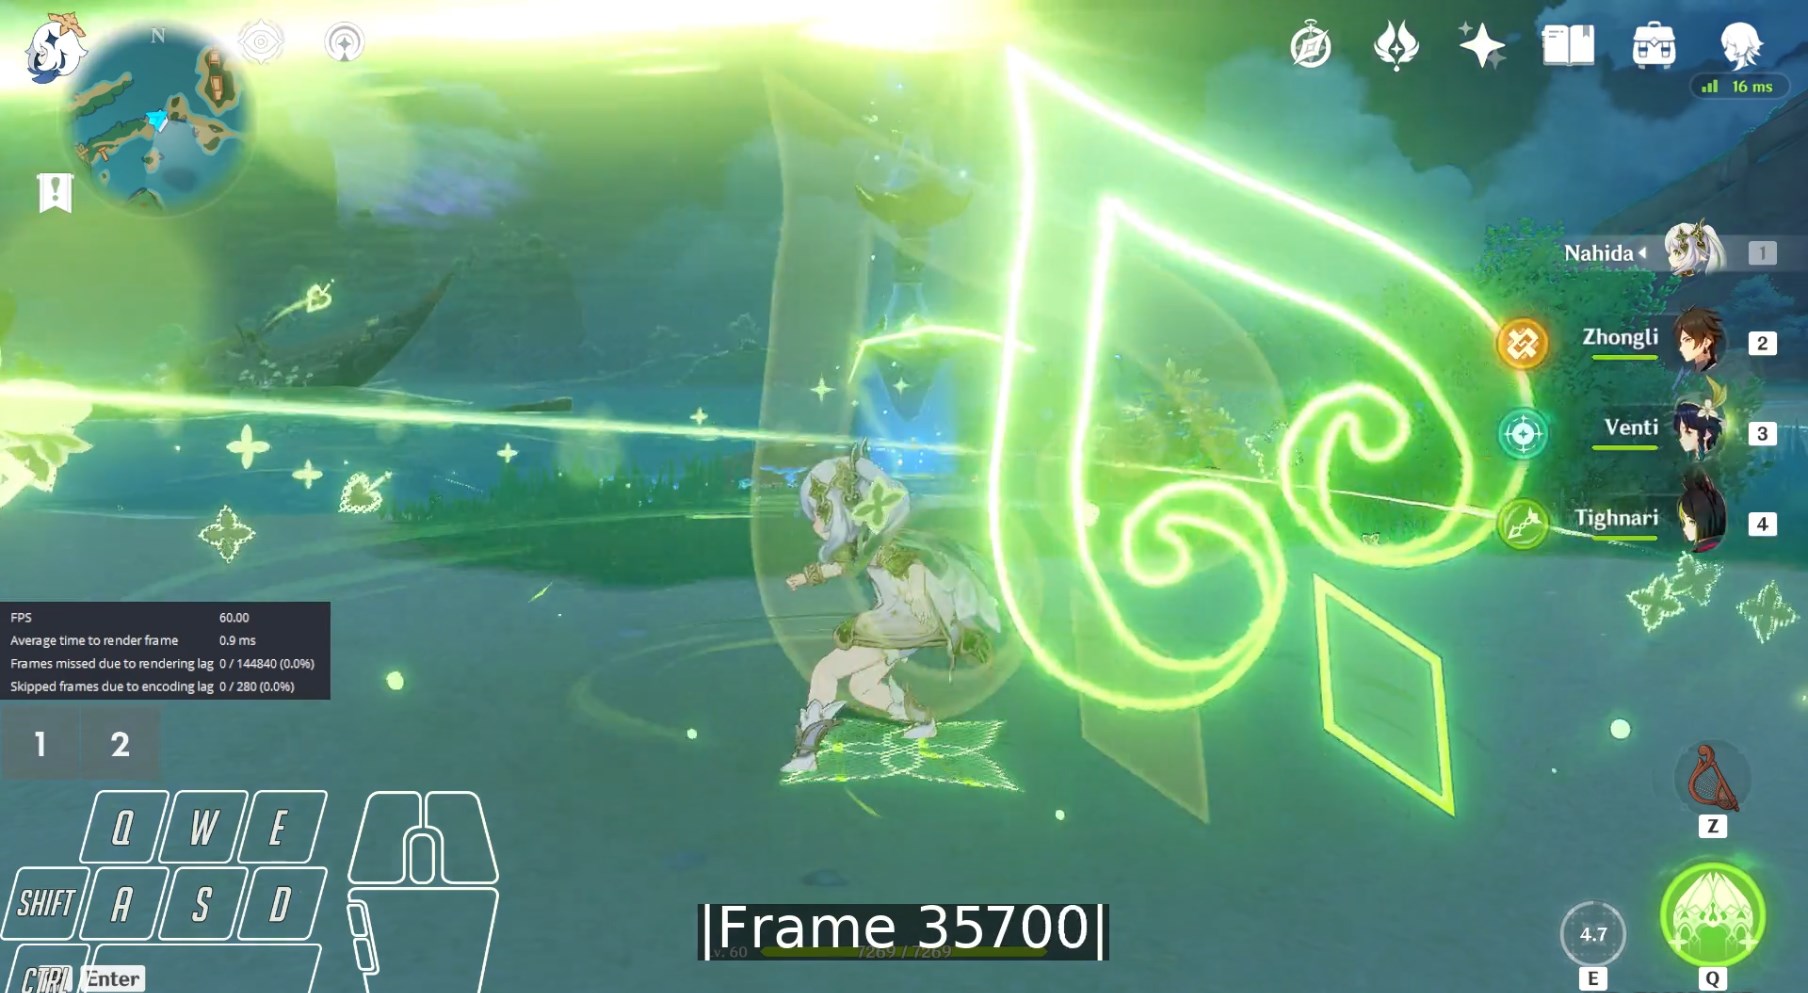
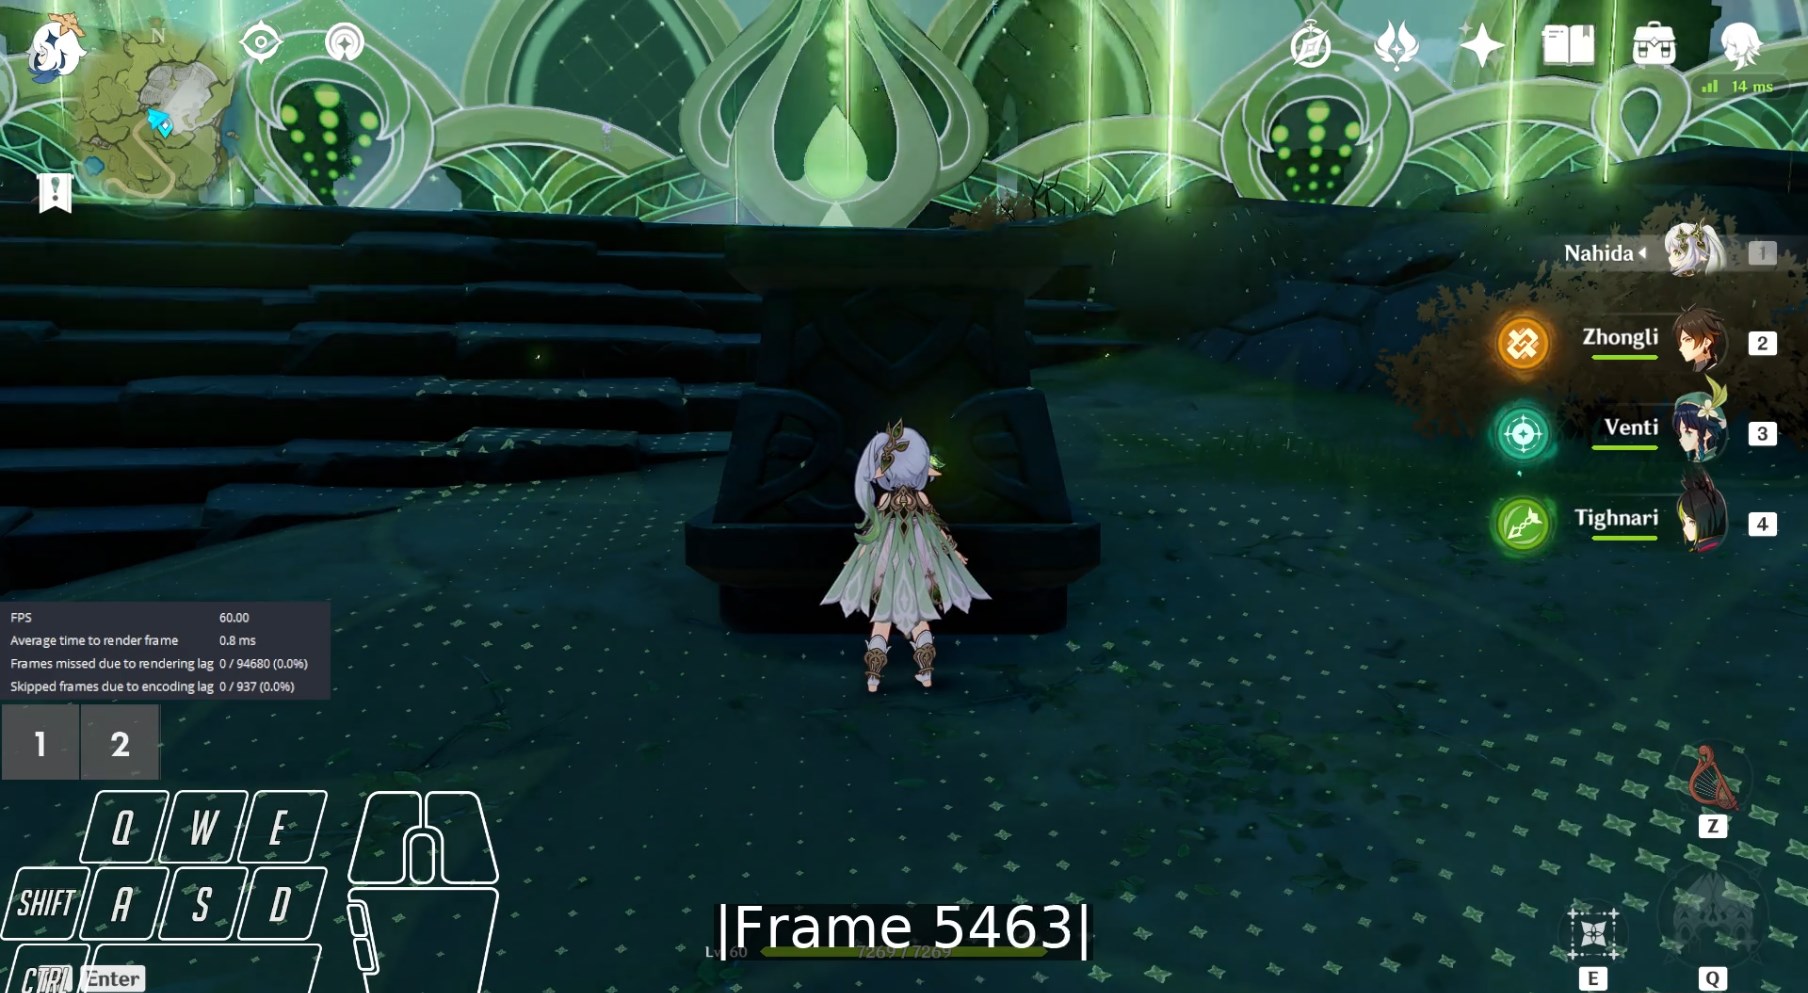
1 frame before Q field disappearing frame:
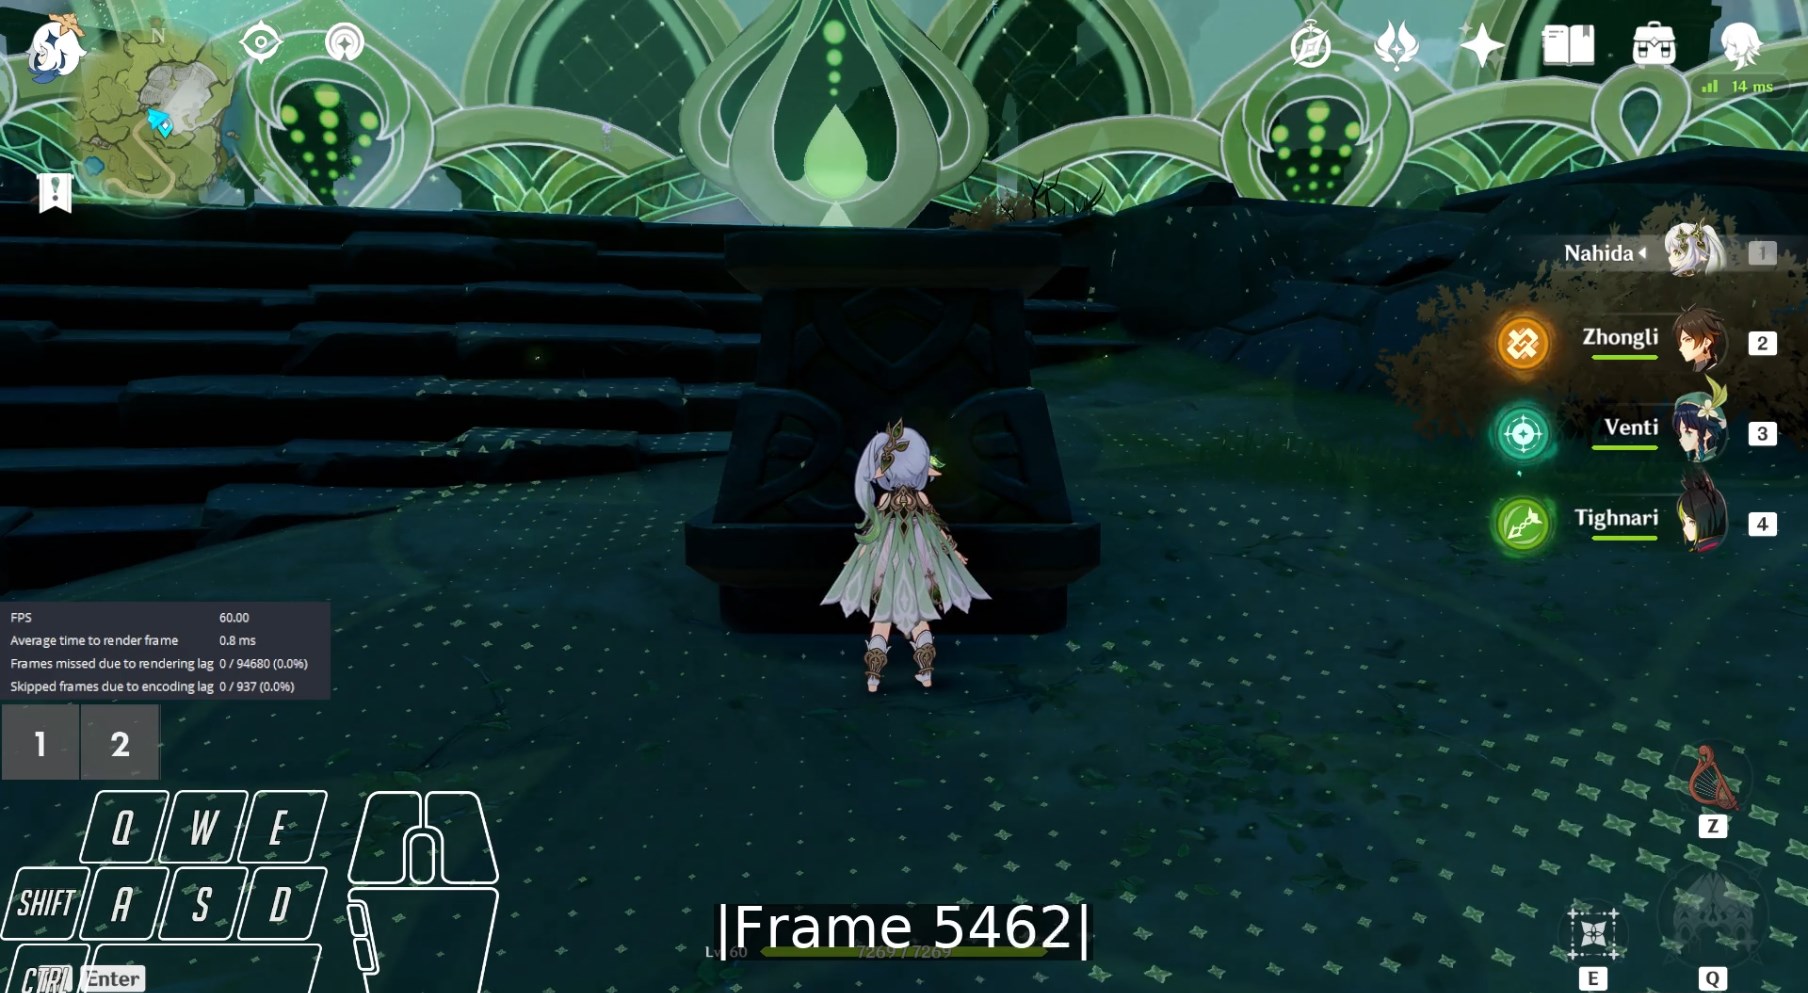
Q field disappearing frame:
Xingqiu/Yelan N0
Use the frame that the N1 starts as start frame (see here) and the frame that the jump starts as end frame (see here).
Miscellaneous
Macro Backup
In case of data loss/hardware changes, it is useful to back up the Wootomation macros.
- Press Windows Key + R.
- Type
%APPDATA%. - Press Enter.
- Open the
wooting-macro-appfolder. - Copy the
data_json.jsonfile to your backup storage (hard drive, Google Drive, iCloud, ...).
To import the data into a new Wootomation installation, simply repeat the steps and replace the existing data_json.json with the backed up version.