Building a Simulation from Scratch
This will be a basic tutorial on how to build your own simulation from scratch. The team we'll be simulating is the ever popular Raiden/Xiangling/Xingqiu/Bennett team.
Feel free to follow along with your own stats! Check out this guide to learn how.
This tutorial is mainly targetted at users that wish to use their own stats to build a simulation. Not everything will apply to theorycrafters intending to use standardized stats. However the general concepts will still remain the same.
Basic options
Let's start with some basic options:
options iteration=1000 duration=90 swap_delay=4;
target lvl=100 resist=0.1 particle_threshold=250000 particle_drop_count=1;
Here we are using a swap_delay of 4 which corresponds to roughly 30ms ping.
Also note that we are using particle_threshold=250000 particle_drop_count=1 to simulate the enemy dropping 1 clear particle for every 250k damage taken.
This takes care of our basic options, target, and energy needs.
Enter some character stats
Starting by entering your character details. We imported ours from Enka Network so that's why all the stats are consolidated into one line.
Our config now looks like this:
options iteration=1000 duration=90 swap_delay=4;
target lvl=100 resist=0.1 particle_threshold=250000 particle_drop_count=1;

raiden char lvl=90/90 cons=0 talent=1,9,9;
raiden add weapon="thecatch" refine=1 lvl=90/90;
raiden add set="emblemofseveredfate" count=4;
raiden add stats def%=0.197 def=42 hp=4780 atk=358 atk%=0.618 er=0.894 cr=0.602 cd=0.948;

xingqiu char lvl=90/90 cons=6 talent=1,9,9;
xingqiu add weapon="sacrificialsword" refine=5 lvl=90/90;
xingqiu add set="emblemofseveredfate" count=4;
xingqiu add stats def=86 hp=4780 hp%=0.105 atk=422 atk%=0.659 er=0.065 cr=0.563 cd=0.988 hydro%=0.466;

xiangling char lvl=90/90 cons=6 talent=1,8,9;
xiangling add weapon="favoniuslance" refine=5 lvl=90/90;
xiangling add set="emblemofseveredfate" count=4;
xiangling add stats def%=0.131 def=42 hp=4780 hp%=0.058 atk=381 atk%=0.099 er=0.816 em=147 cr=0.424 cd=1.033 pyro%=0.466;

bennett char lvl=80/90 cons=6 talent=1,8,9;
bennett add weapon="thealleyflash" refine=5 lvl=90/90;
bennett add set="noblesseoblige" count=4;
bennett add stats def%=0.19 def=79 hp=5348 hp%=0.14 atk=325 atk%=0.053 er=1.114 em=163 cr=0.443 cd=0.264 pyro%=0.466;
The "Rotation"
At point we should have some sort of rotation in mind of what we want to simulate. For this tutorial we'll be simulating the following rotation (roughly):
- Start with Raiden skill
- Xingqiu uses his combo
- Bennett uses his combo
- Xiangling uses her combo
- Raiden uses burst and spam normals
- Repeat
This is by no means an optimal rotation of any sort. This is just a simple rotation that I personally actually use in game (over what is optimal).
Set a starting character
Start by setting a starting character. In this case, we'll want to start on Raiden. We'll add the following line to the bottom of our config:
active raiden;
Enter the rotation
We'll type in our rotation exactly as described by adding in the following below the active char.
raiden skill;
xingqiu skill, burst;
bennett skill, burst;
xiangling burst, skill;
raiden burst;
raiden attack:15;
I put raiden attack:15 after her burst for now since I'm not actually sure how many attacks she can fit into her combo just left clicking.
15 is 3 full combos which feels about right. We'll come back to this later.
With this, we have a basic working config. It should look like the following:
options iteration=1000 duration=90 swap_delay=4;
target lvl=100 resist=0.1 particle_threshold=250000 particle_drop_count=1;

raiden char lvl=90/90 cons=0 talent=1,9,9;
raiden add weapon="thecatch" refine=1 lvl=90/90;
raiden add set="emblemofseveredfate" count=4;
raiden add stats def%=0.197 def=42 hp=4780 atk=358 atk%=0.618 er=0.894 cr=0.602 cd=0.948;

xingqiu char lvl=90/90 cons=6 talent=1,9,9;
xingqiu add weapon="sacrificialsword" refine=5 lvl=90/90;
xingqiu add set="emblemofseveredfate" count=4;
xingqiu add stats def=86 hp=4780 hp%=0.105 atk=422 atk%=0.659 er=0.065 cr=0.563 cd=0.988 hydro%=0.466;

xiangling char lvl=90/90 cons=6 talent=1,8,9;
xiangling add weapon="favoniuslance" refine=5 lvl=90/90;
xiangling add set="emblemofseveredfate" count=4;
xiangling add stats def%=0.131 def=42 hp=4780 hp%=0.058 atk=381 atk%=0.099 er=0.816 em=147 cr=0.424 cd=1.033 pyro%=0.466;

bennett char lvl=80/90 cons=6 talent=1,8,9;
bennett add weapon="thealleyflash" refine=5 lvl=90/90;
bennett add set="noblesseoblige" count=4;
bennett add stats def%=0.19 def=79 hp=5348 hp%=0.14 atk=325 atk%=0.053 er=1.114 em=163 cr=0.443 cd=0.264 pyro%=0.466;

active raiden;

raiden skill;
xingqiu skill, burst;
bennett skill, burst;
xiangling burst, skill;
raiden burst;
raiden attack:15;
Our first run
Now that we have a full configuration, let's just hit the run button and see what happens:
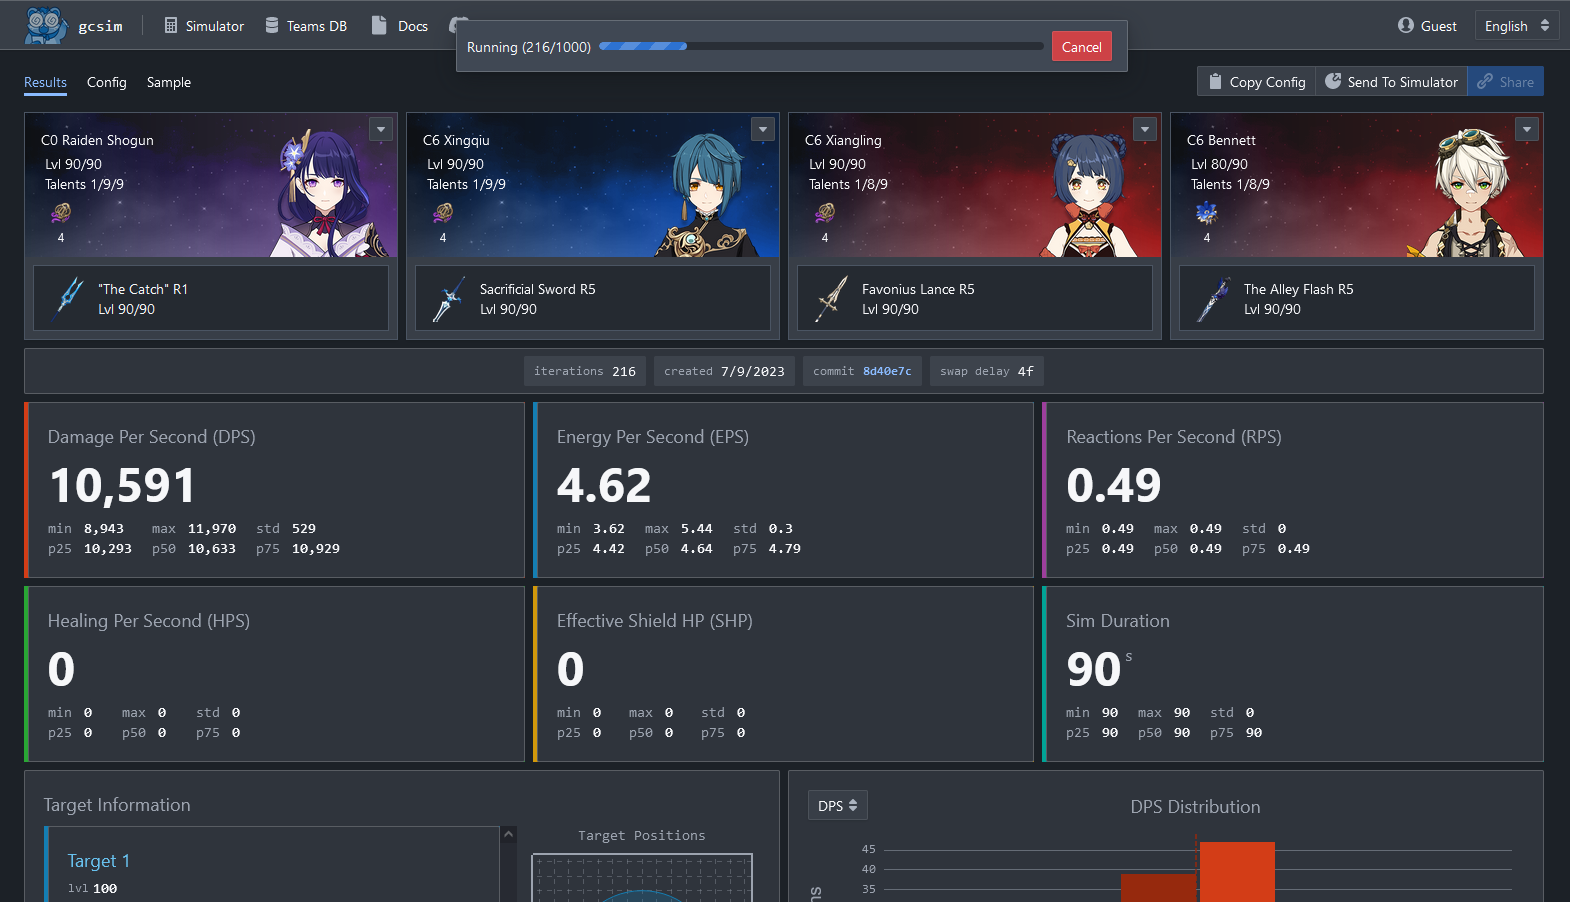
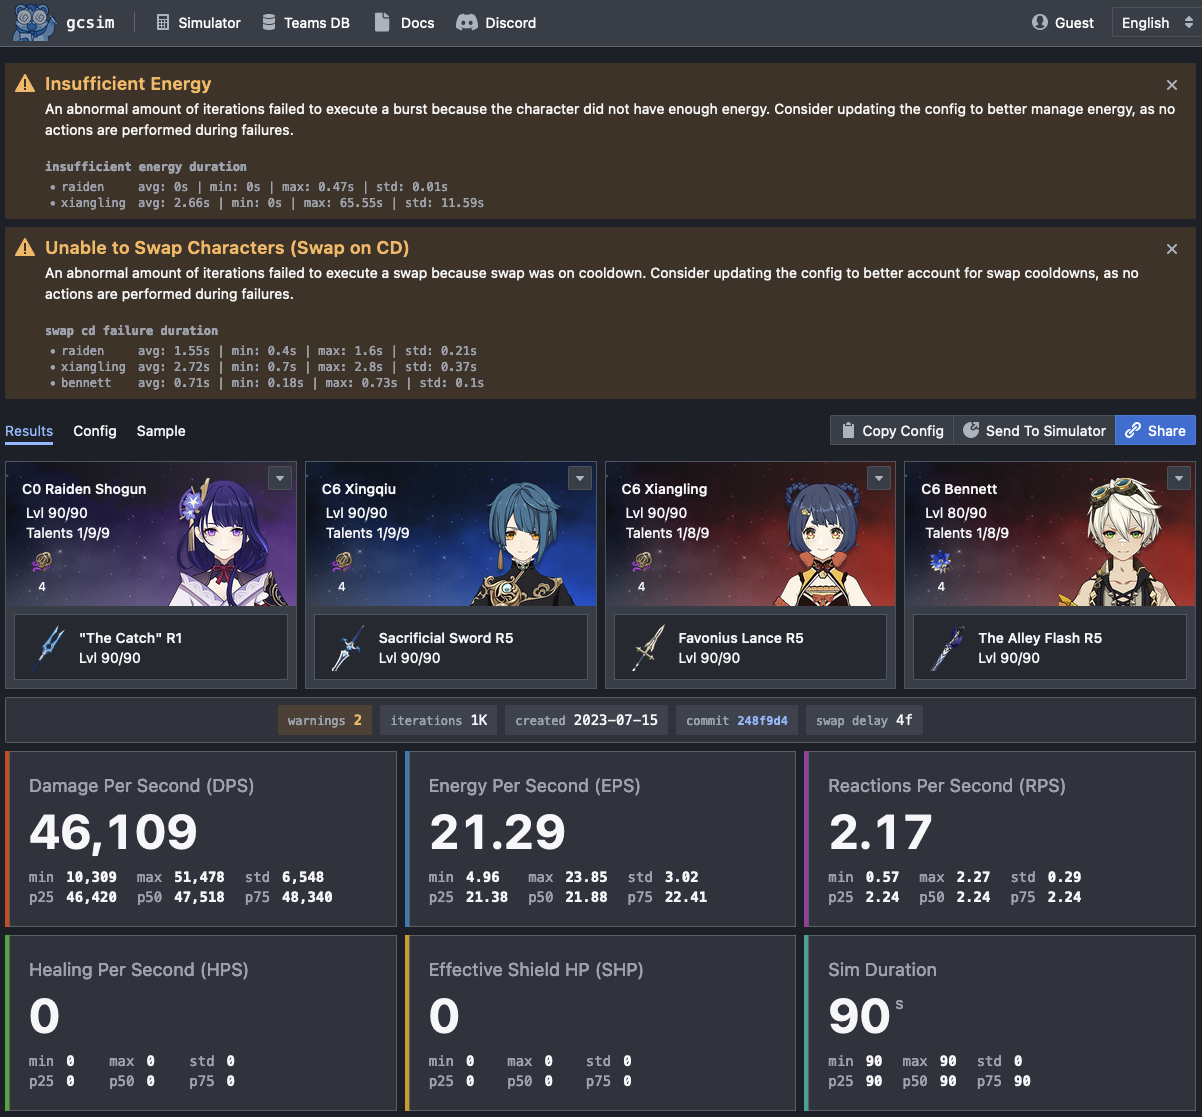
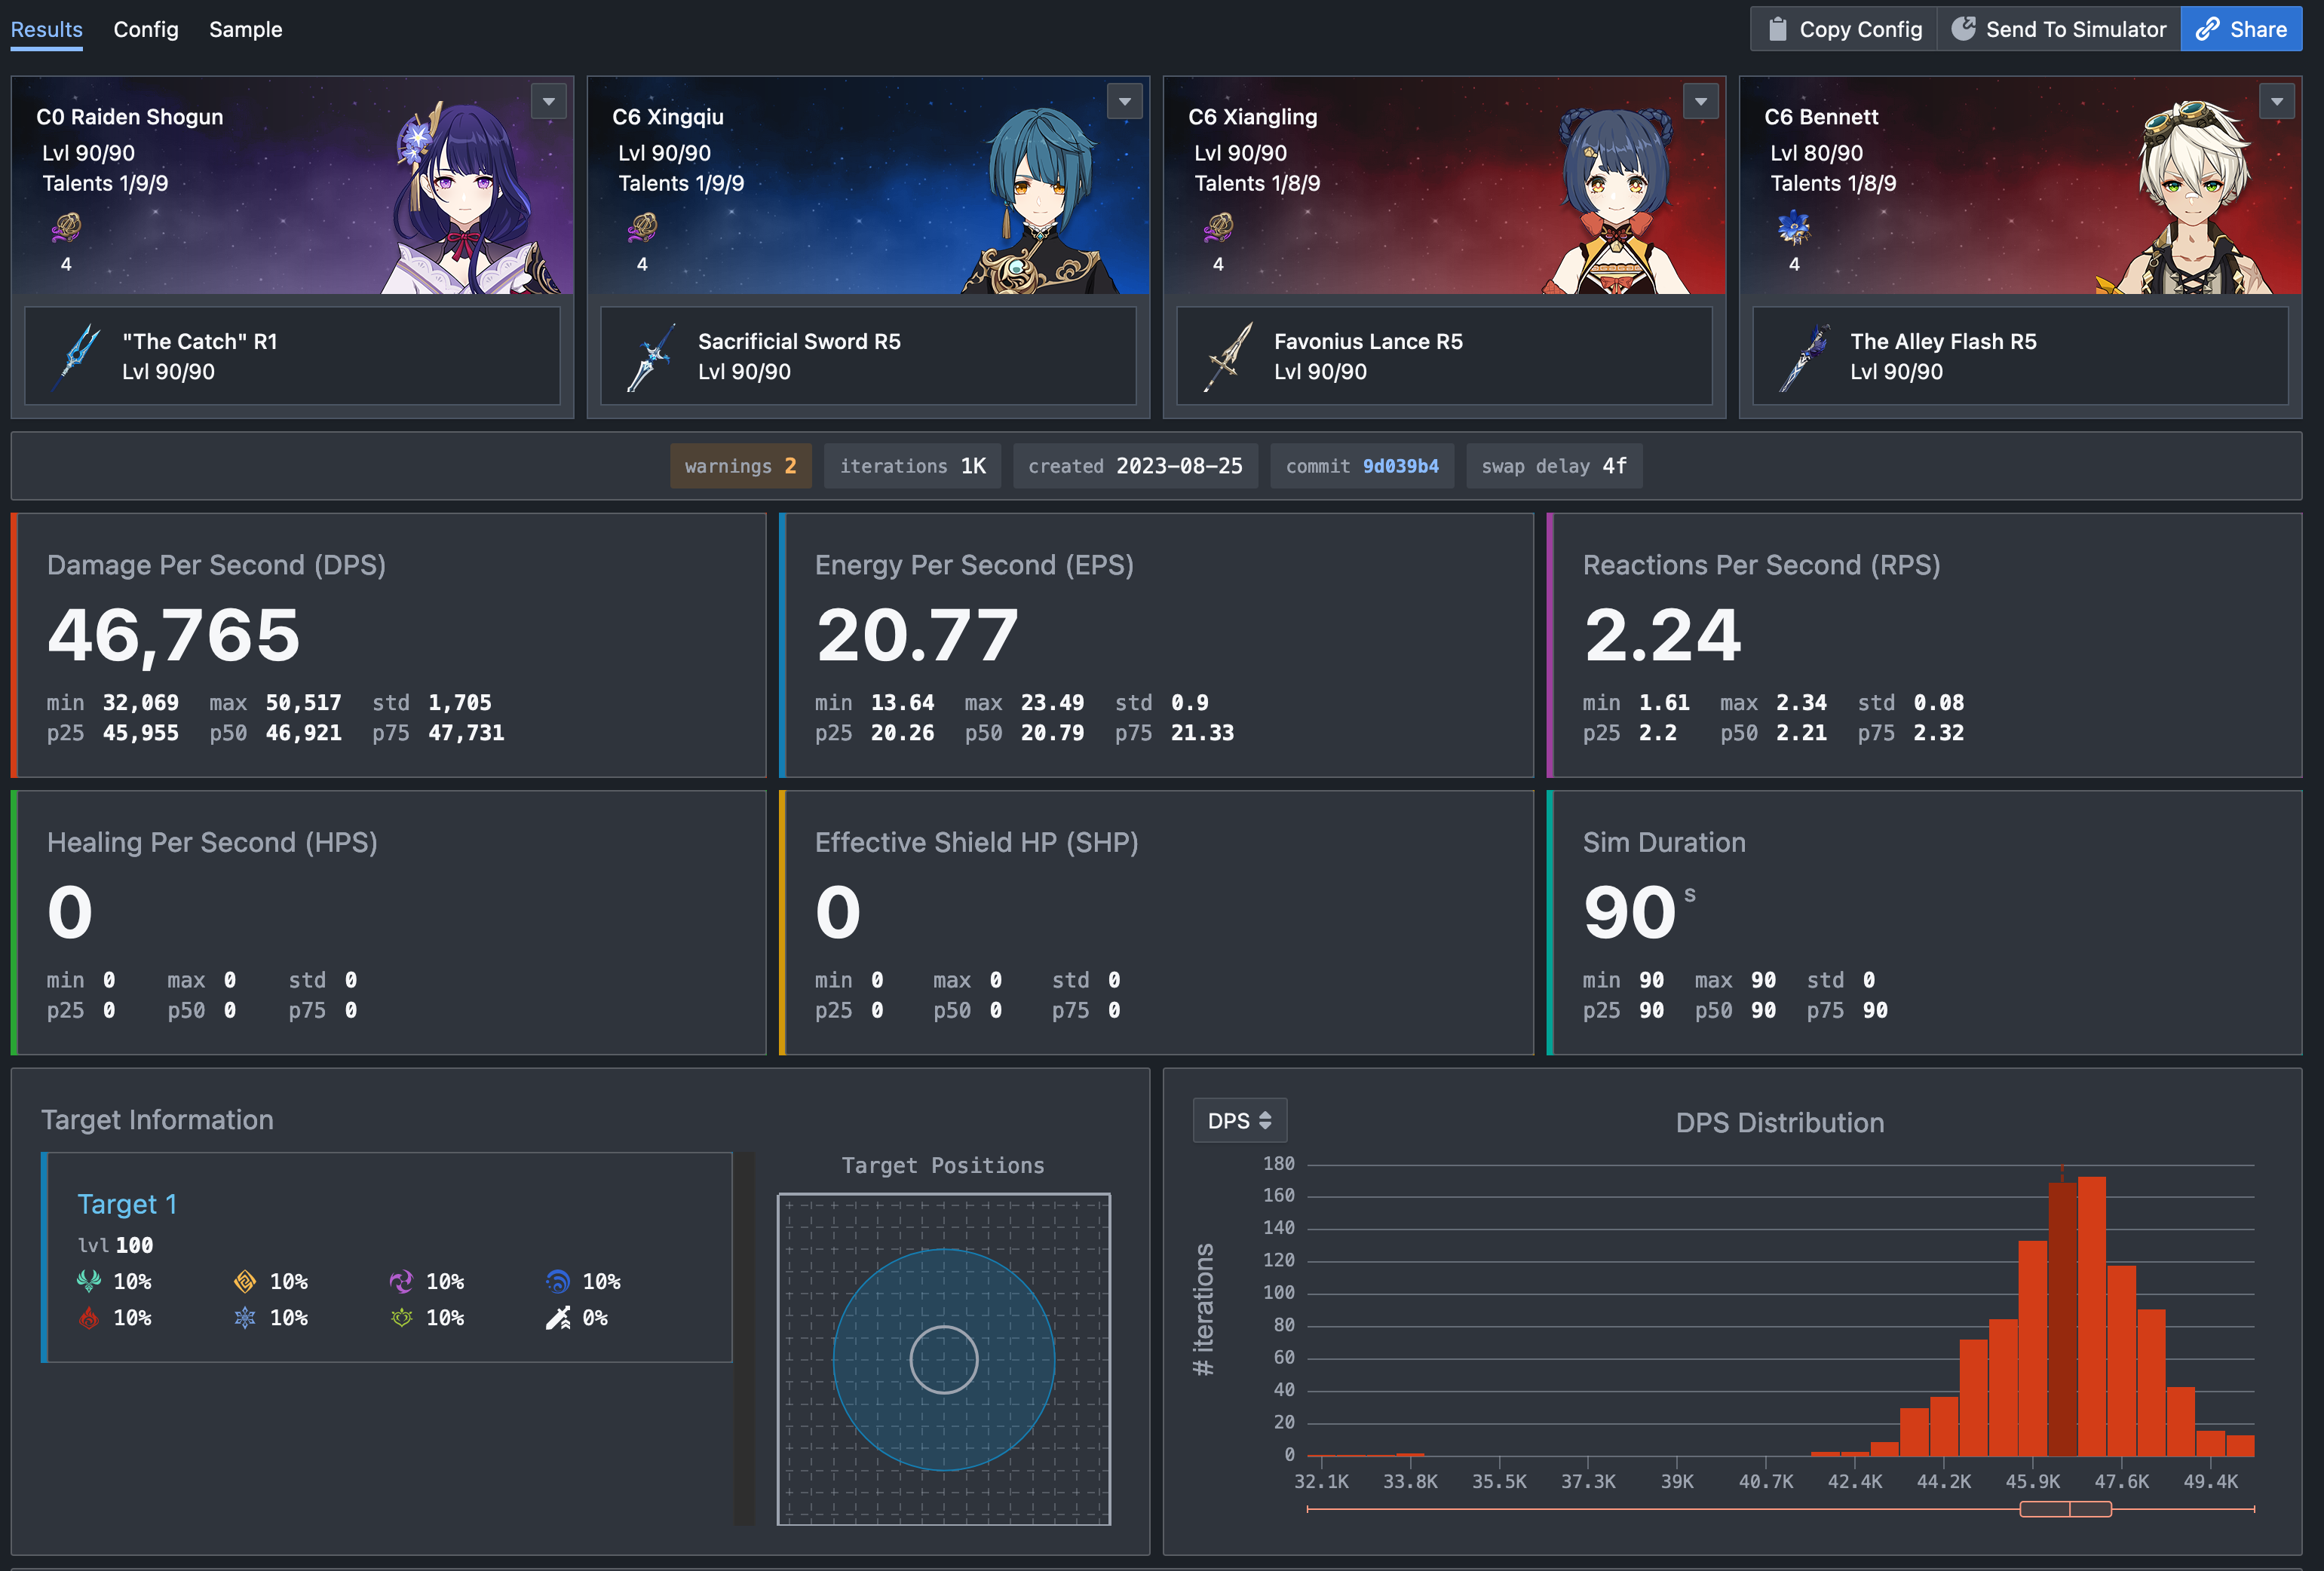
Once the the simulation is done running, we'll be greeted with the following screen:
So far so good, except the average DPS looks a little low. Why is that? You'll recall that in the beginning we had set the simulation last 90 seconds but so far the rotation we entered only lasted roughly 21 seconds. So we'll need to repeat the rotation however many times it takes to fill up 90s.
Repeating the rotation
There are a couple of ways to repeat the same rotation over and over again. The simplest way is to simply copy and paste the block of actions we wish to repeat however many times we wish to repeat it. For example:
active raiden;

raiden skill;
xingqiu skill, burst;
bennett skill, burst;
xiangling burst, skill;
raiden burst;
raiden attack:15;

raiden skill;
xingqiu skill, burst;
bennett skill, burst;
xiangling burst, skill;
raiden burst;
raiden attack:15;
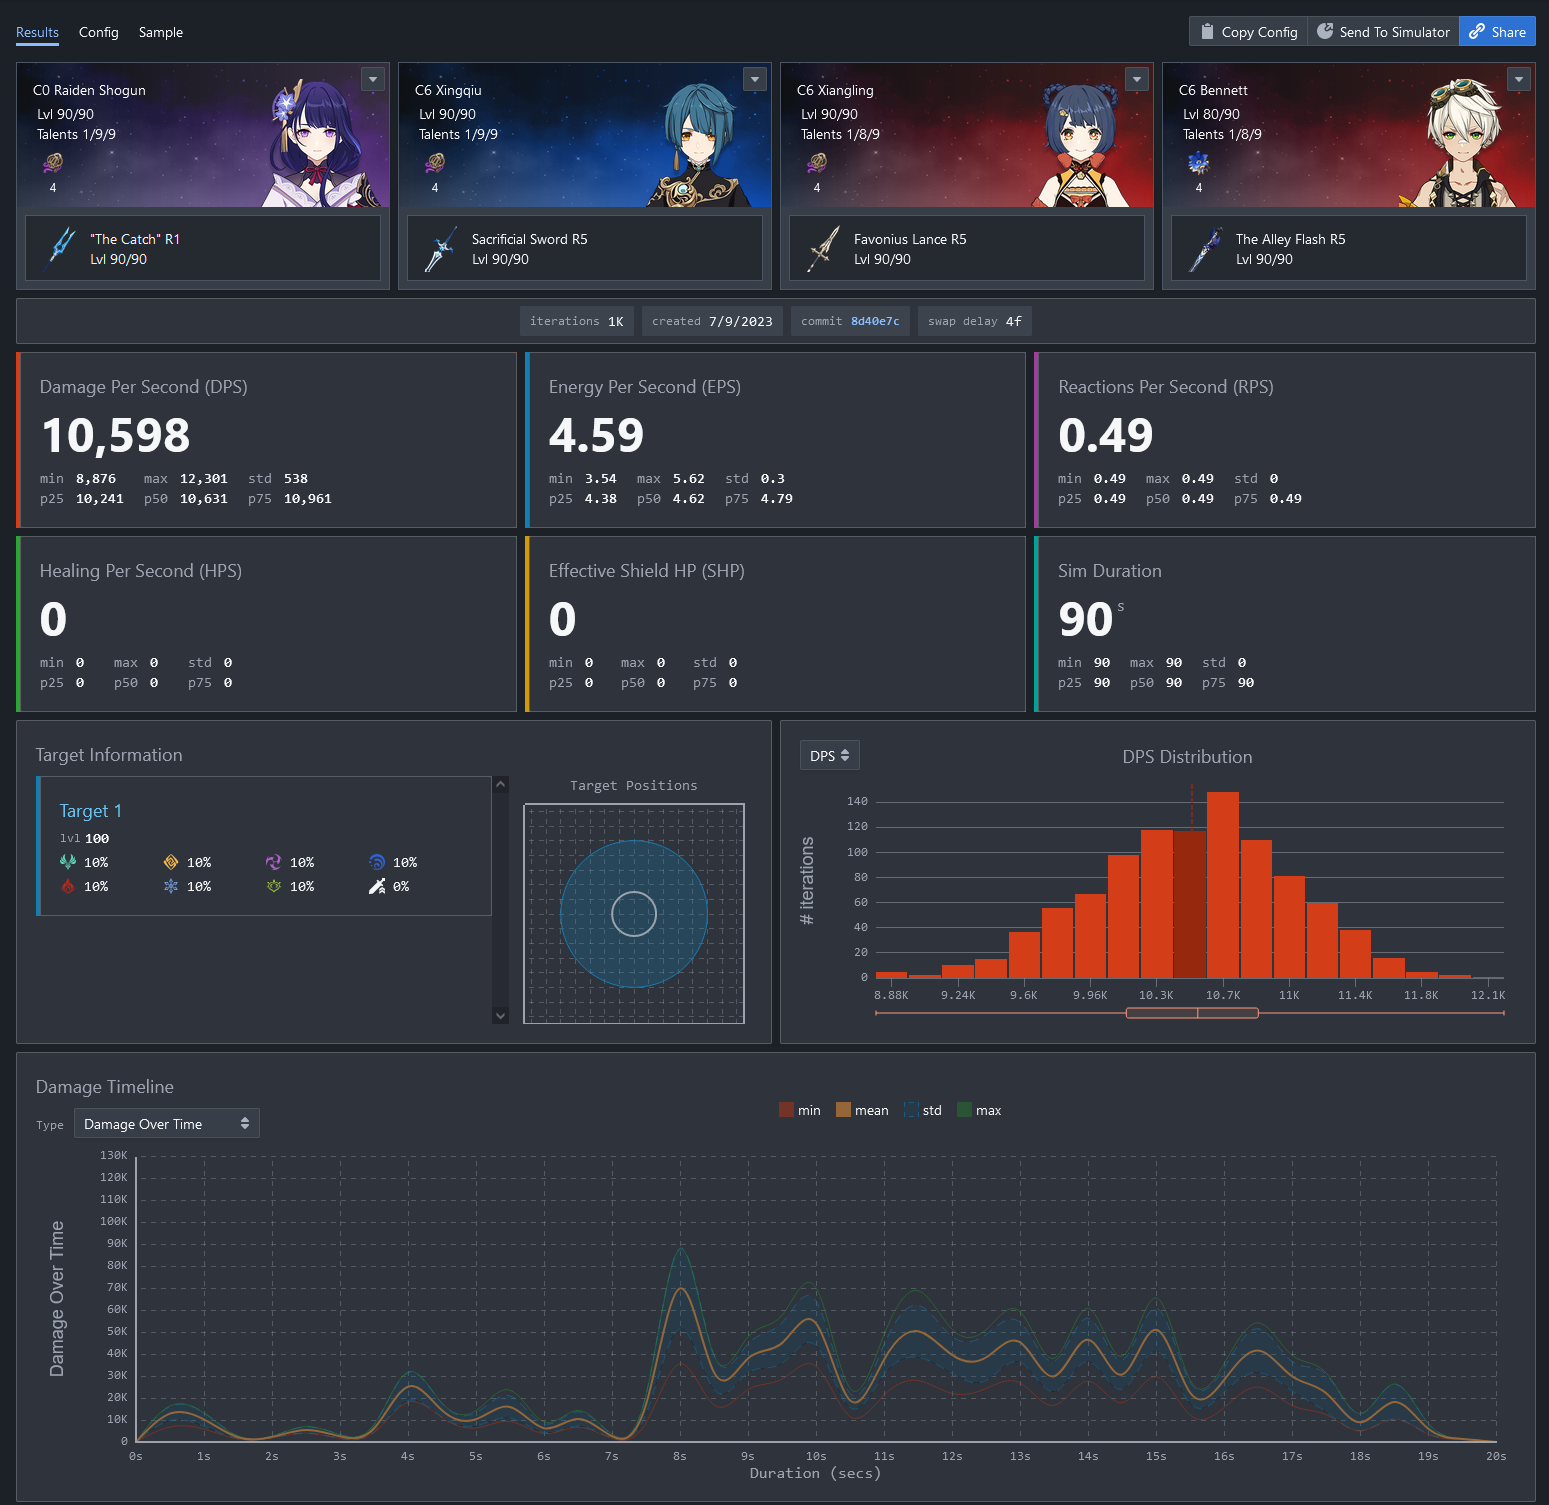
If we go back to the simulator (by clicking on the Simulator button in the menu), change our config to the above, and rerun it, we'll see something like this:
Looks much better already, but we're still a bit short since this only lasted roughly 40s. So we'll have to copy and paste a couple more times... or use a better option.
A better way to repeat
Rather than copying and pasting the same block of action we wish to repeat multiple times, a better way is to just wrap the entire block in a while loop. This way if the duration of the sim changes, we don't have to adjust the number of times we copy and paste. For example:
active raiden:

while 1 {
  raiden skill;
  xingqiu skill, burst;
  bennett skill, burst;
  xiangling burst, skill;
  raiden burst;
  raiden attack:15;
}
For those of you with some familiarity in programming/scripting, you'll notice here that we're just wrapping the entire block in an infinite loop (1 is treated as true here).
If you are not familiar with programming/scripting in general, do not feel intimidated by this.
You do not need to use any scripting features (loops, variables, etc...) and can simply stick to copying and pasting the same block over and over again.
With this, our config now looks like:
options iteration=1000 duration=90 swap_delay=4;
target lvl=100 resist=0.1 particle_threshold=250000 particle_drop_count=1;

raiden char lvl=90/90 cons=0 talent=1,9,9;
raiden add weapon="thecatch" refine=1 lvl=90/90;
raiden add set="emblemofseveredfate" count=4;
raiden add stats def%=0.197 def=42 hp=4780 atk=358 atk%=0.618 er=0.894 cr=0.602 cd=0.948;

xingqiu char lvl=90/90 cons=6 talent=1,9,9;
xingqiu add weapon="sacrificialsword" refine=5 lvl=90/90;
xingqiu add set="emblemofseveredfate" count=4;
xingqiu add stats def=86 hp=4780 hp%=0.105 atk=422 atk%=0.659 er=0.065 cr=0.563 cd=0.988 hydro%=0.466;

xiangling char lvl=90/90 cons=6 talent=1,8,9;
xiangling add weapon="favoniuslance" refine=5 lvl=90/90;
xiangling add set="emblemofseveredfate" count=4;
xiangling add stats def%=0.131 def=42 hp=4780 hp%=0.058 atk=381 atk%=0.099 er=0.816 em=147 cr=0.424 cd=1.033 pyro%=0.466;

bennett char lvl=80/90 cons=6 talent=1,8,9;
bennett add weapon="thealleyflash" refine=5 lvl=90/90;
bennett add set="noblesseoblige" count=4;
bennett add stats def%=0.19 def=79 hp=5348 hp%=0.14 atk=325 atk%=0.053 er=1.114 em=163 cr=0.443 cd=0.264 pyro%=0.466;

active raiden;

while 1 {
  raiden skill;
  xingqiu skill, burst;
  bennett skill, burst;
  xiangling burst, skill;
  raiden burst;
  raiden attack:15;
}
Hit run and we get...
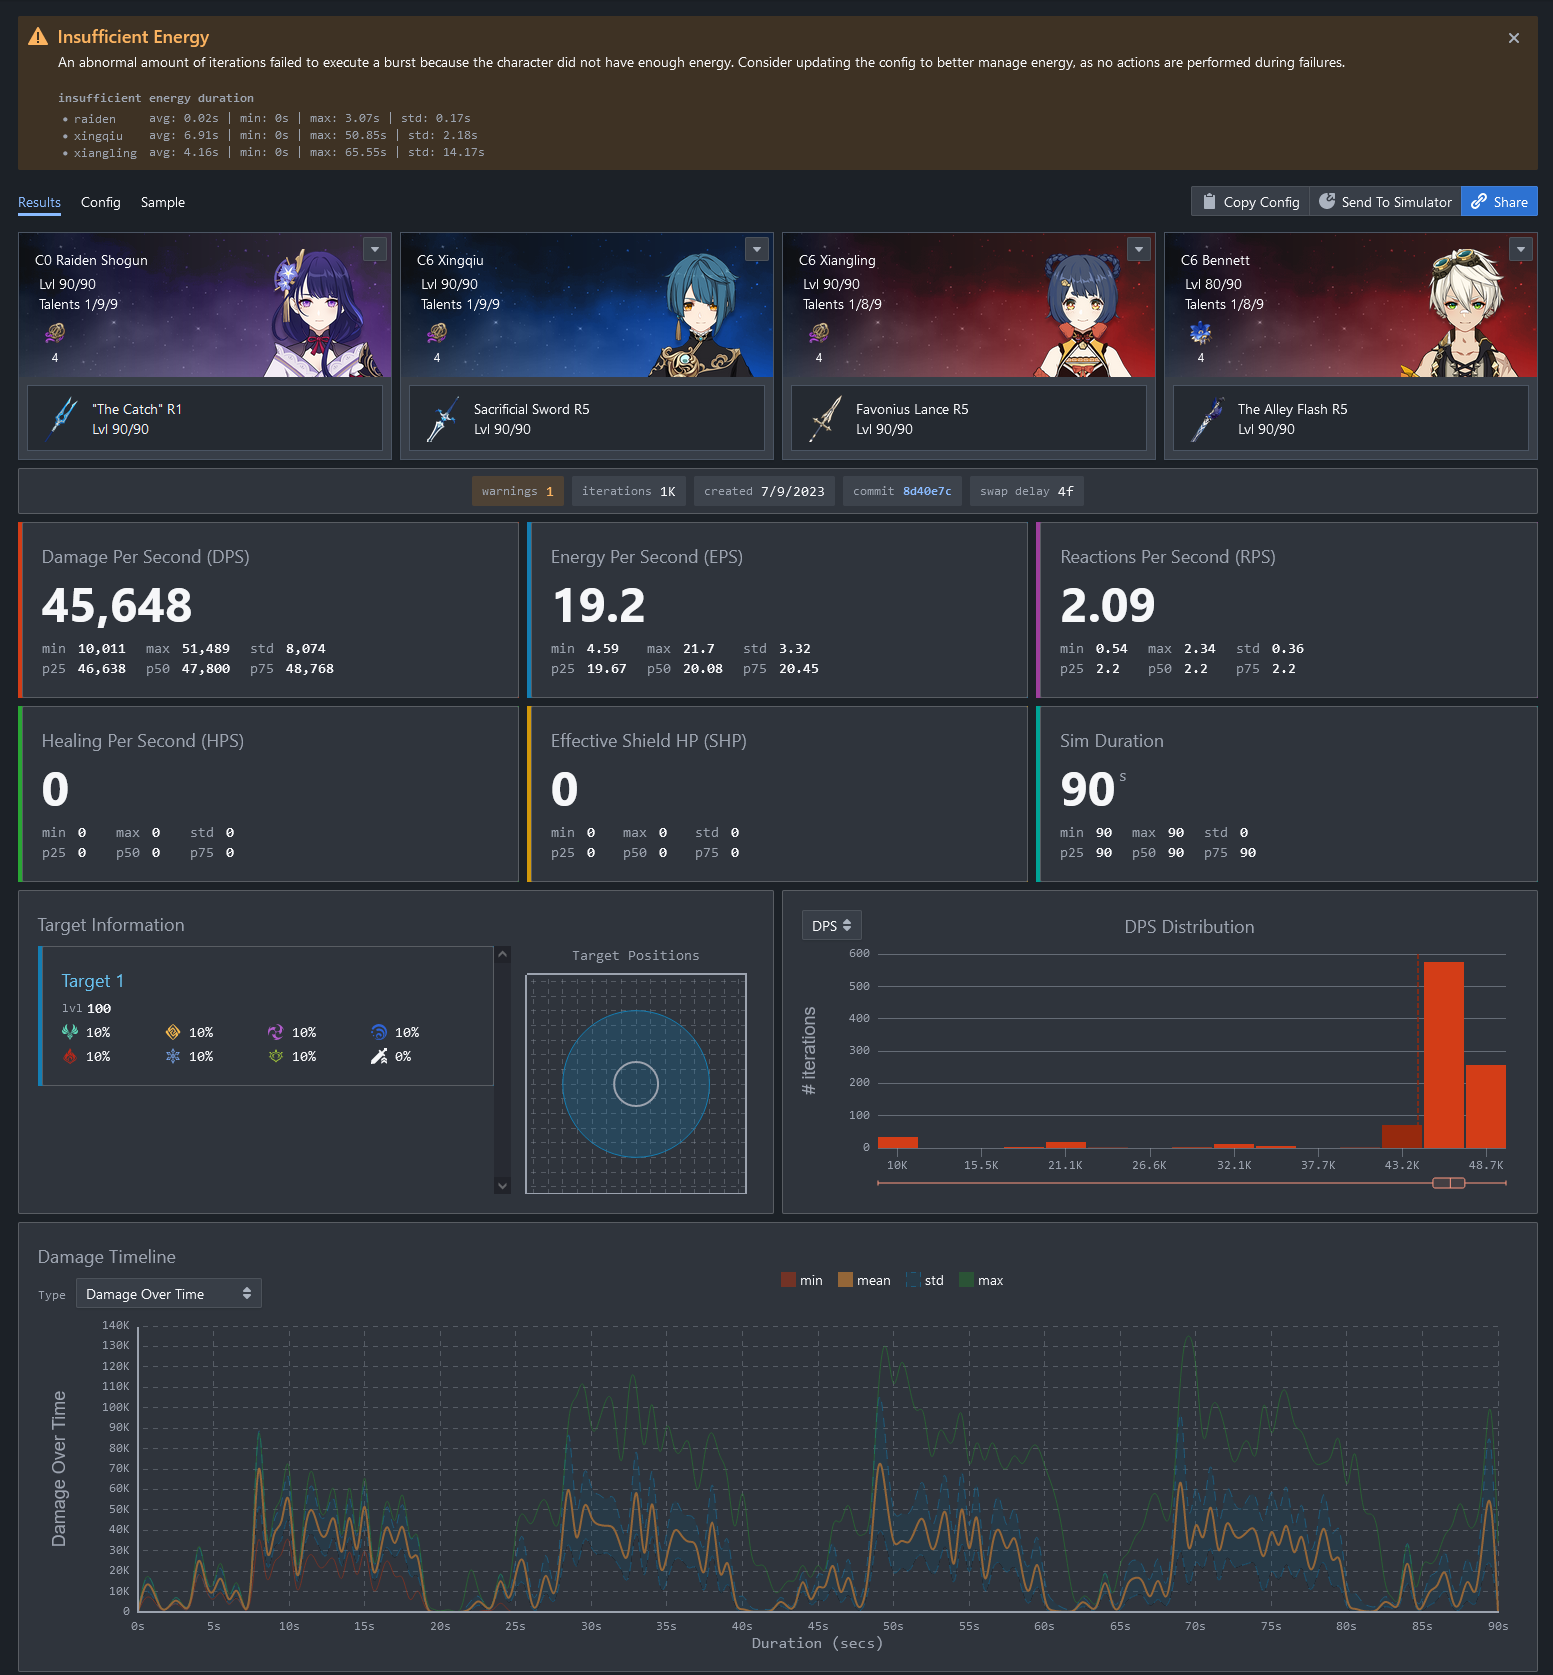
Looking good!
If you're following along with your own stats/weapons/artifacts etc. You may find yourself with a vastly different looking graph. Most likely this has to do with energy so keep following along and we'll address that next.
Energy energy energy
One of the biggest issue first time gcsim users run into is lack of energy on their team. Often we get users coming into our discord asking why when they simulate their own team, their dps is so low. Turns out that most of the time their team is not running enough ER.
The reason why so far everything has looked good in our tutorial is because the stats we're using here is from a member of the gcsim community that has already optimized their team accordingly to have sufficient energy. To illustrate the problem a typical user would have, we're going to modify the stats a little bit.
In particular, we're going change Xiangling's ER from artifacts down to just 20%.
Before:
xiangling add stats
    def%=0.131 def=42 hp=4780 hp%=0.058 atk=381 atk%=0.099
    er=0.816
    em=147 cr=0.424 cd=1.033 pyro%=0.466;
After:
xiangling add stats
    def%=0.131 def=42 hp=4780 hp%=0.058 atk=381 atk%=0.099
    er=0.2
    em=147 cr=0.424 cd=1.033 pyro%=0.466;
You'll note that here we added some arbitrary line breaks to the Xiangling stats line to make it easier to read (and spot the difference).
You can always break up a single line to as many lines as you wish provide it ends in a ;. You can make use of this to make your config more readable.
So now our config looks like this:
options iteration=1000 duration=90 swap_delay=4;
target lvl=100 resist=0.1 particle_threshold=250000 particle_drop_count=1;

raiden char lvl=90/90 cons=0 talent=1,9,9;
raiden add weapon="thecatch" refine=1 lvl=90/90;
raiden add set="emblemofseveredfate" count=4;
raiden add stats def%=0.197 def=42 hp=4780 atk=358 atk%=0.618 er=0.894 cr=0.602 cd=0.948;

xingqiu char lvl=90/90 cons=6 talent=1,9,9;
xingqiu add weapon="sacrificialsword" refine=5 lvl=90/90;
xingqiu add set="emblemofseveredfate" count=4;
xingqiu add stats def=86 hp=4780 hp%=0.105 atk=422 atk%=0.659 er=0.065 cr=0.563 cd=0.988 hydro%=0.466;

xiangling char lvl=90/90 cons=6 talent=1,8,9;
xiangling add weapon="favoniuslance" refine=5 lvl=90/90;
xiangling add set="emblemofseveredfate" count=4;
xiangling add stats
    def%=0.131 def=42 hp=4780 hp%=0.058 atk=381 atk%=0.099
    er=0.2
    em=147 cr=0.424 cd=1.033 pyro%=0.466;

bennett char lvl=80/90 cons=6 talent=1,8,9;
bennett add weapon="thealleyflash" refine=5 lvl=90/90;
bennett add set="noblesseoblige" count=4;
bennett add stats def%=0.19 def=79 hp=5348 hp%=0.14 atk=325 atk%=0.053 er=1.114 em=163 cr=0.443 cd=0.264 pyro%=0.466;

active raiden;

while 1 {
  raiden skill;
  xingqiu skill, burst;
  bennett skill, burst;
  xiangling burst, skill;
  raiden burst;
  raiden attack:15;
}
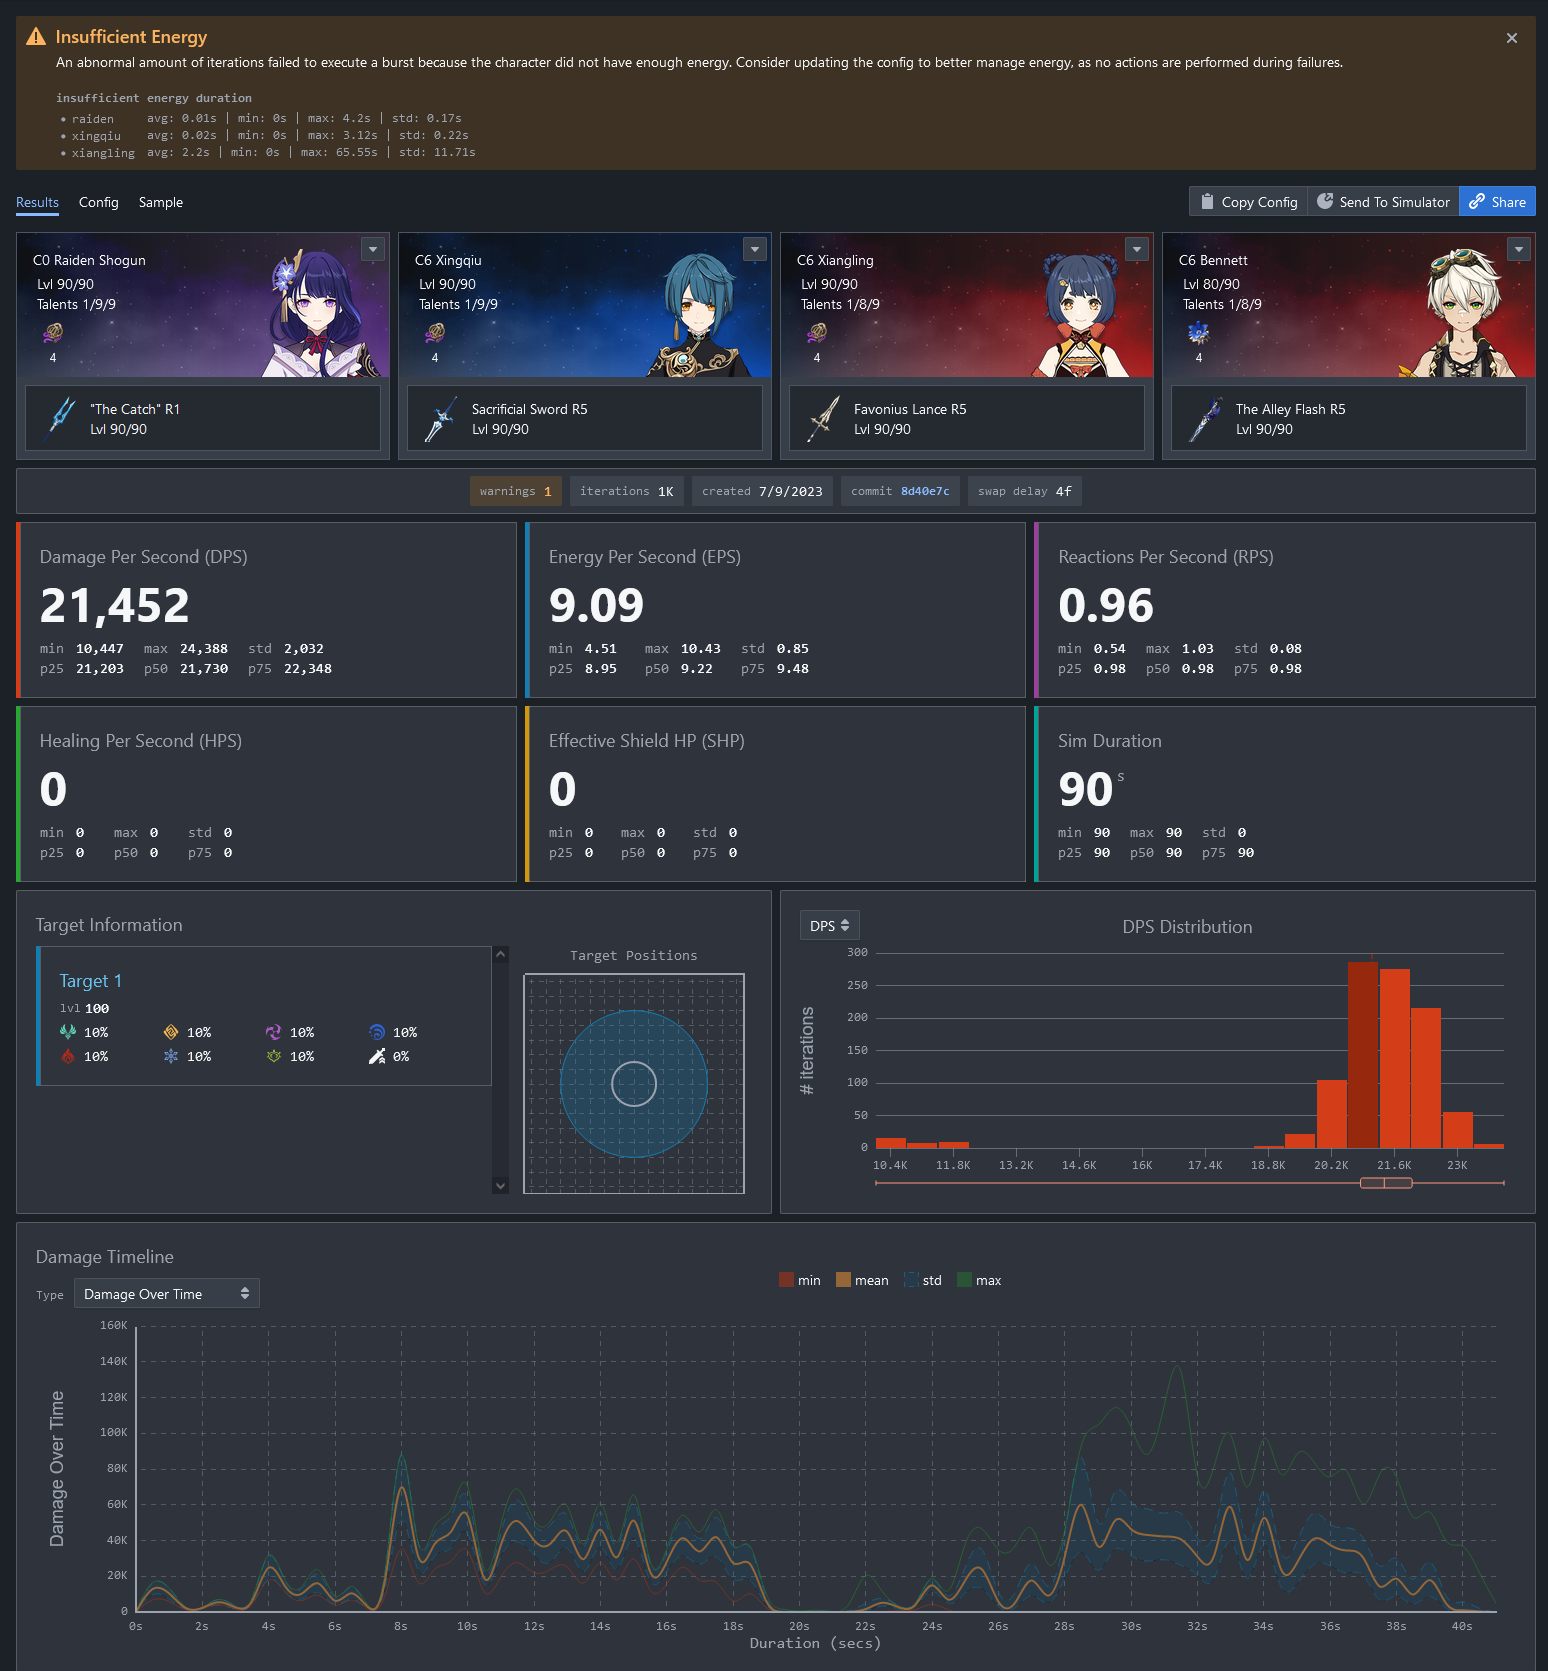
Giving this a spin and...
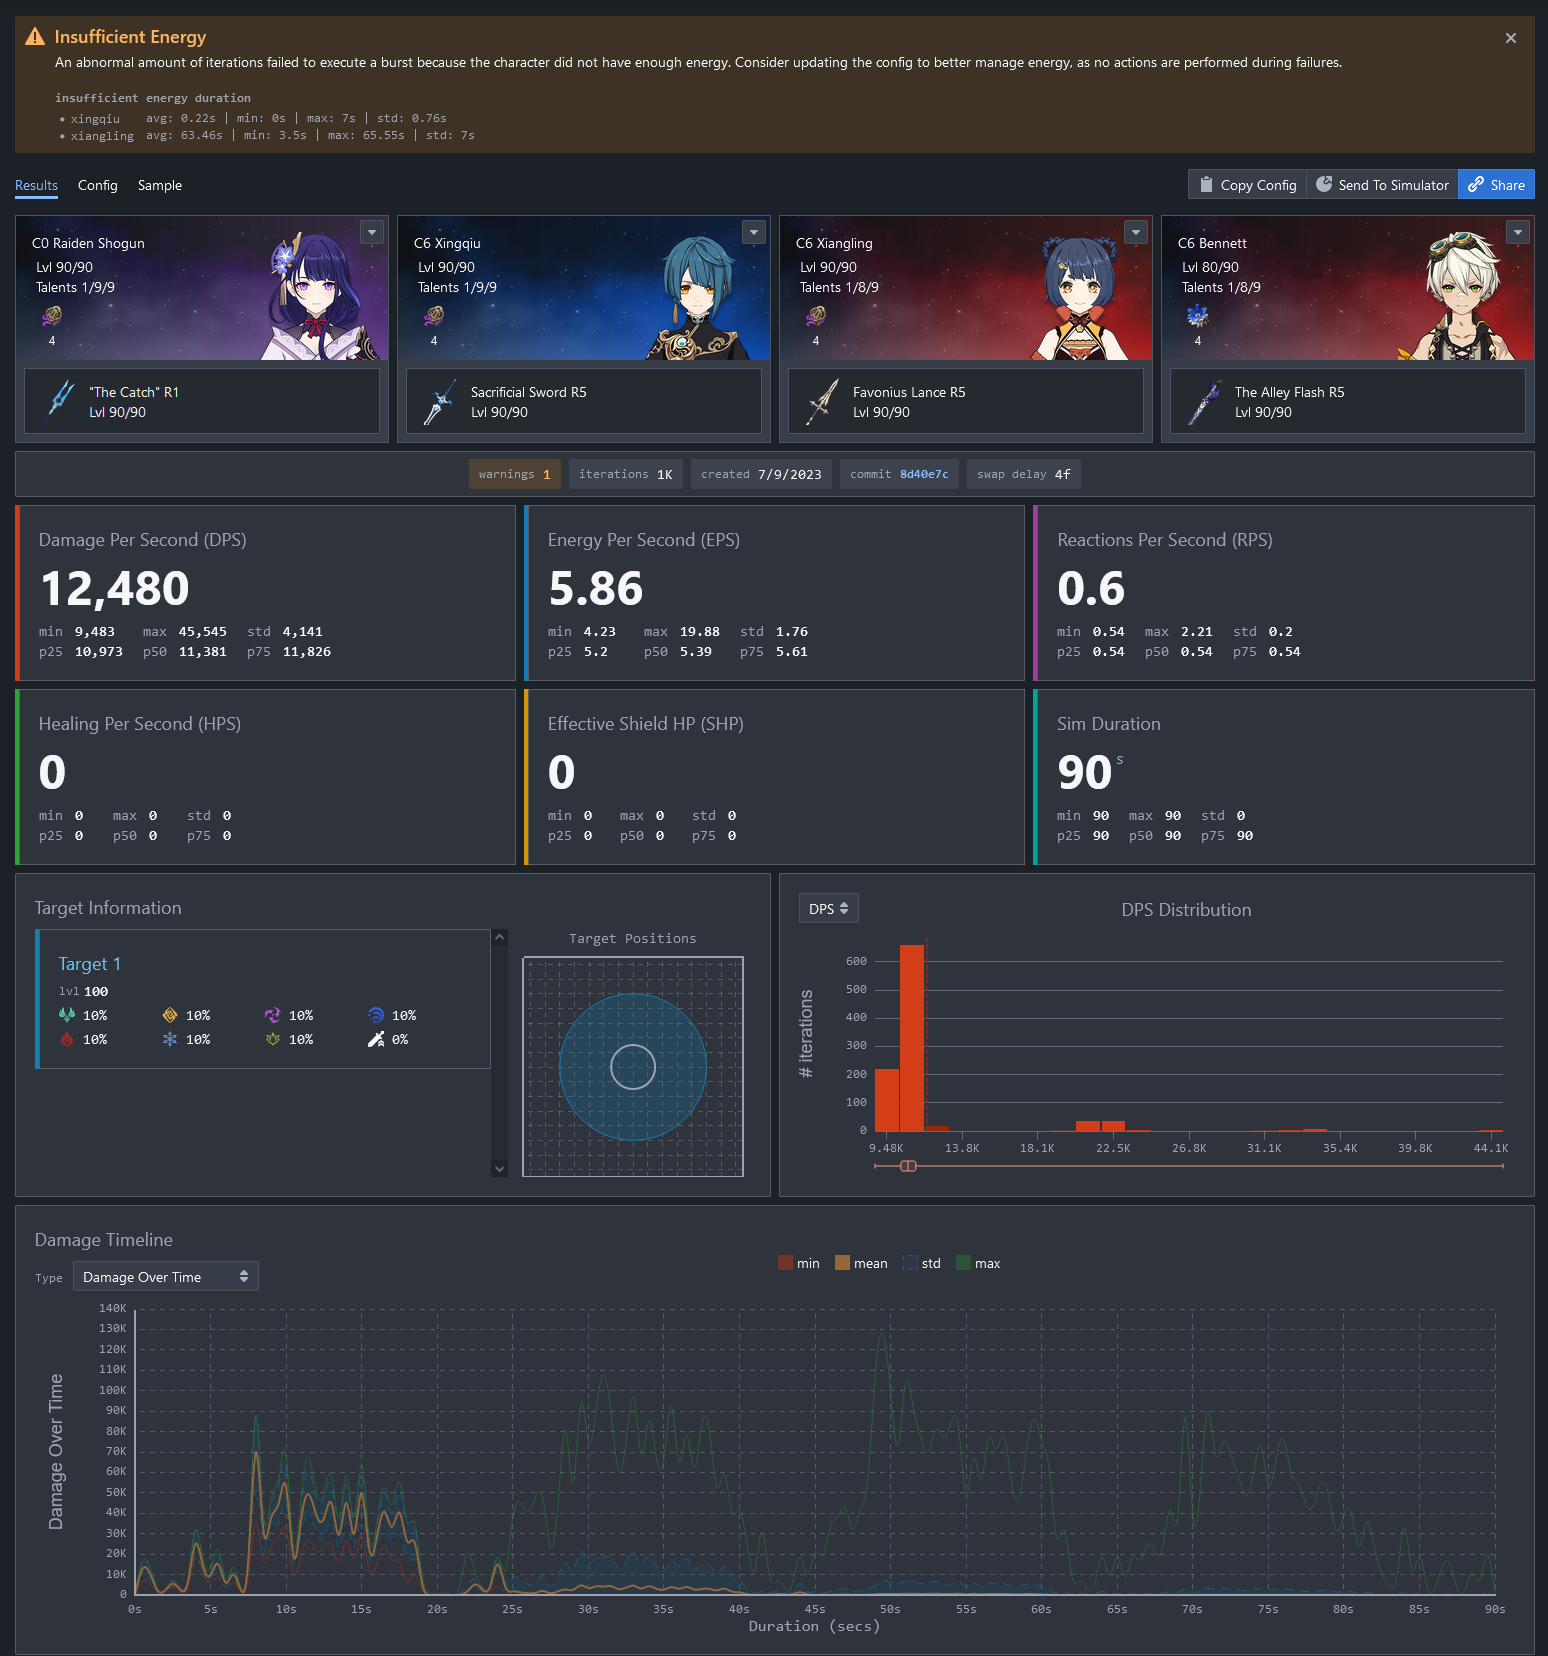
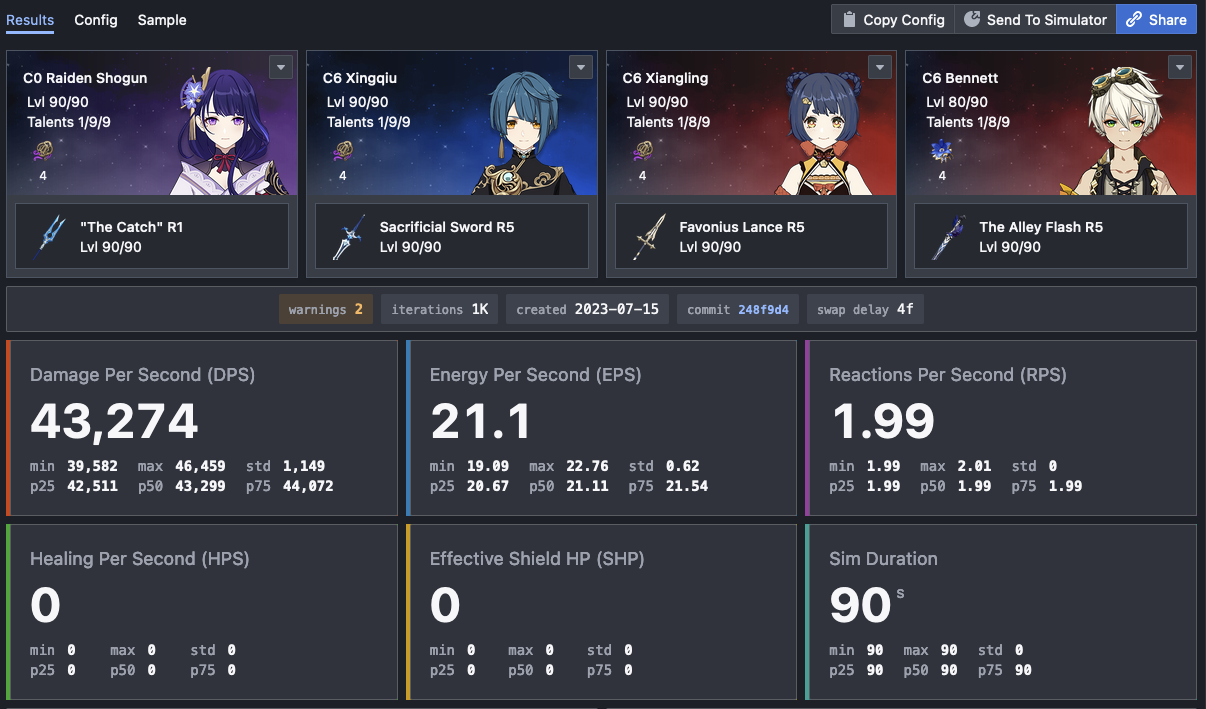
You'll see that the damage completely tanked and the graph looks very flat compared to the original run.
Other ways to spot energy problems
If you recall, when the simulator runs into an action that cannot be executed because it is not ready (due to energy, cooldown, stamina etc.), it will simply stall until it can execute the action, even if it means stalling infinitely.
One way to spot energy issues is through the warnings. As you can see from the above screenshot, there is a warning that says "Insufficient Energy". This warning works by detecting how often a character failed to use their burst on average. Note that the detection system is still fairly new and therefore should not be the only indicator to rely upon.
Solutions
So how do we fix this? One option is to use artifacts with more ER (you should most likely be running ER sands). However, you may not have spare ER sands available. In which case, you'll want to introduce some batterying actions. But before we can talk about how to do that, first we'll need to take a look at the Sample view.
And to Sample we go
gcsim includes a very comprehensive Sample view to help you see exactly what is going on in a rotation, how damage is calculated, what buffs are being applied and so on. Due to the amount of information, it can be overwhelming at first. However, you'll find that as you get more used to it, the Sample view is where you will be spending most of your time when crafting a rotation.
Start by clicking on the Sample tab located towards the top left of the viewer (right above Raiden in our screenshot above).
After that, we're going to generate a sample by clicking the Generate button.
But before that, we're going to change the drop down from Sample Seed to Min Seed, like so:
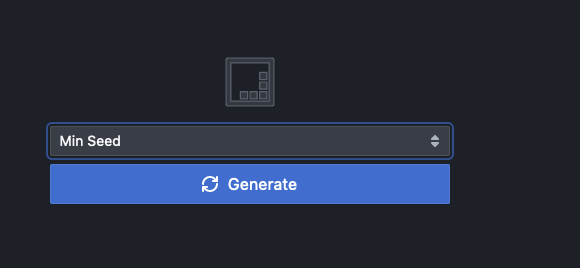
The reason for using min seed here instead of sample seed is to make the example more obvious.
For your own usage, most of the time you'll be using the Sample Seed option.
You'll be taken to a screen that looks something like the following:

Your view may look different than ours above, depending on the options you have ticked.
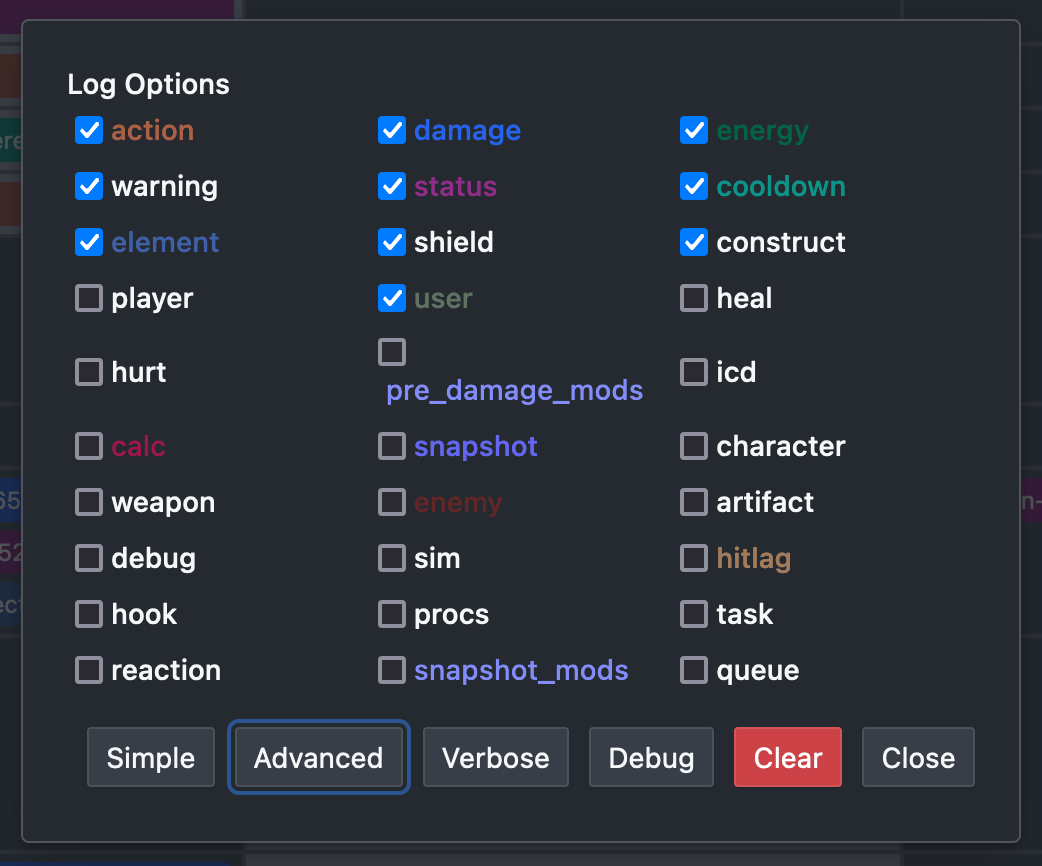
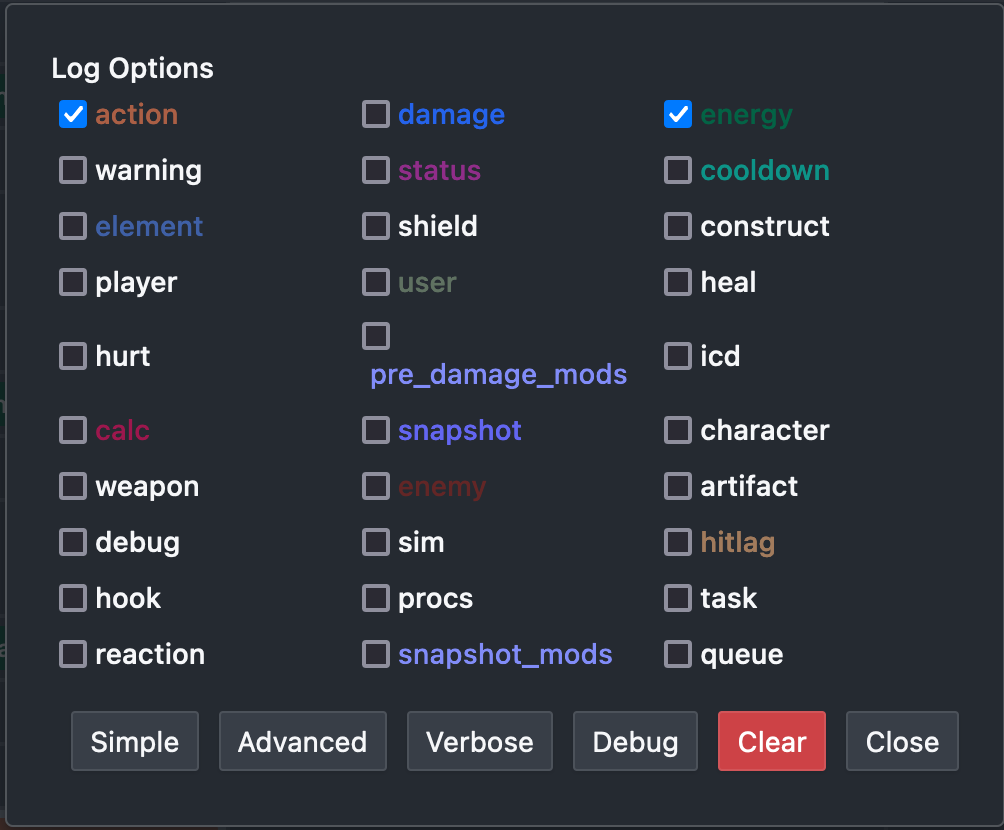
So start by clicking on the Settings button top right, and then clear everything except action and energy.
Your screen should look like the following:
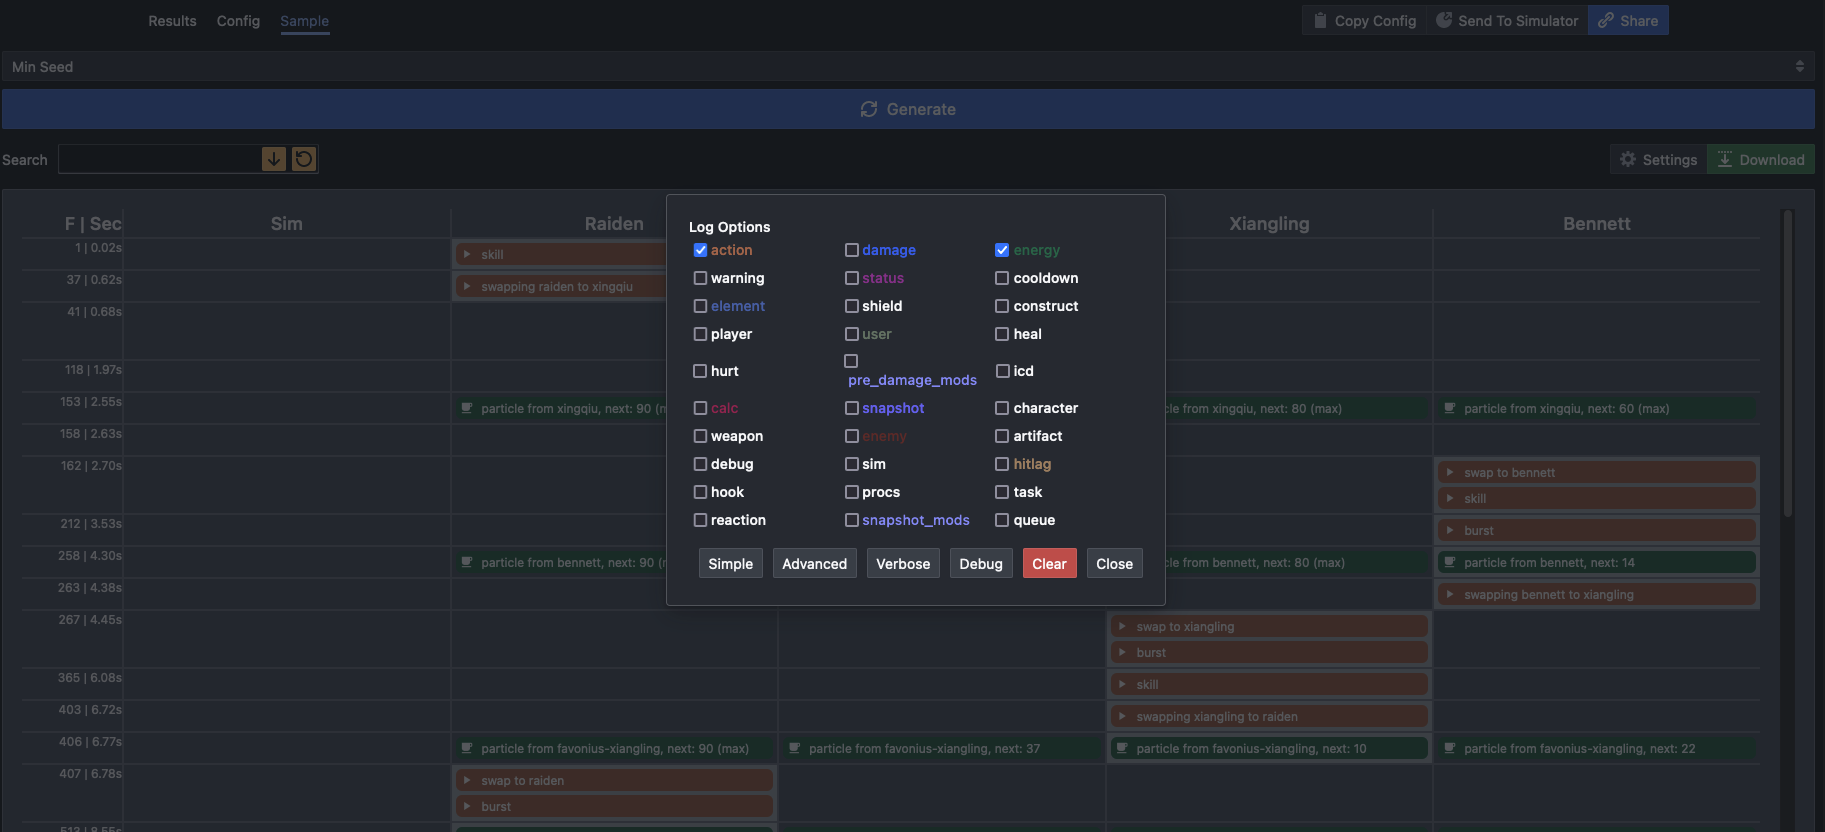
This view is now a lot less cluttered and shows only the actions that were executed and energy generation. The actions executed should look familiar as it matches the rotation we had inputted.
How to read the Sample
Sample table row
Each row in the Sample table represents what took place in a single frame. On the left-hand side, you will see each frame number and its value in seconds:
Here for example, you will see that the first row represents what happened on frame 1, the second row represents what happened on frame 37 and so on.
Notice that the table skips any frames where nothing was logged for the particular options you are filtering for, hence the row jumps from frame 1 to frame 37.
This is important to pay attention to particularly for diagnosing rotation issues.
Currently, we are only showing action and energy.
If you were to enable more options, you'll see new rows populated.
Sample table column
Each column in the Sample table represents a character in your sim, with the first column being a special column representing sim specific events that are not necessarily tied to any specific character. Thus you will always have between 2 to 5 columns.
Reading row by row
When starting out, you'll want to read through the sample row by row. As you get more experienced with it, you'll simply be skipping to certain rows you are interested in.
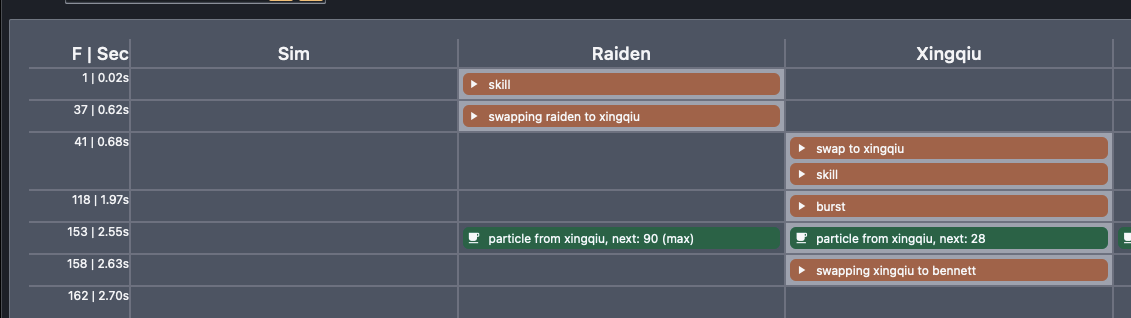
So let's take a look at the first couple of rows and see what is happening there:
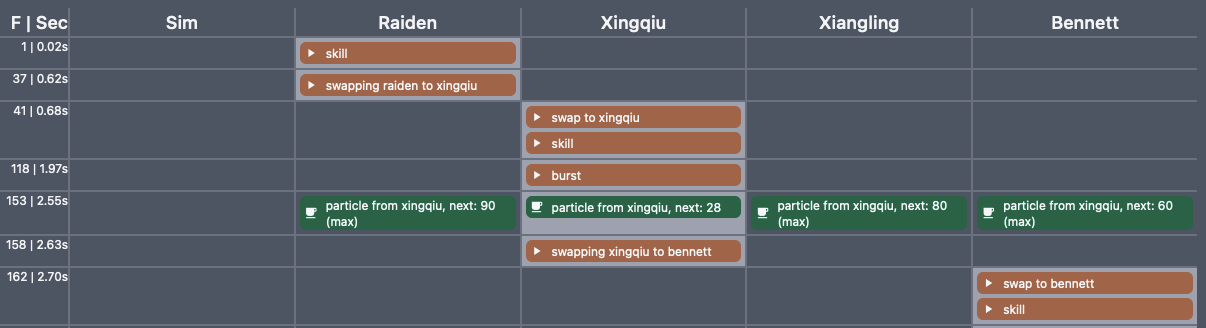
We see that:
- Raiden used
skillon frame 1. - Raiden started
swapto Xingqiu on frame 37. - Xingqiu comes on field on frame 41, and uses
skillon the same frame. - Xingqiu uses
burston frame 118. - The team received particles from Xingqiu's
skillusage on frame 153. - Xingqiu started
swapto Bennett on frame 158. - Bennett comes on field on frame 162, and uses
skillon the same frame.
Going back to our config:
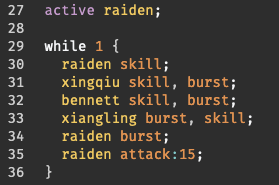
We see that this is exactly what we told the sim to do. We start with Raiden, use her skill, then use Xingqiu skill and burst, etc...
You'll see that the sim handled when the actions took place for us. We only had to tell the sim which action to use.
It's important to understand that by default, gcsim will execute actions as fast as possible aka. frame perfect.
It is possible to delay execution via waits, but be careful of how waits are handled (read the warning in the documentation carefully). It may not be intuitive.
And that's really all there is to it when it comes to reading the Sample table. In the next section, we'll cover some more tips and tricks.
Sample tips and tricks
Getting more information
Sometimes just knowing when an action took place is not enough. Sometimes we need to get more information. For every single event in the Sample table, you can click on it to get more details. For example, if we were to click on any of the energy events, we would see the following:

Here we get a detail log as recorded by gcsim that shows us additional information such as the number of particles, the current ER of the character receiving the particle, the amount of energy being recovered, the amount of energy before receiving the particles, and the amount of energy after receiving the particles.
Commonly used log options
The following are some commonly used log options and what they tell you:
damage: shows when damage took place and the amount of damagecalc: shows the calculation that goes into each damage instance
This section is incomplete, feel free to contribute to this.
Finding our energy problem
Let's backtrack a bit and get back to finding our energy problem.
Sticking with the same sample options (i.e. only showing action and energy), if we scroll down, we'll notice that the log ends abruptly at frame 1483:
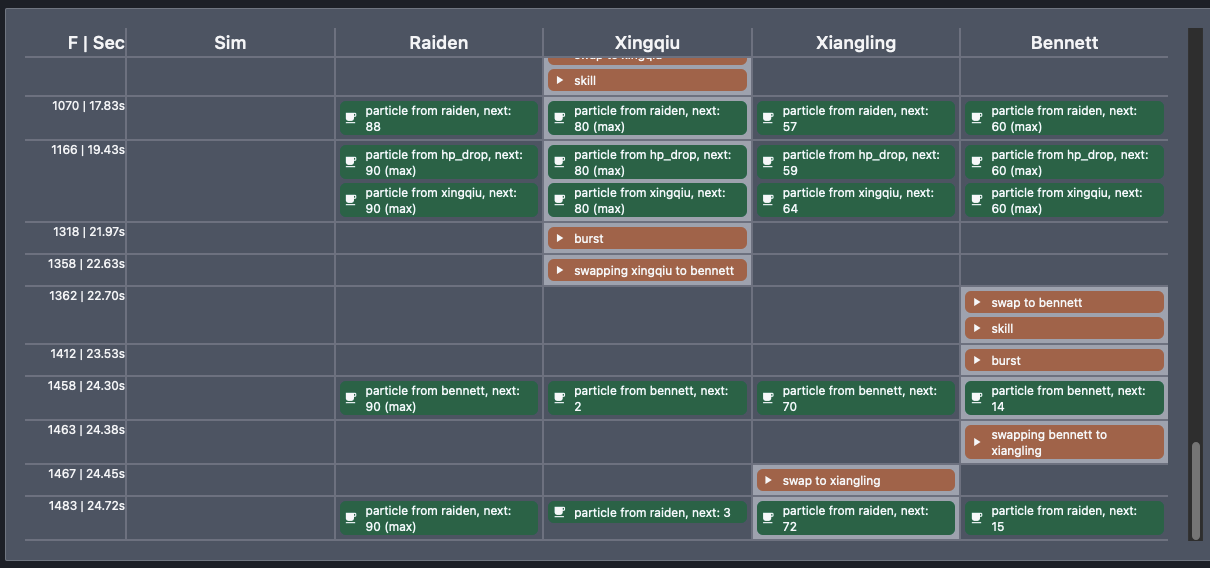
If you recall, we had asked our sim to run for 90s of combat. How come there's nothing happening after 24.72s? Looking at the sample page, we see that the last couple of actions were as follows:
- Frame 1412: Bennett used
burst. - Frame 1463: Bennett started
swapto Xiangling. - Frame 1467: Xiangling came on field.
Let's take a look at our config again:
We can see that at this point, on frame 1467, Xiangling should be using her burst. Notice that as of frame 1458, Xiangling only has 70 energy, but she needs 80 energy to use her burst. This means she doesn't have enough energy to use her burst.
Unfortunately, with no other source of energy, for the remainder of the simulation from 24.72s onwards to 90s, she never gets enough energy to use her burst. As a result, in this particular iteration, Xiangling is stuck on trying to use her burst every frame but she can't.
This is what is causing our dps to tank completely.
Batterying actions
Now that we see Xiangling is the one that's having energy problem, we'll need to find some way to charge her up. Looking at our config:
The ideal place for this is probably after Raiden's attack string before the entire thing loops again.
Figuring out where and how to change a config is the creative process of coming up with a good rotation. This is something you will build experience for over time.
So let's try something like this:
active raiden;

while 1 {
  raiden skill;
  xingqiu skill, burst;
  bennett skill, burst;
  xiangling burst, skill;
  raiden burst;
  raiden attack:15;
  // let's swap to bennett and battery xiangling here
  bennett skill;
  xiangling attack;
}
Rerun the simulation and...
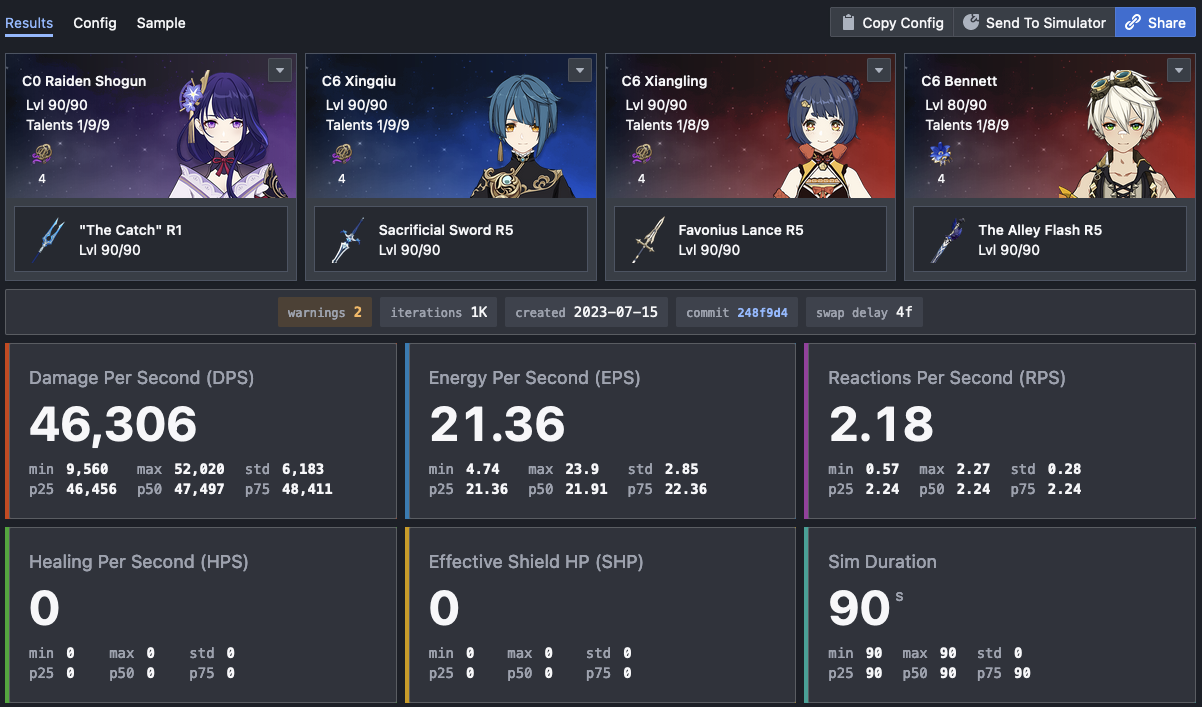
Look at that! Our DPS jumped right up.
Notice that we now have a new warning about swap cd (1s cd on swap). The cause of this is the two new actions we added. The warning is telling us that we are trying to swap to Raiden and Xiangling and in both cases the action is failing due to cd.
If you look at the actions we added, we are asking the sim to swap to Xiangling right after Bennett skill. Bennett skill does not take up enough field time for swap to come off cooldown. Hence resulting in the swap to Xiangling failing.
Similarily, we are asking the sim to swap to Raiden right after using a single Xiangling attack, which again, does not take up enough field time for swap to come off cooldown.
We can resolve this by tweaking the above batterying actions a little, transforming them into something like:
  // let's swap to bennett and battery xiangling here
  bennett attack, attack, skill;
  xiangling attack, attack, attack;
  raiden attack;
This is all part of that creative rotation building process. The thought here is we want to minimize the amount of time a character sits around doing nothing, so we add extra filler actions such as Bennett normals and Xiangling normals while waiting for swap to come off cooldown.
Double check Sample
Let us regenerate our Min Seed Sample again to see if the enery problem is fixed.
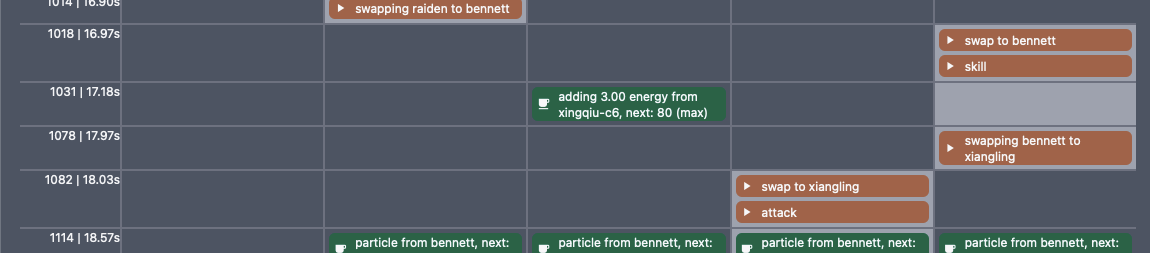
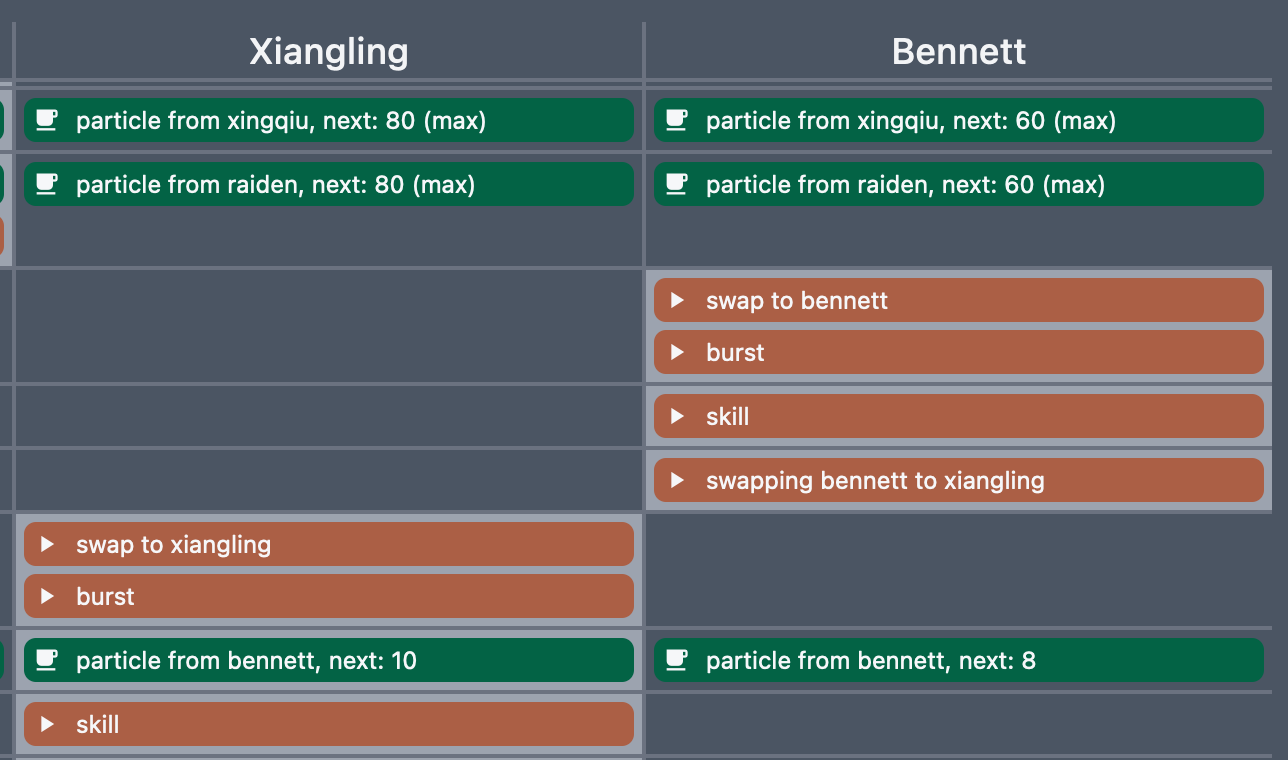
You'll notice on frame 1018, we can see the new batterying actions we added:
However, as we scroll down to the bottom, we see that the events still ended abruptly at frame 1483. What gives? Our dps jumped, so the problem should have been fixed, right?
Understanding randomness
This actually illustrates a very important point about randomness. The DPS we see on the main page shows the average dps across many many trials.
The sample screen we are looking at represents a single trial.
In particular, when we picked Min Seed, we actually asked for the trial that had the lowest dps.
Remember that there is randomness in the amount of particles generated.
So in the trial with the lowest dps, we actually had really bad luck and Xiangling still didn't have enough energy even after adding in batterying actions.
So let's try and fix this by adding more batterying actions, making our config look like:
active raiden;

while 1 {
  raiden skill;
  xingqiu skill, burst;
  bennett skill, burst;
  xiangling burst, skill;
  raiden burst;
  raiden attack:15;
  // let's swap to bennett and battery xiangling here
  bennett skill;
  xiangling attack;
  // let's swap to bennett and battery xiangling here
  bennett skill;
  xiangling attack;
}
Rerun this and jump to the Min Seed sample and you'll see now that the trial with the lowest dps no longer stalls at frame 1483 and instead continues to the end of 90s.
But this came at a cost:
Now, our dps is lower. This is the cost of the extra field time required for the two batterying actions.
Conditional batterying
We are not going into too much detail here, because this is getting more advanced. However, we still want to show that this is more realistic than the above example.
Above, we showed how we can add batterying actions. However, what we have done above is always batterying. The reality is, most players will check to see if Xiangling's burst is up (i.e. has enough energy) at the end of the rotation, and only battery if she does not have enough energy.
This can be handled in gcsim with conditionals, like so:
active raiden;

while 1 {
  raiden skill;
  xingqiu skill, burst;
  bennett skill, burst;
  xiangling burst, skill;
  raiden burst;
  raiden attack:15;
  // let's swap to bennett and battery xiangling here
  if .xiangling.energy < 70 {
    bennett skill;
    xiangling attack;
  }
}
With this, the batterying will only occur if Xiangling has less than 70 energy at the end of Raiden's attack string, making our results look slightly better as well:
Rotation optimization
In this section we're going to go over some common rotation optimization tricks.
Maximizing number of Raiden attacks in burst
I mentioned earlier that I put raiden attack:15; because I didn't know exactly how many normal attacks Raiden can squeeze in just spamming left mouse click (no fancy combos here) during her burst duration. Now we're going to look at how we can use sample to optimize that.
Although a lot of effort has gone into making sure gcsim has accurate frame counts, it's always a good idea to reference vs a video of your own gameplay to see what actions are possible. Keeping in mind that gcsim frames are as optimal as possible (i.e. frame perfect cancels) which could be significantly faster than what you may be able to execute.
So to start, we're going to generate a sample using Min Seed again. This time, make sure that the options are set to show Advanced as follows (we're going to need some of the options here, namely status):
Next scroll down to the first instance where Raiden uses burst (roughly 6.7s in). You'll see a status line saying: raidenburst status mod added. We're going to click on the tiny little icon to the left of it, this is going to highlight the F column like so:
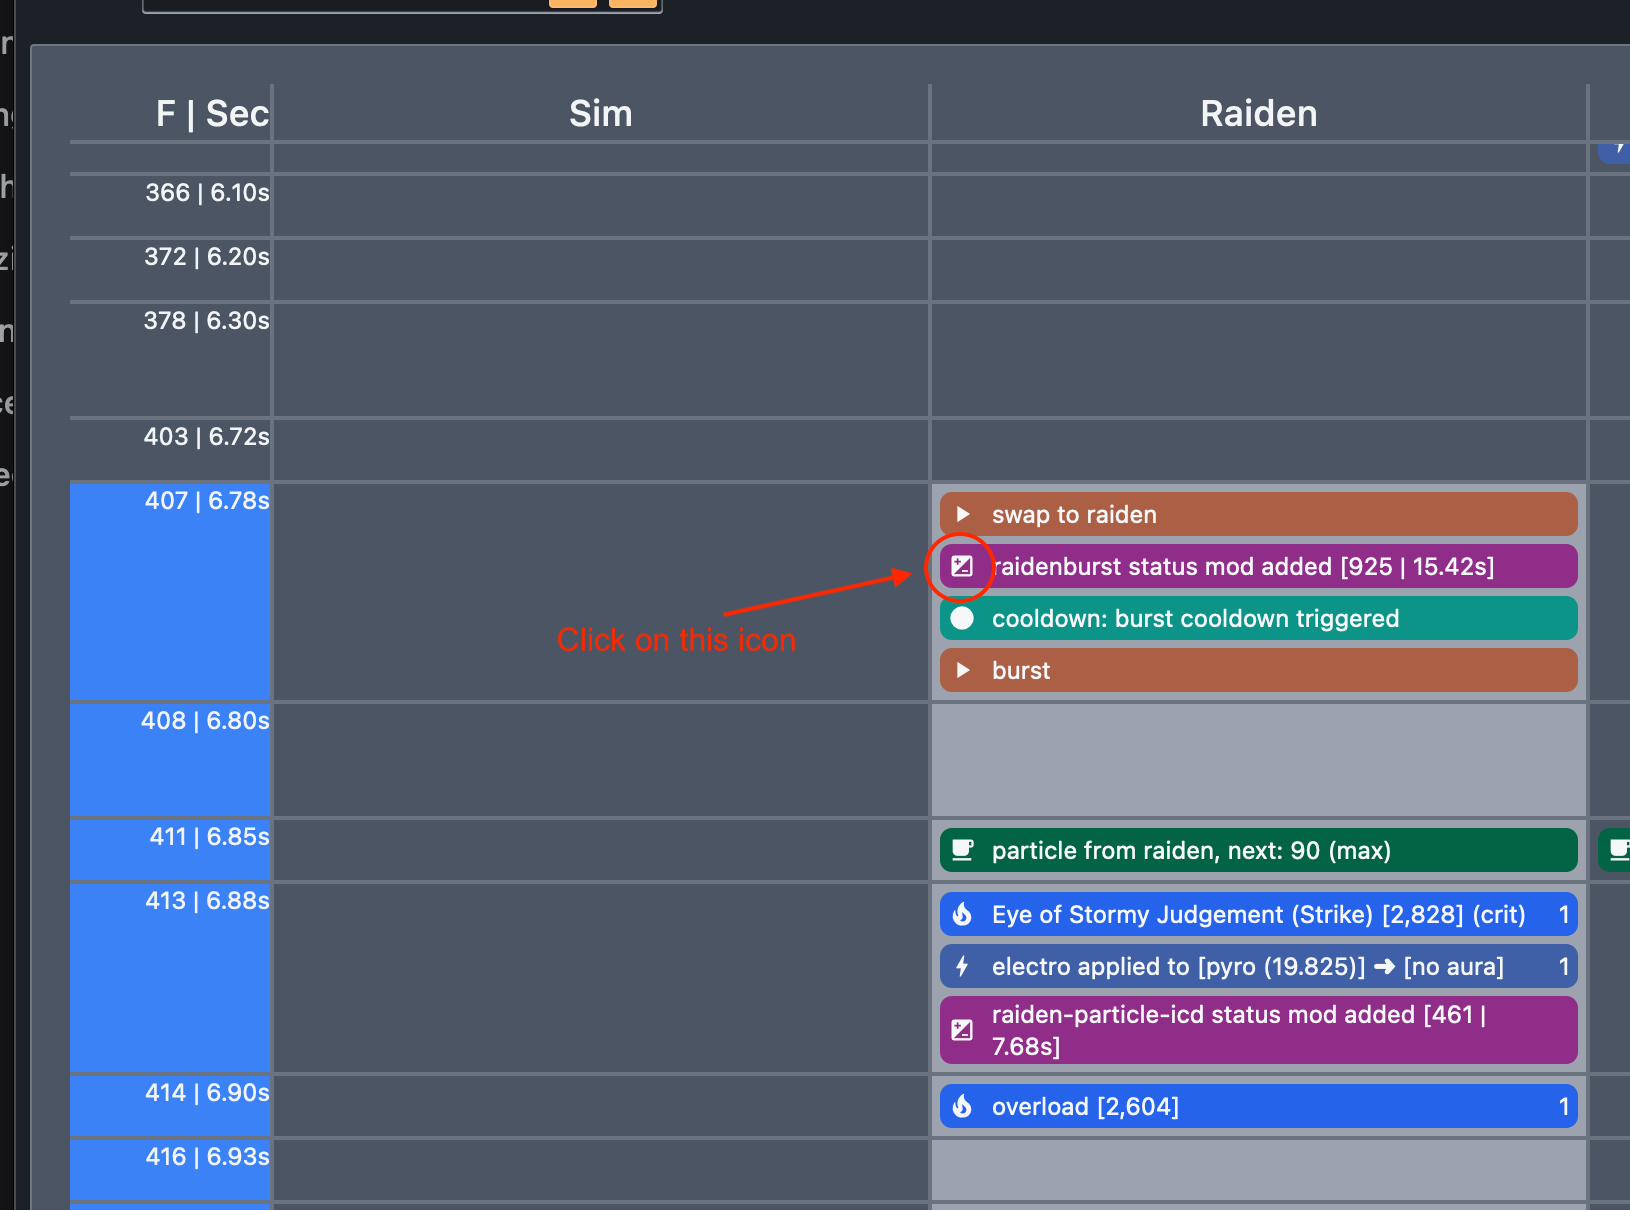
This highlight on the F column is a little helper that shows how long the particular buff that you click on lasts. When the blue highlight fades is when that buff expires. So now we can scroll down and find where the Raiden burst buff expires:
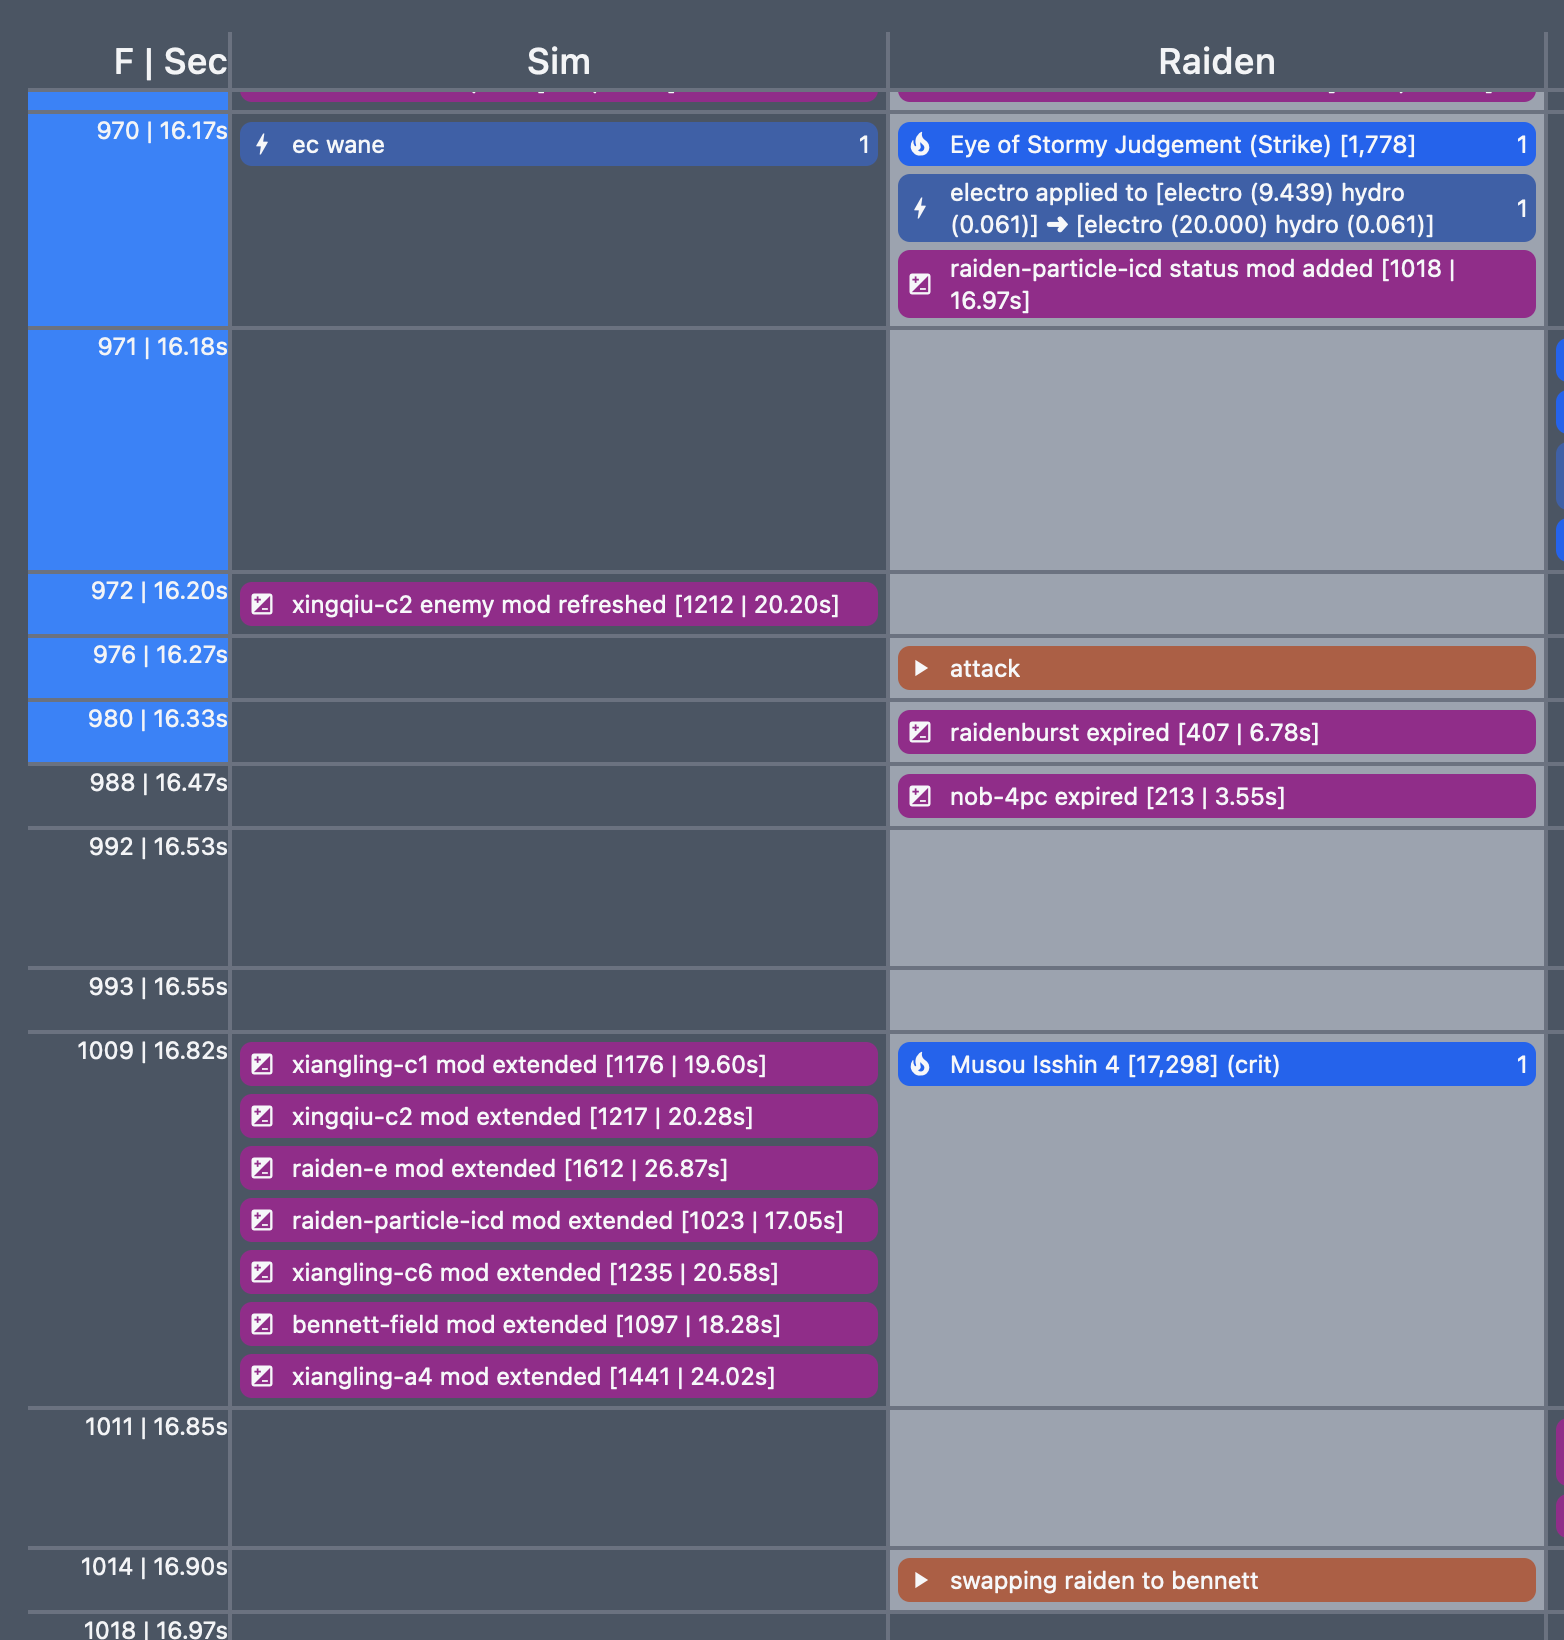
From this picture, we can see that the last normal attack started on frame 976, and the buff expires 980. This shows that our 15 normal attacks line up perfectly and fit into the burst duration perfectly! We didn't need to do anything.
Optimizing particles
Another important aspect of optimizing a rotation involves taking a look at energy and making sure the right character is catching the particles. If you are familiar with this particular team, you may know that Xiangling is one of the more energy hungry characters of the team. One potential optimization we can make is to look for ways to increase her energy gain.
Let's start by going back into the sample, and showing just the actions + energy and seeing what we can find:
In particular, we want to look at how the team's energy behaves towards the end of Raiden's attack string during burst to see how far off they are from fully recharged. Scrolling down a bit:

We see that roughly 2/3rd of the way into Raiden's attack string, Bennett is already fully charged:

Xingqiu took a bit longer than Bennett and didn't get fully recharged in this iteration until just after Raiden's attack string ended:
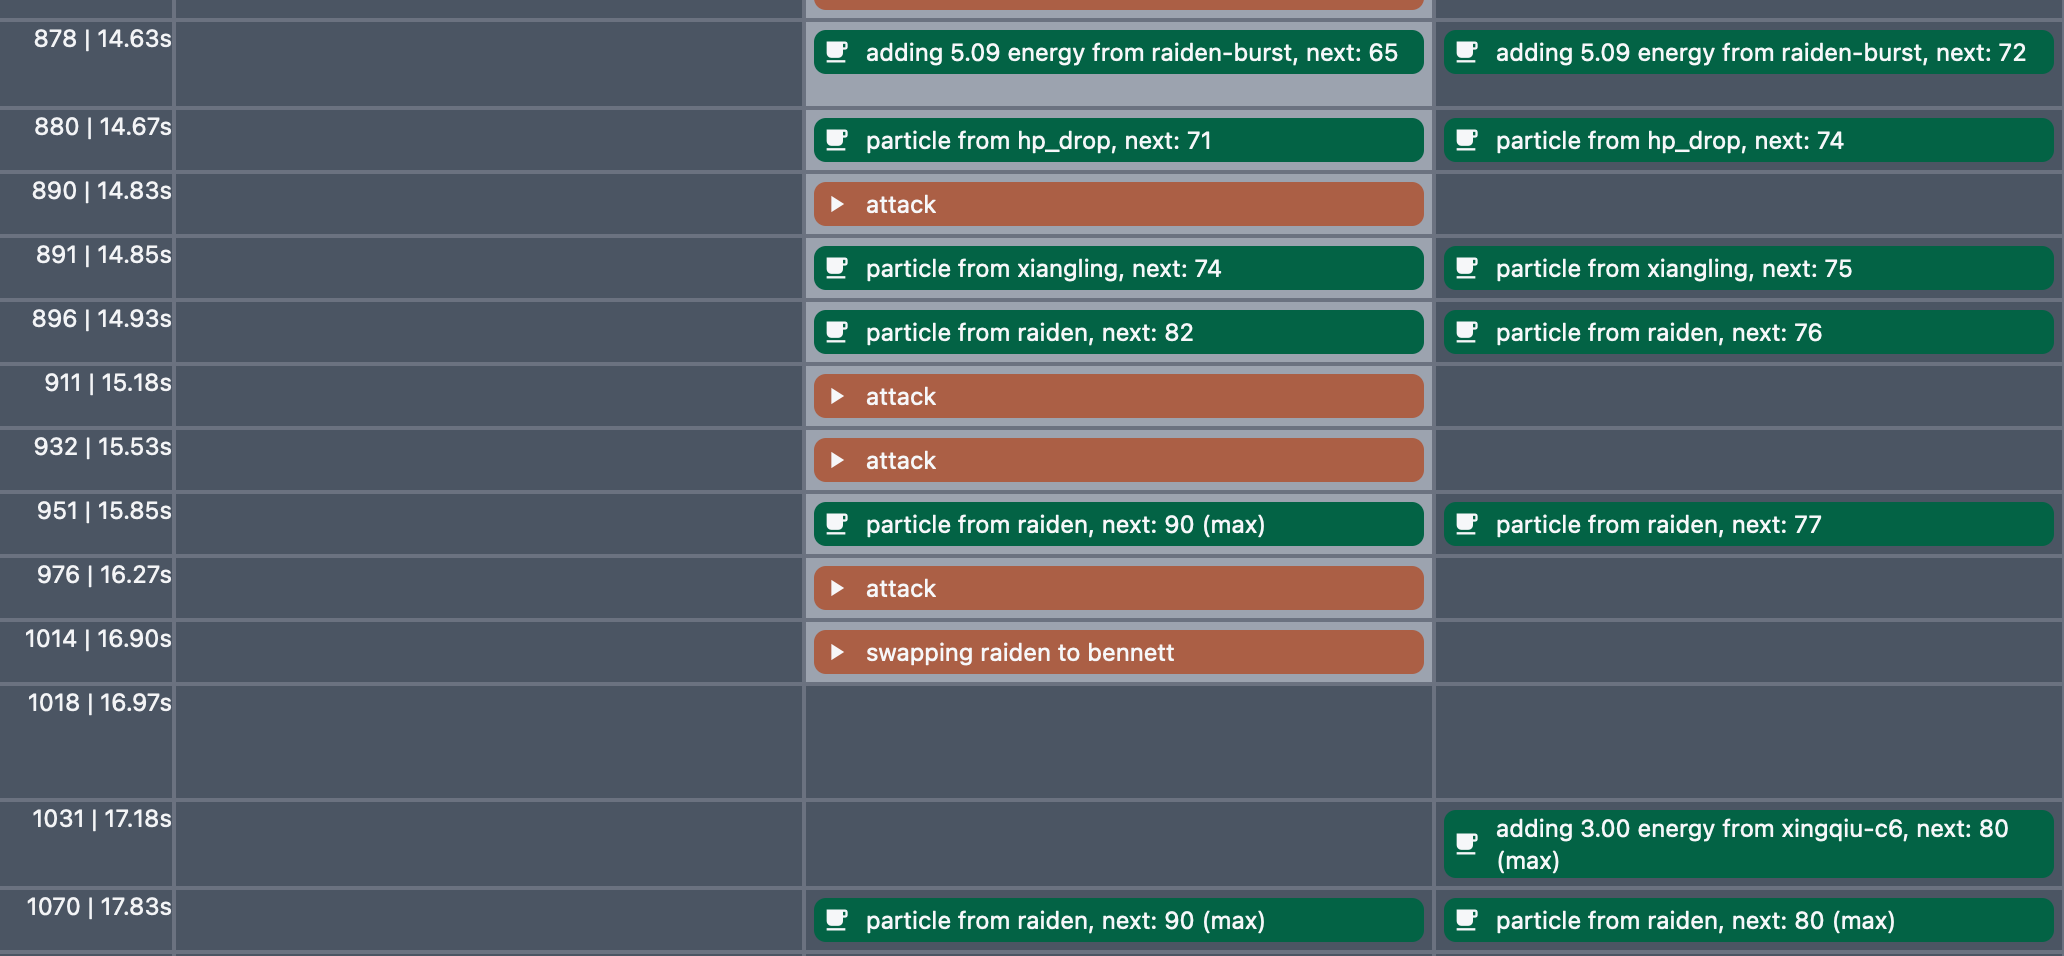
While Xiangling is still a way off by the end of Raiden's attack string (48 out of 80, barely over the half way point):

Seeing that Bennett has way more energy than he needs, one possible optimization is that we can try using Bennett to battery Xiangling instead at the beginning of our rotation, namely, instead of:
  ...
  raiden skill;
  xingqiu skill, burst;
  bennett skill, burst;
  xiangling burst, skill;
  ...
Let's change this to:
  ...
  raiden skill;
  xingqiu skill, burst;
  bennett burst, skill; // use bennett's skill after burst so that xiangling can catch the particles
  xiangling burst, skill;
  ...
Rerunning this and we get:
A nice 400dps gain. Let's double check the sample to make sure it's working as intended:
Here you see that Xiangling is catching Bennett's particles right after using her burst, getting a slight head start on her energy
Understand that this works because Xiangling uses burst as soon as she is swapped on field, giving her time to catch Bennett's particles. If you try this in game, you need to make sure you are using her Q ASAP. Add any delay and you may see that the particles arrive before her Q resulting in no energy gain.
Concluding remarks
This tutorial ends here for now. Hopefully you found this tutorial useful. If you have any suggestions for what should be included/changed here, then feel free to talk to us on Discord (see top right).